


To migrate your NSX-V cloud accounts to NSX-T cloud accounts, and map existing NSX-V objects in vRealize Automation to new NSX-T objects, use on-screen migration plan instructions and supporting documentation.
Before you can create your migration plan, you must perform the tasks described on the Getting Started page. See Getting started with vRealize Automation NSX-V to NSX-T migration.
The Migration Plan pages contain sequential steps that you need to perform to successfully migrate a source NSX-V cloud account and its associated objects to NSX-T within vRealize Automation.
Each step in the numbered sequence of migration plan pages requires successful completion of the previous plan page. The migration plan advances in a linear sequence. Each numbered page represents a stage in the process.
Prerequisites
- Cloud Assembly Administrator
- vRA Migration Assistant Administrator
See Organization and service user roles in vRealize Automation.
Create a new plan
From the vRealize Automation Migration Assistant service page, click to start your new migration plan.
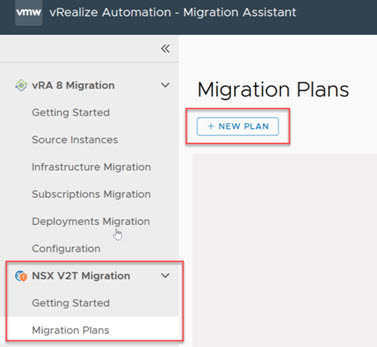
The 7 step migration plan page appears. Proceed sequentially through each step of the plan.
1. NSX accounts - Add source and target NSX accounts
Enter your new vRealize Automation NSX-V to NSX-T migration plan name and enter the 1:1 mapping for your source NSX-V cloud account and its target NSX-T cloud account.
- Enter a migration plan name. You can optionally enter a plan description.
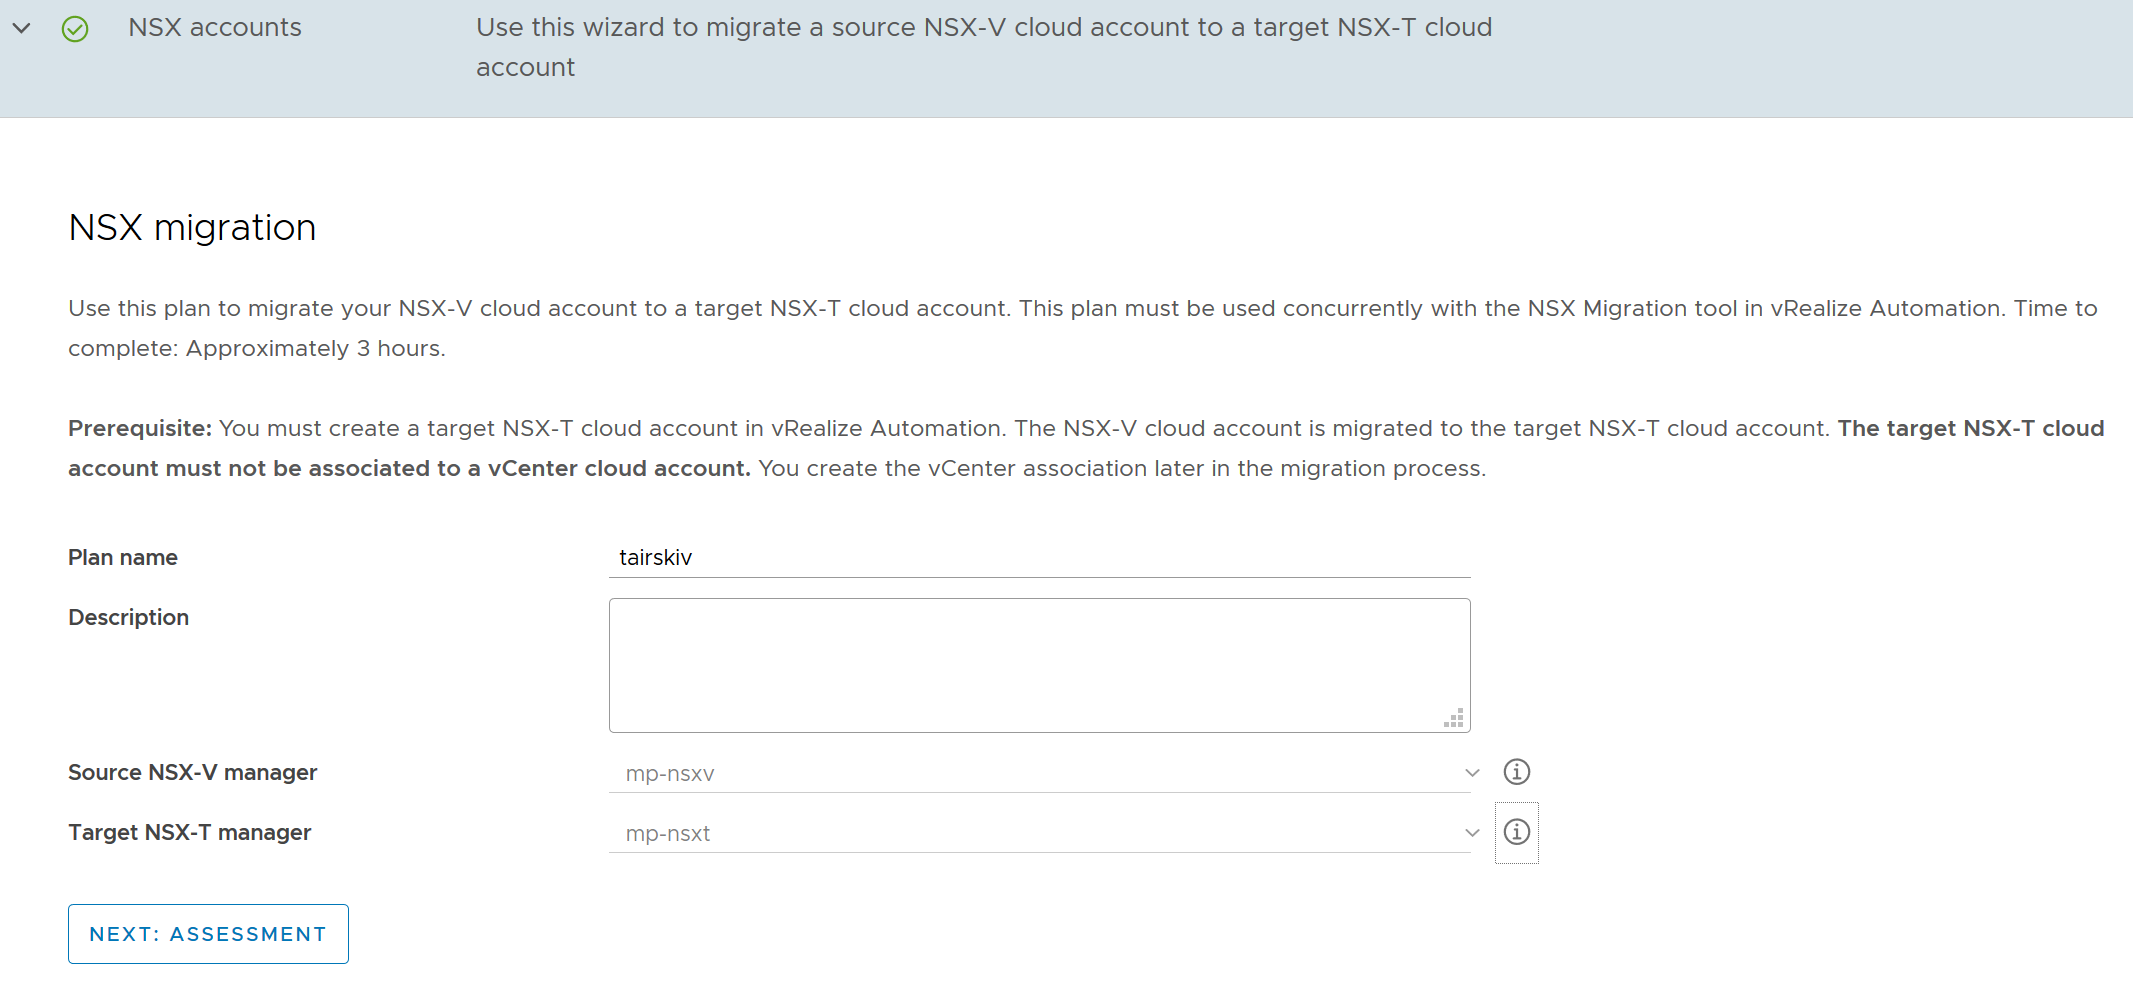
- Enter the existing vRealize Automation source NSX-V Manager cloud account name.
Each source NSX-V cloud account requires a separate migration plan in the vRealize Automation NSX-V to NSX-T migration assistant.
The source NSX-V cloud account must be associated with a vCenter 7.0 or later cloud account.
- Enter the vRealize Automation target NSX-T Manager cloud account name.
This is the target NSX-T cloud account that you created during the prerequisite phase of migration using instructions on the Getting Started page.
The target NSX-T cloud account must meet the following conditions:- The target NSX-T cloud account must be at NSX-T Data Center version 3.1.1 or higher.
- You must specify the Policy API method option when you create the target NSX-T cloud account. The Manager API method is not supported by the migration utility for a target NSX-T cloud account.
- The target NSX-T cloud account must not be associated to a vCenter cloud account. You create that association later in the process.
- The NSX-T cloud account specified must not be in use by a vRealize Automation deployment.
- Click Next: Assessment to move to the next page in the plan and continue with the migration process.
2. Assessment - Run an assessment of your current vRealize Automation integration with NSX-V
Determine the migration readiness of the source NSX-V cloud account and its related objects to NSX-T. Also determine the readiness of the target NSX-T cloud account to receive the migrated objects.
- Click Run assessment to run the initial assessment.
- If the assessment displays an error, examine the output messages.
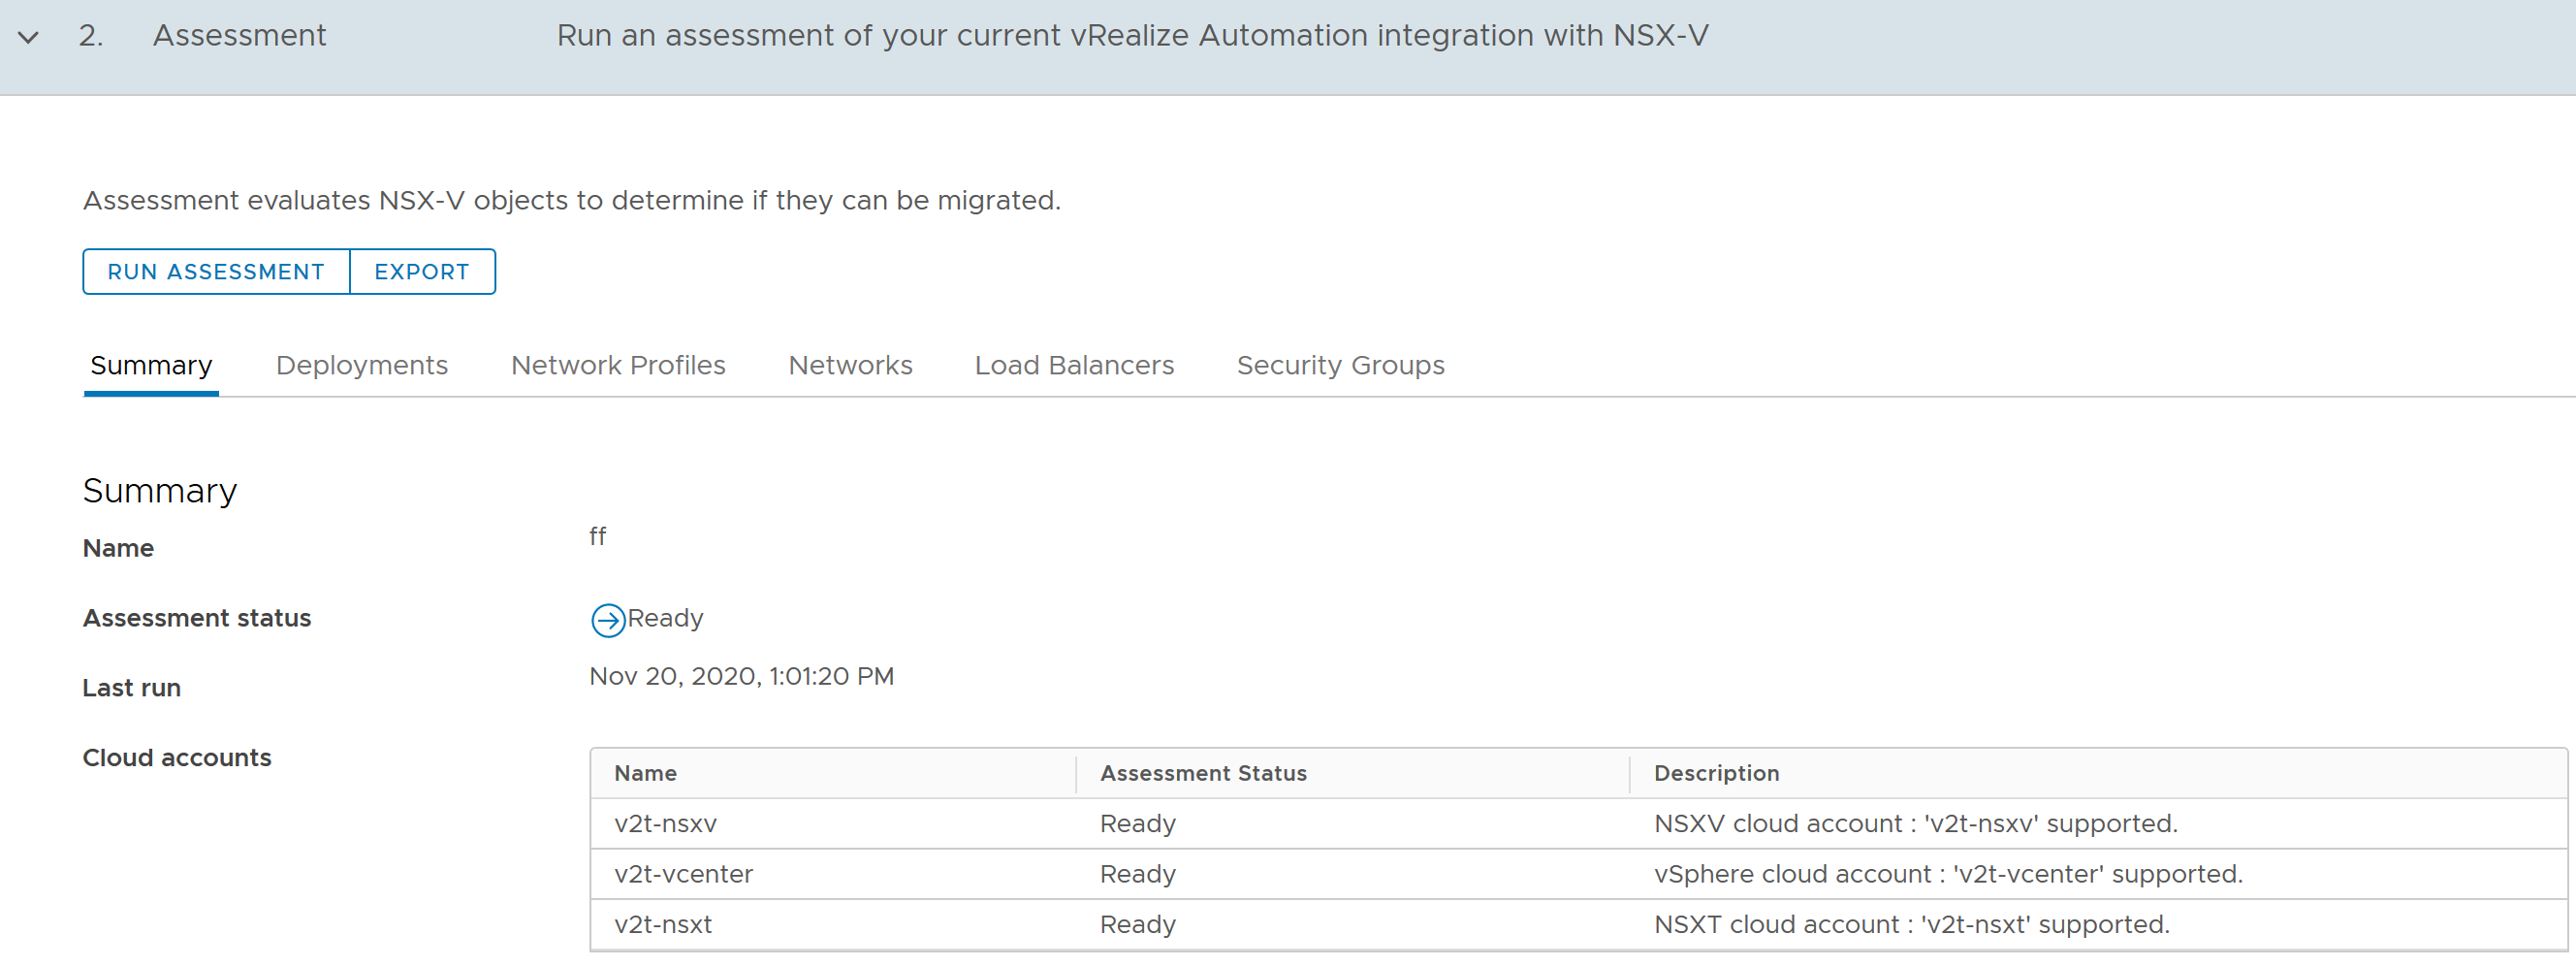
- Based on the messages that you receive, open the Summary tab and each relevant tab to check for readiness.
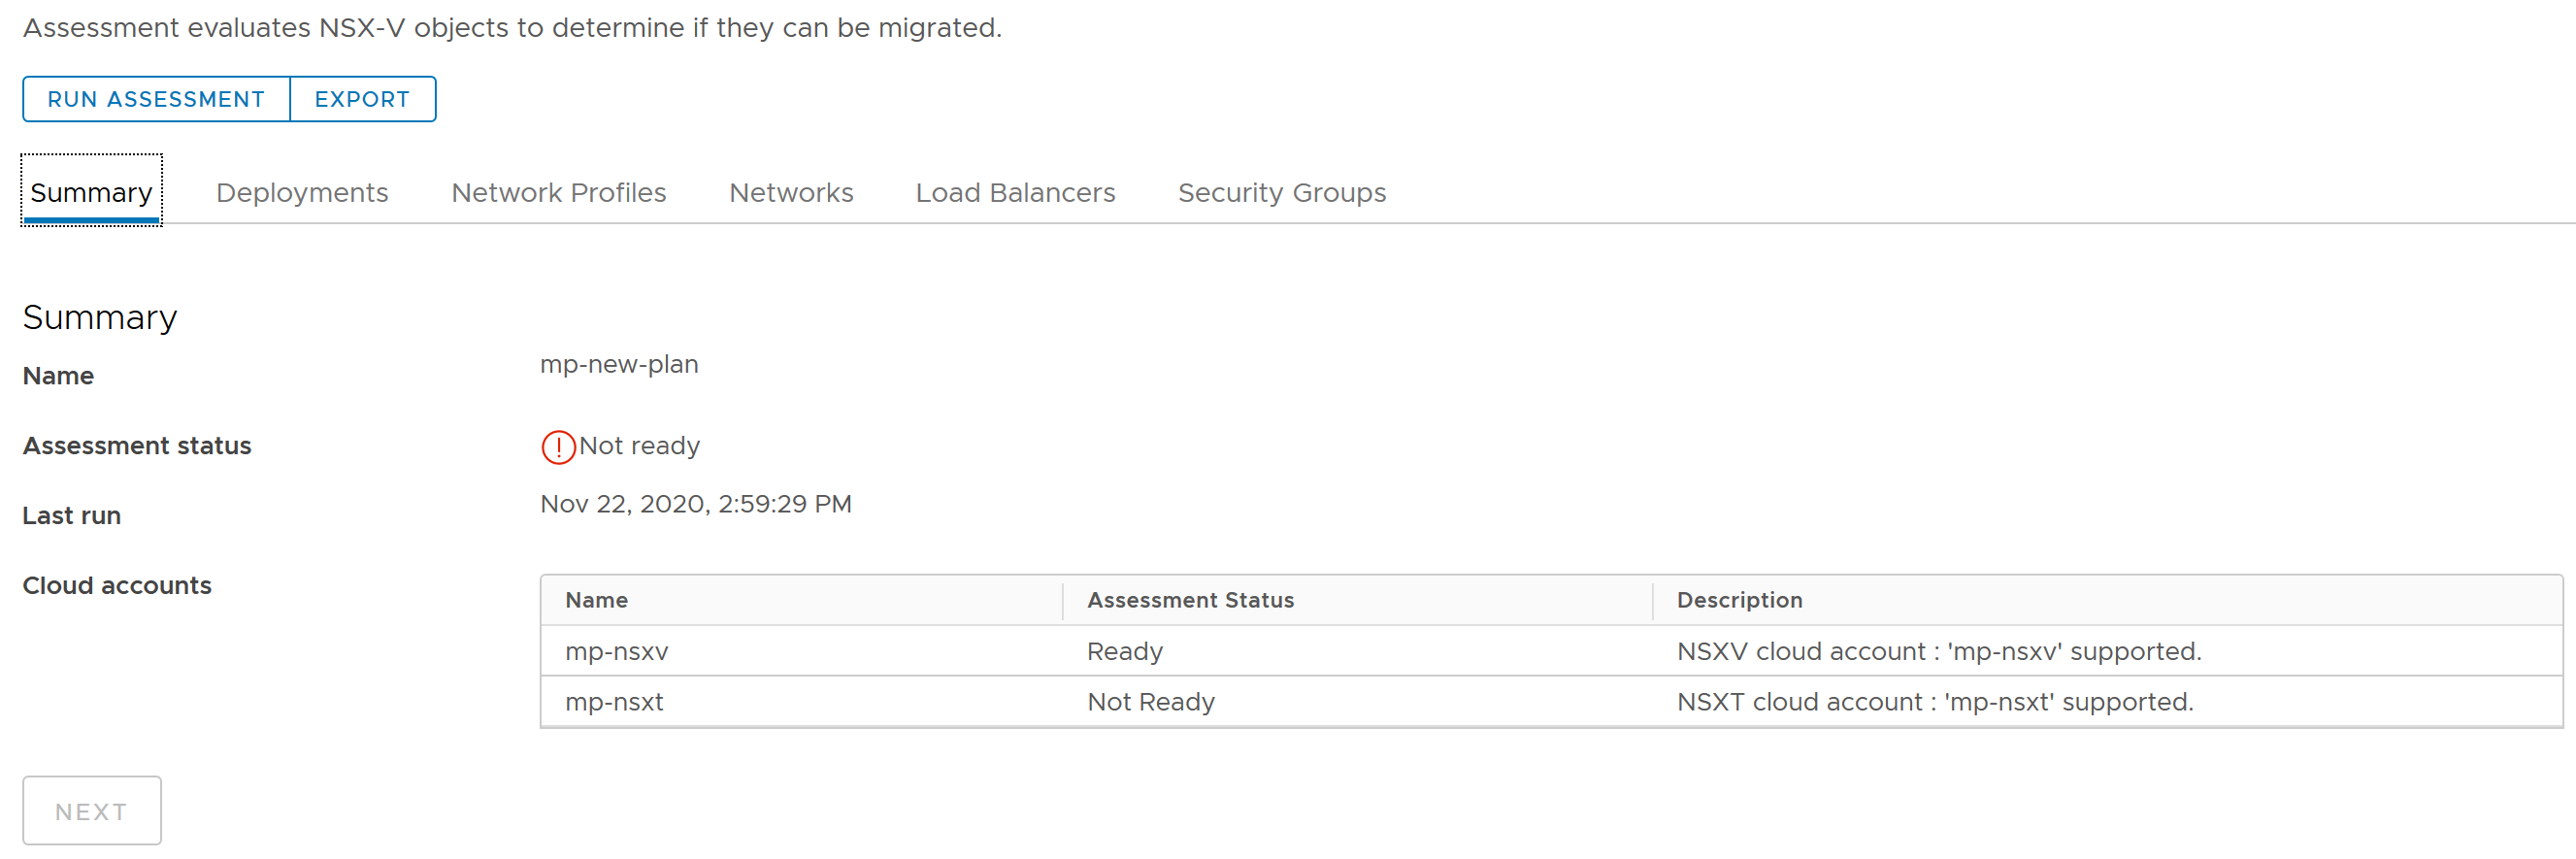
Make any needed corrections and then click Run assessment again.
- Open each tab to examine the objects that are ready for migration.
For example, open the Networks tab and examine the network objects that are ready for migration.
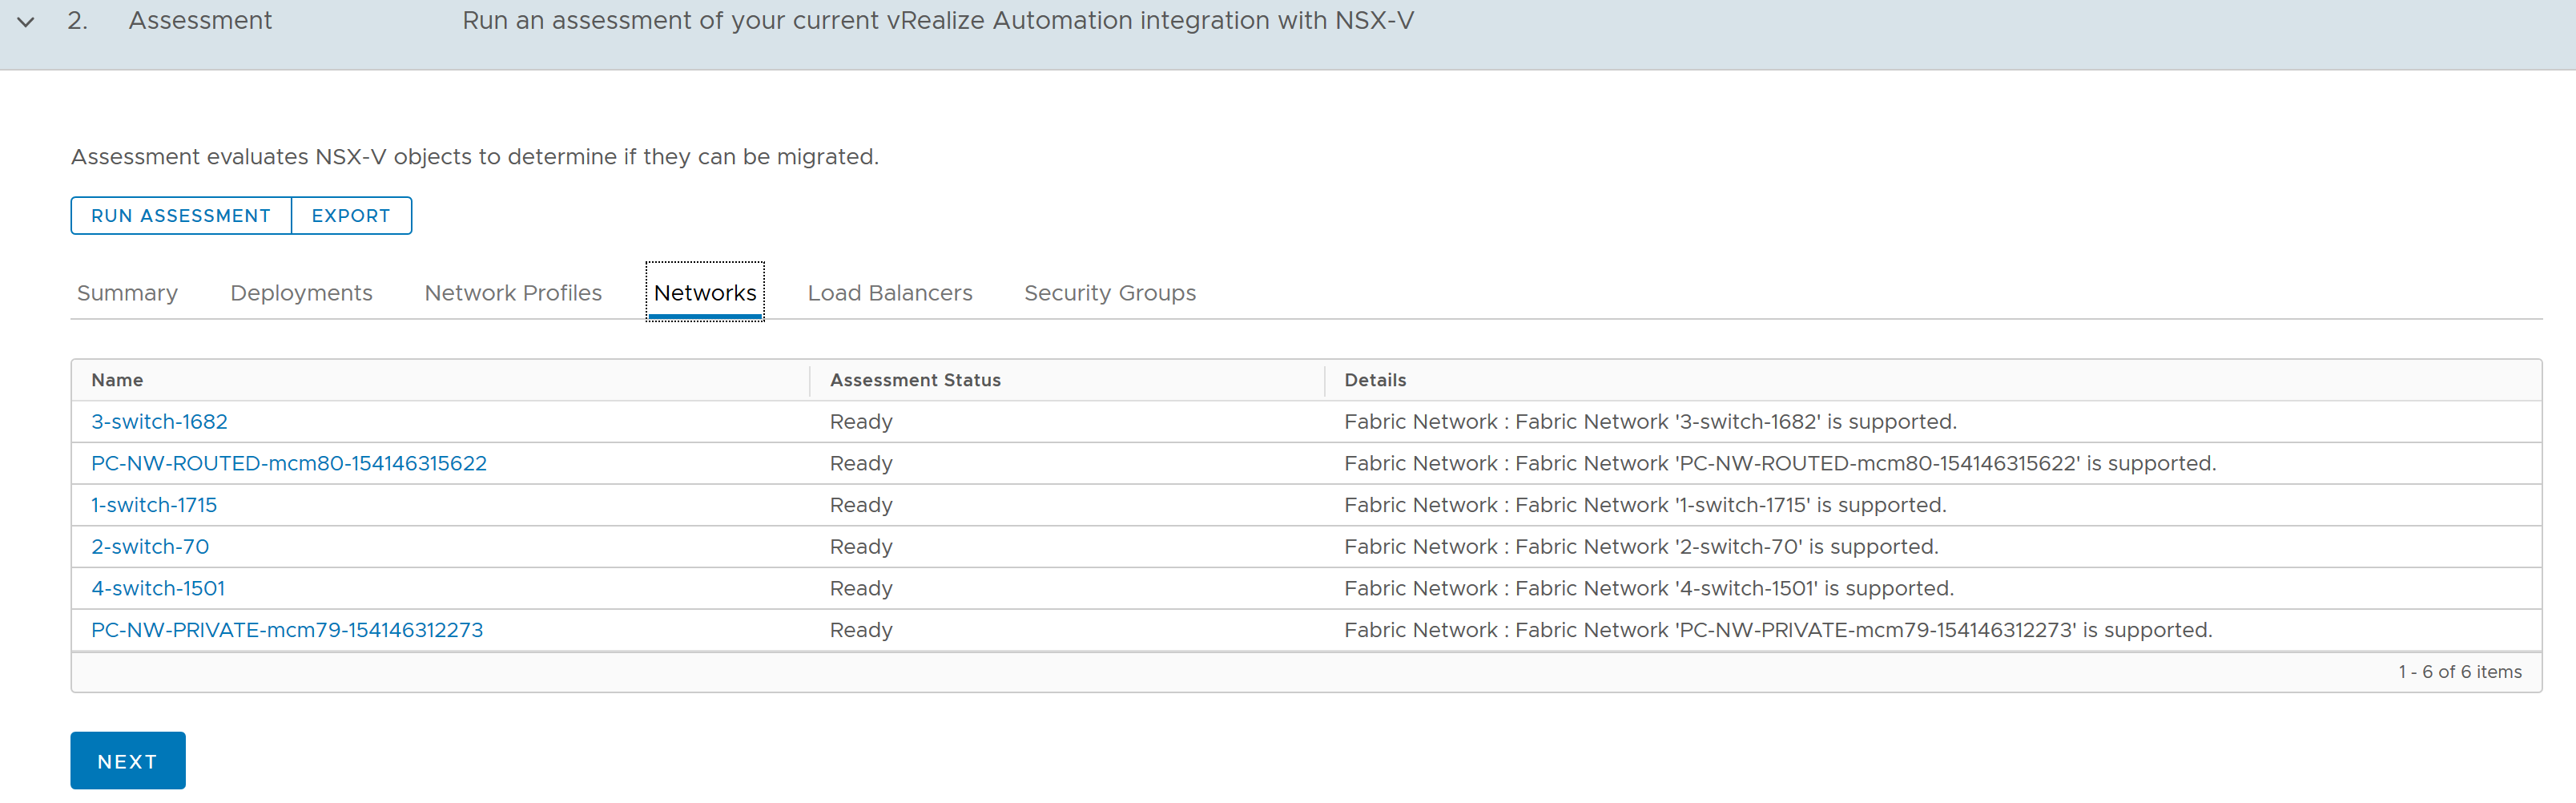
- When you are satisfied with the assessment and are ready to continue, click Export.
You can use the exported file to help you with post-migration testing prior to taking the cloud accounts out of maintenance mode.
- Click Next to move to the next page in the plan and continue with the migration process.
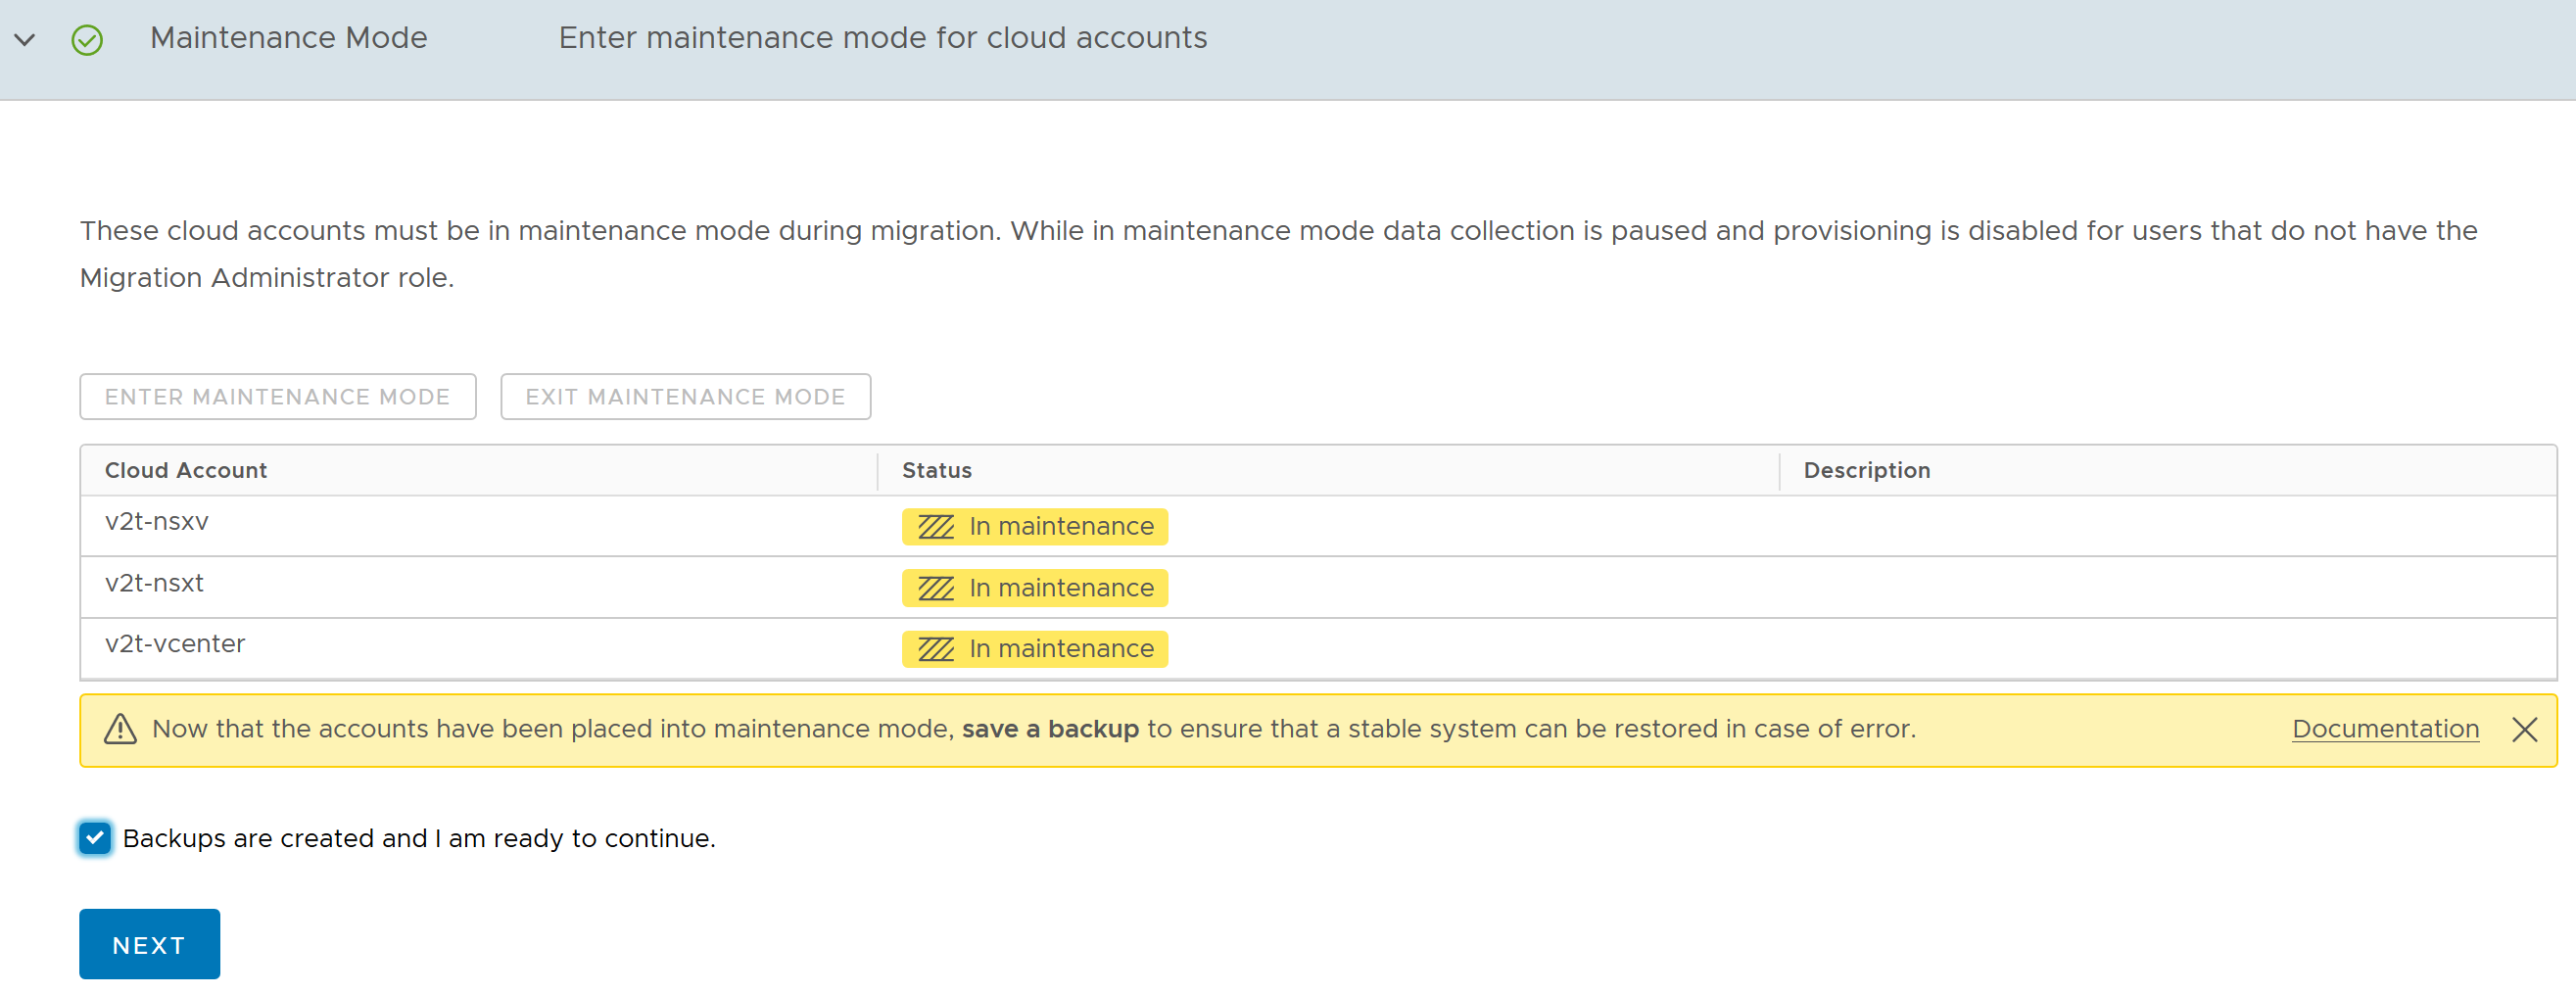
3. Maintenance Mode - Enter maintenance mode for the cloud accounts
Put the cloud accounts that you are about to migrate into maintenance mode. When a cloud account is in maintenance mode, all allocation, provisioning, day 2 actions, and scheduled enumeration is stopped for that cloud account. This ensures that no impacted vRealize Automation deployments can be initiated, edited, or in operation while its affiliated NSX-V cloud account is in the process of being migrated to NSX-T.
While maintenance mode prevents the use of the cloud account, and any objects that are related to the cloud account, during the migration process, vRealize Automation administrators who have the Migration Administrator Service role are provided with testing access.
- Click Enter maintenance mode.
- As prompted, create a backup of your vRealize Automation environment.
For information about how to create a backup in vRealize Automation, see the Backup and Restore, and Disaster Recovery > 2019 section of vRealize Suite product documentation.
- After you have created the needed backup, click Backups are created and I am ready to continue and then click Next to move to the next page in the plan and continue with the migration process.
4. NSX Migration - Transfer files to and from the NSX-T Data Center Migration Coordinator
Generate a deployment configuration file for input to the NSX-T Data Center Migration Coordinator service. You give that configuration file to the NSX administrator for their input to the NSX-T Data Center. You then receive and import a mapping output file, which is generated by the NSX-T Data Center coordinator service and which you obtain from the NSX administrator.
This procedure describes tasks that are performed by the vRealize Automation administrator in vRealize Automation and tasks that are performed by the NSX administrator in NSX. The vRealize Automation administrator and the NSX administrator can be different people or they may be the same person.
- As prompted, create the deployment configuration file by clicking Create File.
 Note: If you receive errors or warnings about objects that are not ready for migration, address the issues as suggested and then click Reassess. The Create File option is not re-enabled until you click Reassess and receive no further errors or warnings.
 - Respond to prompts to save the .json file and review the instructions about where to send the file.
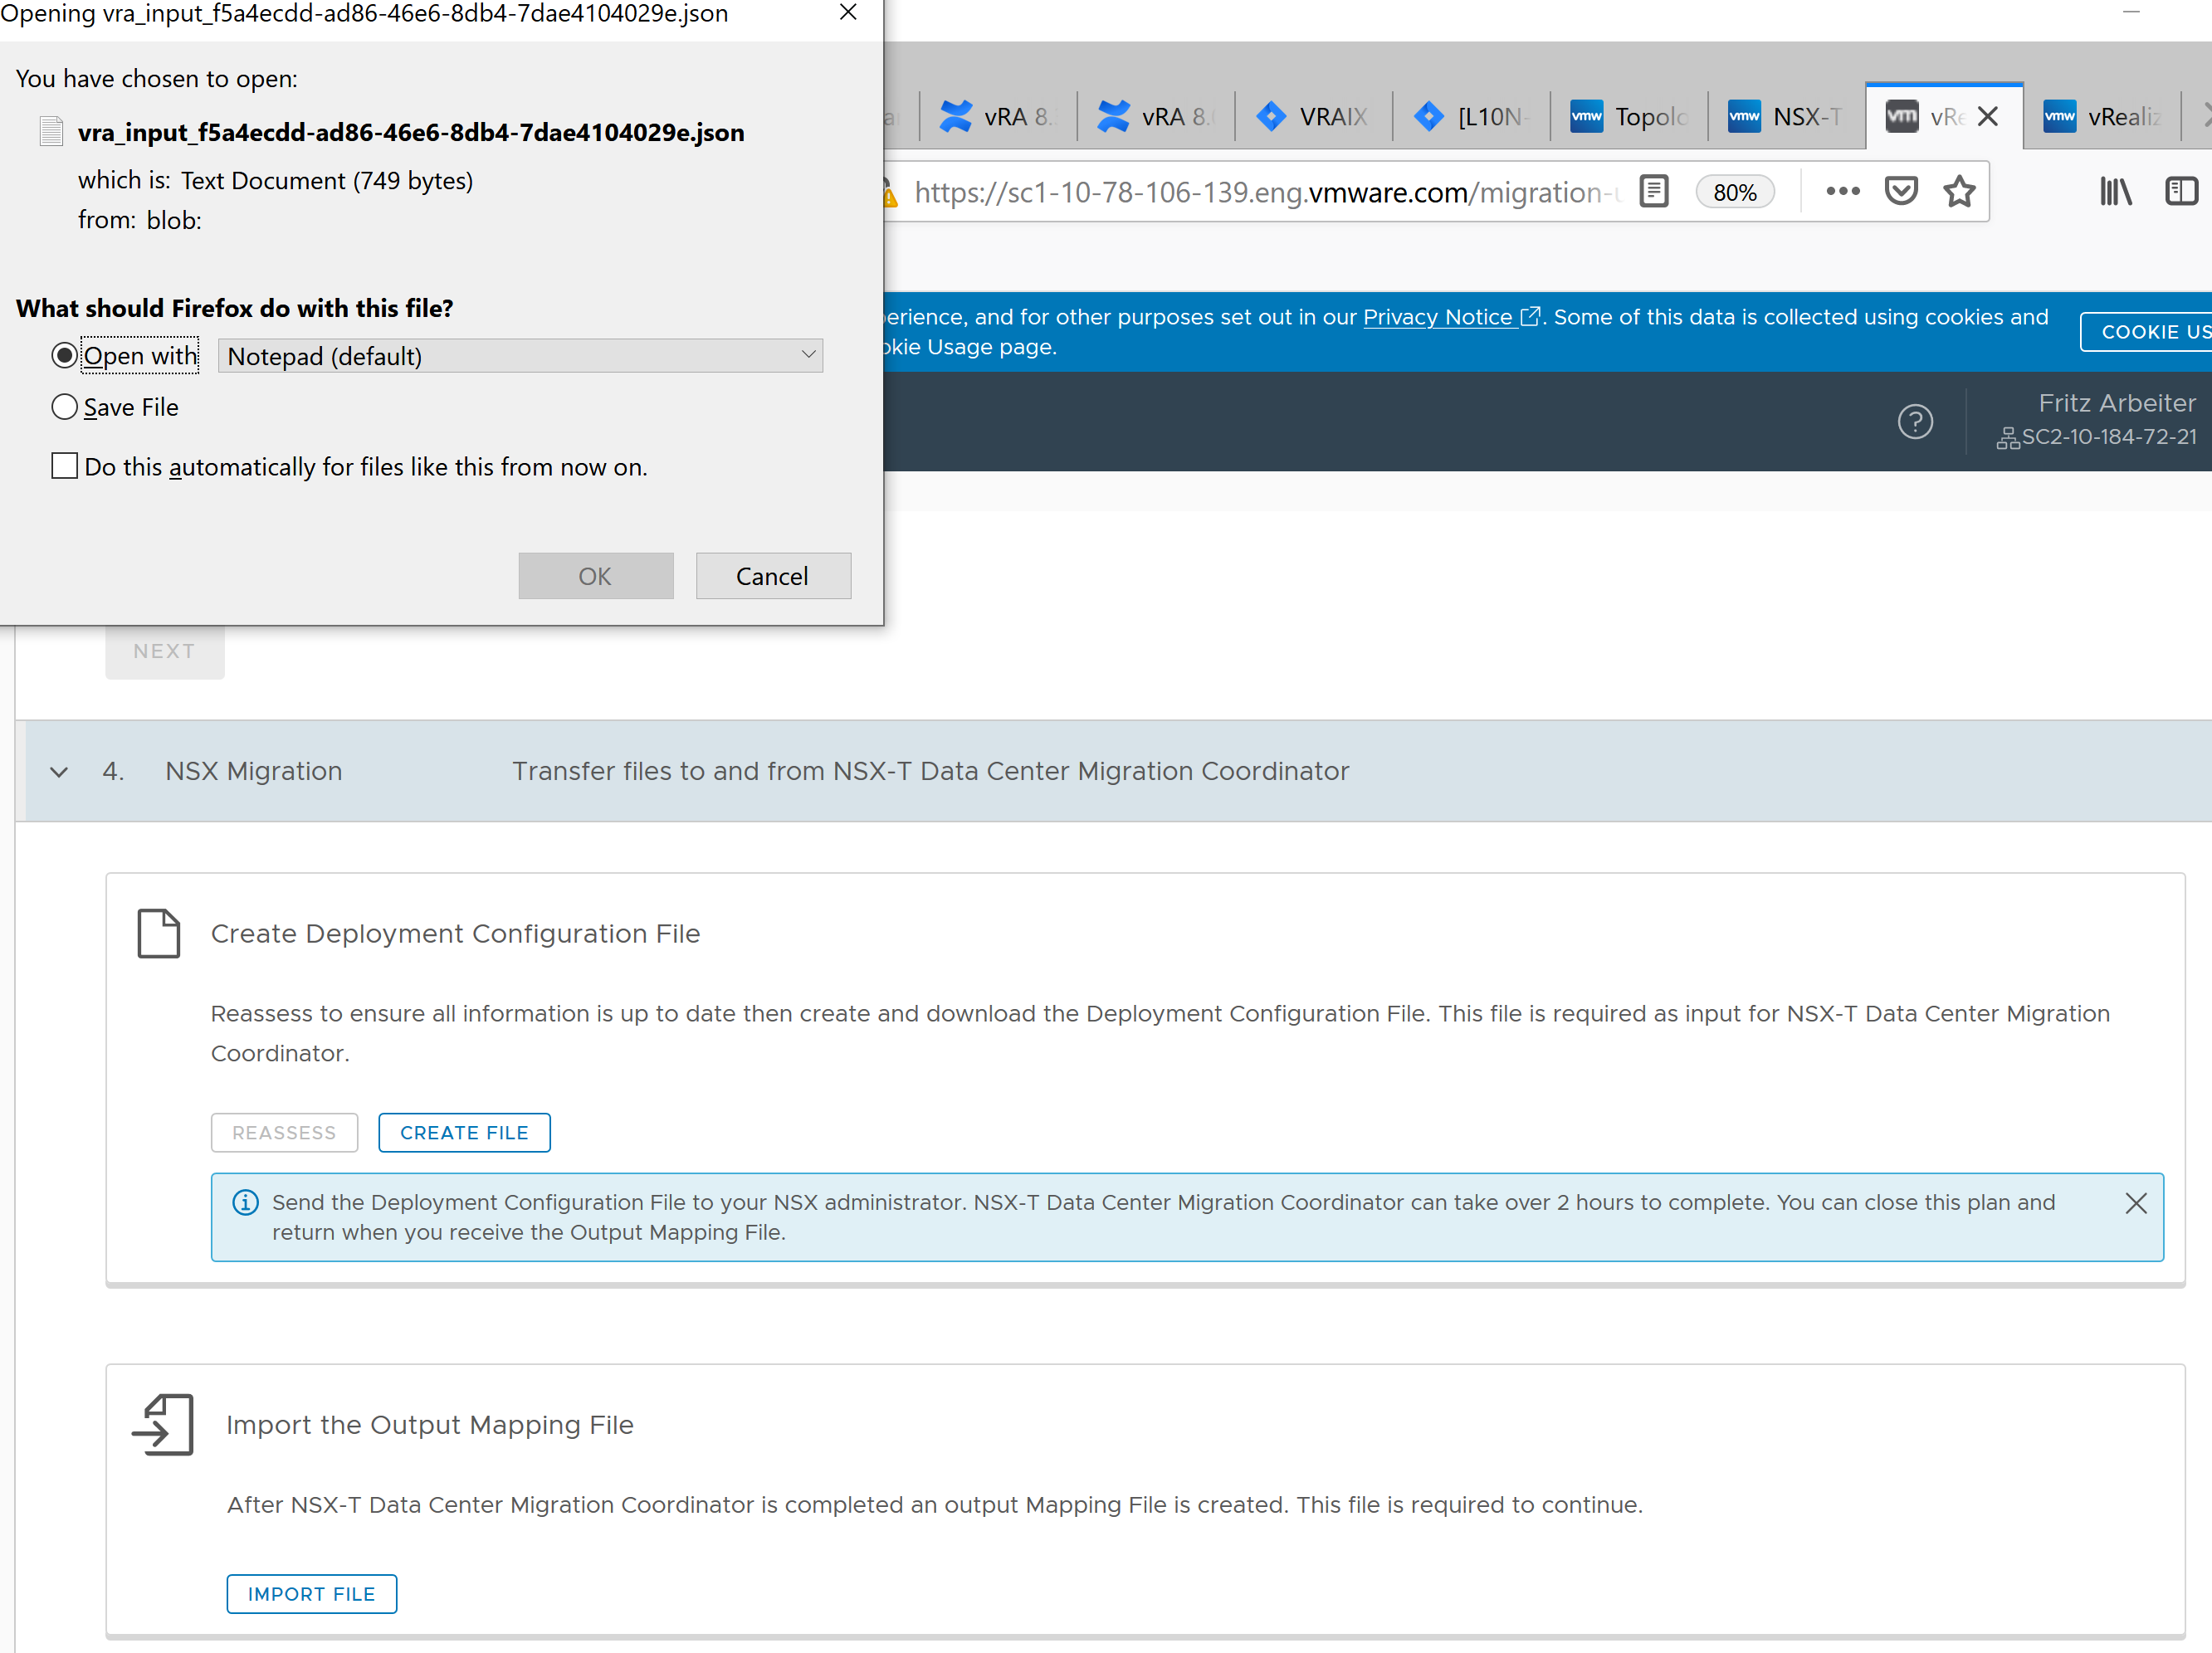
- After the deployment configuration file is generated, and as prompted, send it to the NSX administrator and ask them to import it into the NSX-T Data Center Migration Coordinator service.
The NSX administrator imports the file into the NSX-T Data Center Migration Coordinator service, which subsequently generates the output mapping file that you need to complete the next step on this migration plan page. For information about the process by which the NSX administrator imports the file into the NSX-T Data Center Migration Coordinator service, see Import the NSX Data Center for vSphere Configuration in the NSX-T Data Center Migration Coordinator Guide at VMware NSX product documentation.
It can take some time between this step and the next. During this wait period, your cloud accounts remain in maintenance mode.
- Obtain the output mapping file, which is generated by the NSX-T Data Center Migration Coordinator, from the NSX administrator.
The NSX-T Data Center Migration Coordinator can generate a partial or a complete output mapping file. The migration plan requires a complete output mapping file. To save time and avoid confusion, confirm with the NSX administrator that they are giving you the complete, not partial, output mapping file.
- Click Import File and import the NSX-T Data Center Migration Coordinator output mapping file supplied to you by the NSX administrator.

When you import the completed output mapping file from NSX-T Data Center Migration Coordinator, the migration plan uses it to migrate cloud accounts and their related objects in vRealize Automation.
If you import a partial output mapping file, the import task eventually fails with the following error message:
The output mapping file was downloaded before the NSX migration completed. Use the output mapping file downloaded after the migration process completed.For information about the contents of an output mapping file, see Overview of Output Mapping File in the NSX-T Migration Coordinator Guide in VMware NSX product documentation.
- When the import task is finished successfully, click Next to move to the next page in the plan and continue with the migration process.
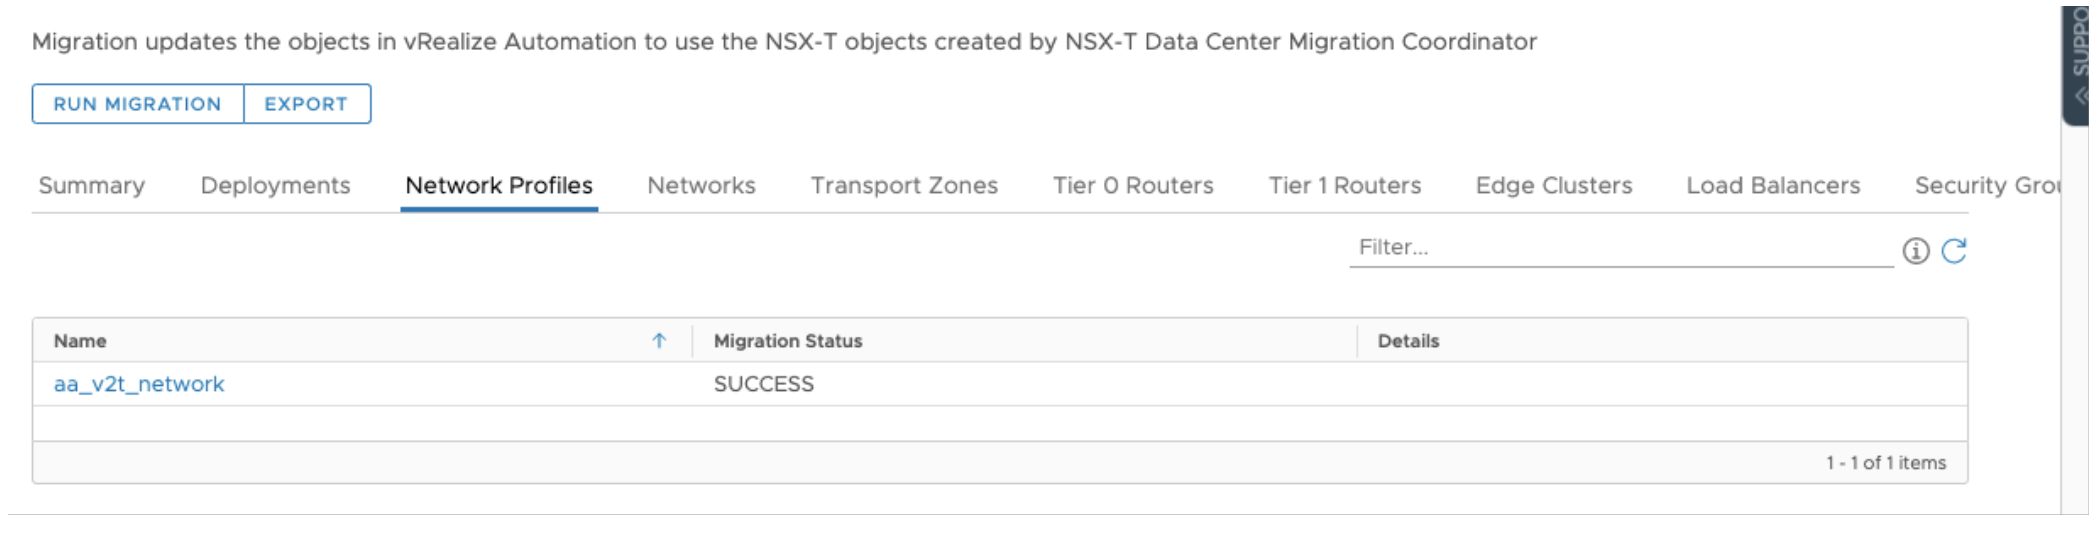
5. vRA Migration - Migrate from source to target cloud accounts
Run migration to map the source NSX-V cloud account and its related objects in vRealize Automation to the target NSX-T cloud account.
This stage of the migration uses data from the NSX-T Data Center Migration Coordinator output mapping file (which you imported on the previous page in the migration plan) to migrate your NSX-V cloud account to NSX-T in vRealize Automation.
- Click Run migration to migrate the NSX-V cloud accounts and their associated objects in vRealize Automation to NSX-T cloud accounts and objects.
- When the Run migration is complete, a summary message appears.
If the Run migration action is not successful, examine the output messages on the Summary page and open each relevant tab to discover where problems were found.
Depending on what problems may have occurred during migration, you might decide to continue or to use the snapshot backups that you created earlier to discard the migration and restore your cloud accounts and objects to their pre-migration status. If the objects have been migrated in the NSX-T Data Center Migration Coordinator, you would also need to roll back the actual NSX migration.
- Click Export to generate a history file of the migration for your future reference.
- Click Next to move to the next page in the plan and continue with the migration process.
6. Test Phase - Test your system
After migration is complete, leave your cloud accounts in maintenance mode and run tests to verify the migration results.
The cloud accounts and their related objects are still in maintenance mode and no work can be done on them. However,vRealize Automation administrators who have the Migration Assistant Administrator role can access the cloud account objects for post-migration testing. vRealize Automation administrators who have the Migration Assistant Administrator role can perform limited testing on cloud accounts that are in maintenance mode. For more information about roles, see What are the vRealize Automation user roles.
Ideally you will have created a test plan for your organization, but general suggestions for testing are provided on-screen and include the following basics. Reference the assessment files that you exported on pages 2 and 5 of the migration plan as part of your post-migration testing.
- Review any warnings that were generated during migration.
- Test the 1:1 cloud account mapping that you specified in plan step 1.
- Test a sample or all of the impacted cloud templates and deployments.
- Examine mapped NSX load balancers, networks, and security groups to verify that they are configured as expected.
- Provision and destroy applications by deploying cloud templates and confirming that the applications land on the correct endpoint and that they are functional.
- Monitor previously deployed applications to verify that they are functioning as intended.
After you complete post-migration testing, click Next to move to the next page in the plan and complete the migration process.
7. Finish - Exit maintenance mode and finish
After you have completed your post-migration testing, remove the cloud accounts from maintenance mode and exit the vRealize Automation NSX-V to NSX-T migration plan.
- Select the vRealize Automation resources that are currently in maintenance mode and remove their maintenance mode marker. Respond to any prompts.
- To complete the cloud account migration process and exit the plan, click Finish.
Perform post-migration cleanup tasks in vCenter
After you exit the migration plan, you must perform some post-migration cleanup tasks in the associated vCenter environments. See Performing post-migration tasks and working with migrated resources in vRealize Automation.
