


This topic describes how you can restore critical back end components using BOSH Backup and Restore (BBR), a command-line tool for backing up and restoring BOSH deployments. These procedures prepare your environment for VMware Tanzu Operations Manager, deploy Tanzu Operations Manager, import your installation settings, and use BBR to restore your Tanzu Operations Manager components.
To perform the procedures in this topic, you must have backed up your deployment by following the procedure in Backing up deployments with BBR.
Restoring a deployment with BBR is a destructive operation. If the restore fails, the new environment could be left in an unusable state and require re-provisioning. Only perform the procedures in this topic for the purpose of disaster recovery, such as recreating a deployment after a storage-area network (SAN) corruption.
When validating your backup, the VMs and disks from the backed-up BOSH Director must not be visible to the new BOSH Director. As a result, VMware recommends that you deploy the new BOSH Director to a different IaaS network and account than the VMs and disks of the backed-up BOSH Director.
If the BOSH Director you are restoring had any deployments that were deployed manually rather than through a Tanzu Operations Manager tile, you must restore them manually at the end of the process. For more information, see (Optional) Restore non-tile deployments.
Compatibility of restore
This section describes the restrictions for a backup artifact to be restorable to another environment. This section is for guidance only, and VMware recommends that you validate your backups by using the backup artifacts in a restore.
For a backup artifact to be restorable, these restrictions apply:
-
CIDR ranges: BBR requires the IP address ranges to be the same in the restore environment as in the backup environment.
-
Topology: BBR requires the BOSH topology of a deployment to be the same in the restore environment as it was in the backup environment.
-
Naming of instance groups and jobs: For any deployment that implements the backup and restore scripts, the instance groups and jobs must have the same names.
-
Number of instance groups and jobs: For instance groups and jobs that have backup and restore scripts, there must be the same number of instances.
-
Limited validation: BBR puts the backed-up data into the corresponding instance groups and jobs in the restored environment, but cannot validate the restore beyond that. For example, if the MySQL encryption key is different in the restore environment, the BBR restore might succeed, but the restored MySQL database is unusable.
-
Tanzu Operations Manager version: BBR can restore to the same version of Tanzu Operations Manager that was backed up. BBR does not support restoring to other major, minor, or patch releases.
A change in VM size or underlying hardware does not affect the ability of BBR to restore data, as long as there is adequate storage space to restore the data.
Restore workflow
The following diagram illustrates the flow of the restore process in a series of steps performed by the operator. These steps are described in more detail throughout this topic.

View a larger version of this diagram..
Complete the following steps as an operator:
-
Launch new Tanzu Operations Manager: Follow the procedures for your IaaS to deploy Tanzu Operations Manager. For more information, see step 1 of Deploy Tanzu Operations Manager and Import Installation Settings.
-
Import settings: You can import settings either with the Tanzu Operations Manager UI or API. For more information, see step 2 of Deploy Tanzu Operations Manager and Import Installation Settings.
-
Remove bosh-state.json: SSH into your Tanzu Operations Manager VM and delete the
bosh-state.jsonfile. For more information, see Remove BOSH State File. -
Apply Changes (BOSH Director only): Use the Tanzu Operations Manager API to only deploy the BOSH Director. For more information, see Deploy the BOSH Director.
-
bbr restore <director>: Run the BBR restore command from your jumpbox to restore the BOSH Director. For more information, see Restore the BOSH Director.
-
Use BOSH cck to fix the stale cloud ID references in the BOSH database: For each deployment in the BOSH Director, you must run a
bosh cloud-checkcommand. For more information, see Remove Stale Cloud IDs for All Deployments. -
Apply Changes: In the Tanzu Operations Manager Installation Dashboard, click Review Pending Changes, review your changes, and click Apply Changes. For more information, see Reviewing Pending Product Changes.
-
bbr restore <TAS for VMs>: Run the BBR restore command from your jumpbox to restore TAS for VMs. For more information, see Restore TAS for VMs.
Prepare to restore
These sections describe the procedure you must perform before restoring your backup with BBR.
Step 1: Prepare your environment (optional)
In the event of a disaster, you can lose not only your VMs and disks, but your IaaS resources as well, such as networks and load balancers.
If you need to recreate your IaaS resources, prepare your environment by following the instructions specific to your IaaS in Installation overview.
The instructions for installing a deployment on Amazon Web Services (AWS) and OpenStack combine the procedures for preparing your environment and deploying Tanzu Operations Manager into a single topic. The instructions for the other supported IaaSes split these procedures into two separate topics.
If you recreate your IaaS resources, you must also add those resources to Tanzu Operations Manager by following the procedures in (Optional) Configure Tanzu Operations Manager for New Resources.
Step 2: Deploy Tanzu Operations Manager and import installation settings
-
Follow the procedures for your IaaS to deploy Tanzu Operations Manager:
- AWS: See Deploying Tanzu Operations Manager on AWS.
- GCP: See Deploying Tanzu Operations Manager on GCP.
- OpenStack: See Step 4: Create Tanzu Operations Manager Image through _Step 9: Create a DNS entry in Deploying Tanzu Operations Manager on OpenStack.
- vSphere: See Deploying Tanzu Operations Manager on vSphere.
-
Import your installation settings. This can be done in two ways:
-
Using the Tanzu Operations Manager UI:
- Access your new Tanzu Operations Manager deployment by navigating to the fully-qualified domain name (FQDN) for your Tanzu Operations Manager deployment in a browser.
- On the Welcome to Tanzu Operations Manager page, click Import Existing Installation.
-
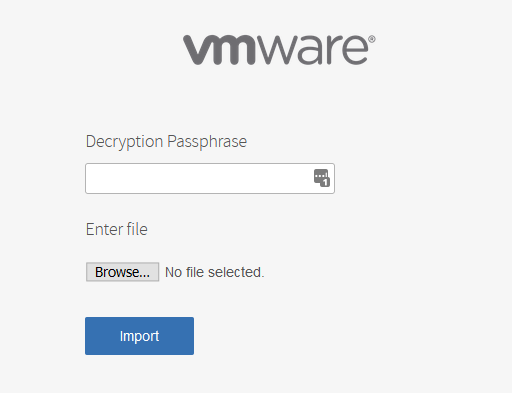
In the import panel:
- Enter the Decryption Passphrase in use when you exported the installation settings from Tanzu Operations Manager.
- Click Browse and browse to the installation ZIP file that you exported in Export Installation Settings in Backing Up Deployments with BBR.
-
Click Import.
Some browsers do not provide feedback on the status of the import process, and might appear to hang. The import process takes at least 10 minutes, and takes longer the more tiles that were present on the backed-up Tanzu Operations Manager.
-
When the import is complete, a Successfully imported installation message appears.
-
Using the Tanzu Operations Manager API:
-
Run:
curl -v "https://OPS-MANAGER-FQDN/api/v0/installation_asset_collection \
  -X POST \
  -H "Authorization: Bearer UAA-ACCESS-TOKEN" \
  -F 'installation[file][email protected]' \
  -F 'passphrase=DECRYPTION-PASSPHRASE'
Where:
OPS-MANAGER-FQDNis the FQDN for your Tanzu Operations Manager deployment.UAA-ACCESS-TOKENis your UAA access token. For more information about how to retrieve this token, see Using the Tanzu Operations Manager API.DECRYPTION-PASSPHRASEis the decryption passphrase in use when you exported the installation settings from Tanzu Operations Manager.
-
-
Important Do not click Apply Changes in Tanzu Operations Manager until you reach the instructions in Redeploy TAS for VMs.
Step 3: Configure Tanzu Operations Manager for new resources (optional)
If you recreated IaaS resources such as networks and load balancers by following the procedure in (Optional) Prepare your environment, you must update Tanzu Operations Manager with your new resources.’
To update Tanzu Operations Manager:
-
Enable the advanced mode of Tanzu Operations Manager. For more information, see How to enable advanced mode in the Tanzu Operations Manager. In advanced mode, Tanzu Operations Manager allows you to make changes that are normally disallowed. You might see warning messages when you save changes.
-
Go to Installation Dashboard.
-
Click the BOSH Director tile.
-
If you are using Google Cloud Platform (GCP), click Google Config and update:
- Project ID to reflect the GCP project ID.
- Default Deployment Tag to reflect the environment name.
- AuthJSON to reflect the service account.
-
Click Create Networks and update the network names to reflect the network names for the new environment.
-
If your BOSH Director had an external hostname, modify the Director Hostname field in the Director Config pane of the BOSH Director tile to ensure it does not conflict with the hostname of the backed-up Director.
-
Return to the Installation Dashboard.
-
Click the TAS for VMs tile.
-
Click Resource Config.
-
If necessary for your IaaS, enter the name of your new load balancers in the Load Balancers column.
-
If necessary, select Networking and update the load balancer SSL certificate and private key under Certificates and private keys for the Gorouter and HAProxy.
-
If your environment has a new DNS address, update the old environment DNS entries to point to the new load balancer addresses. For more information, see the TAS for VMs documentation and follow the instructions for your IaaS.
-
If your TAS for VMs deployment uses an external blobstore, ensure that the TAS for VMs tile is configured to use a different blobstore. Otherwise, it attempts to connect to the blobstore that the backed-up TAS for VMs deployment is using.
-
Click Domains.
-
Update your System domain and Apps domain refer to the new environment’s domains.
-
Ensure that there are no outstanding warning messages in the BOSH Director tile, then deactivate Tanzu Operations Manager advanced mode. For more information, see How to enable advanced mode in Tanzu Operations Manager.
Step 4: Remove BOSH state file
Tanzu Operations Manager records the state of the BOSH Director in a BOSH state file. Tanzu Operations Manager uses this file when performing a BOSH operation or upgrading the BOSH Director. For more information, see the BOSH documentation.
Tanzu Operations Manager fails to apply changes if it cannot contact the BOSH Director. In most cases this is because the BOSH Director, as described by the BOSH state file, is missing or unresponsive.
If this failure is dangerous then it is recommended that you delete the BOSH state file. This forces Tanzu Operations Manager to create a new BOSH Director.
To remove the BOSH state file:
-
SSH into your Tanzu Operations Manager VM. For more information, see Log Into the Tanzu Operations Manager VM with SSH.
-
To delete the
/var/tempest/workspaces/default/deployments/bosh-state.jsonfile, go to the Tanzu Operations Manager VM and run:sudo rm /var/tempest/workspaces/default/deployments/bosh-state.json -
In a browser, navigate to the FQDN of your Tanzu Operations Manager deployment.
-
Log in to Tanzu Operations Manager.
Step 5: Deploy the BOSH Director
Use the Tanzu Operations Manager API or the check box on the Review Pending Changes page to deploy the BOSH Director by itself.
Step 6: Transfer artifacts to jumpbox
In the Back up your TAS for VMs Deployment step of Backing Up Deployments with BBR, you moved the TAR and metadata files of the backup artifacts off your jumpbox to your preferred storage space. Now you must transfer those files back to your jumpbox.
Restore your backup
These sections describe the procedure to restore your backup with BBR.
Step 7: Retrieve BOSH Director credentials
To use BBR, you must retrieve and record the following credentials:
- Bosh Director Credentials
- Bbr Ssh Credentials
- Uaa Bbr Client Credentials
There are two ways to retrieve BOSH Director credentials:
- Tanzu Operations Manager Installation Dashboard
- Tanzu Operations Manager API
Option 1: Tanzu Operations Manager Installation Dashboard
To retrieve your BOSH Director credentials using the Tanzu Operations Manager Installation Dashboard:
-
Go to Tanzu Operations Manager Installation Dashboard.
-
Click the BOSH Director tile.
-
Click the Credentials tab.
-
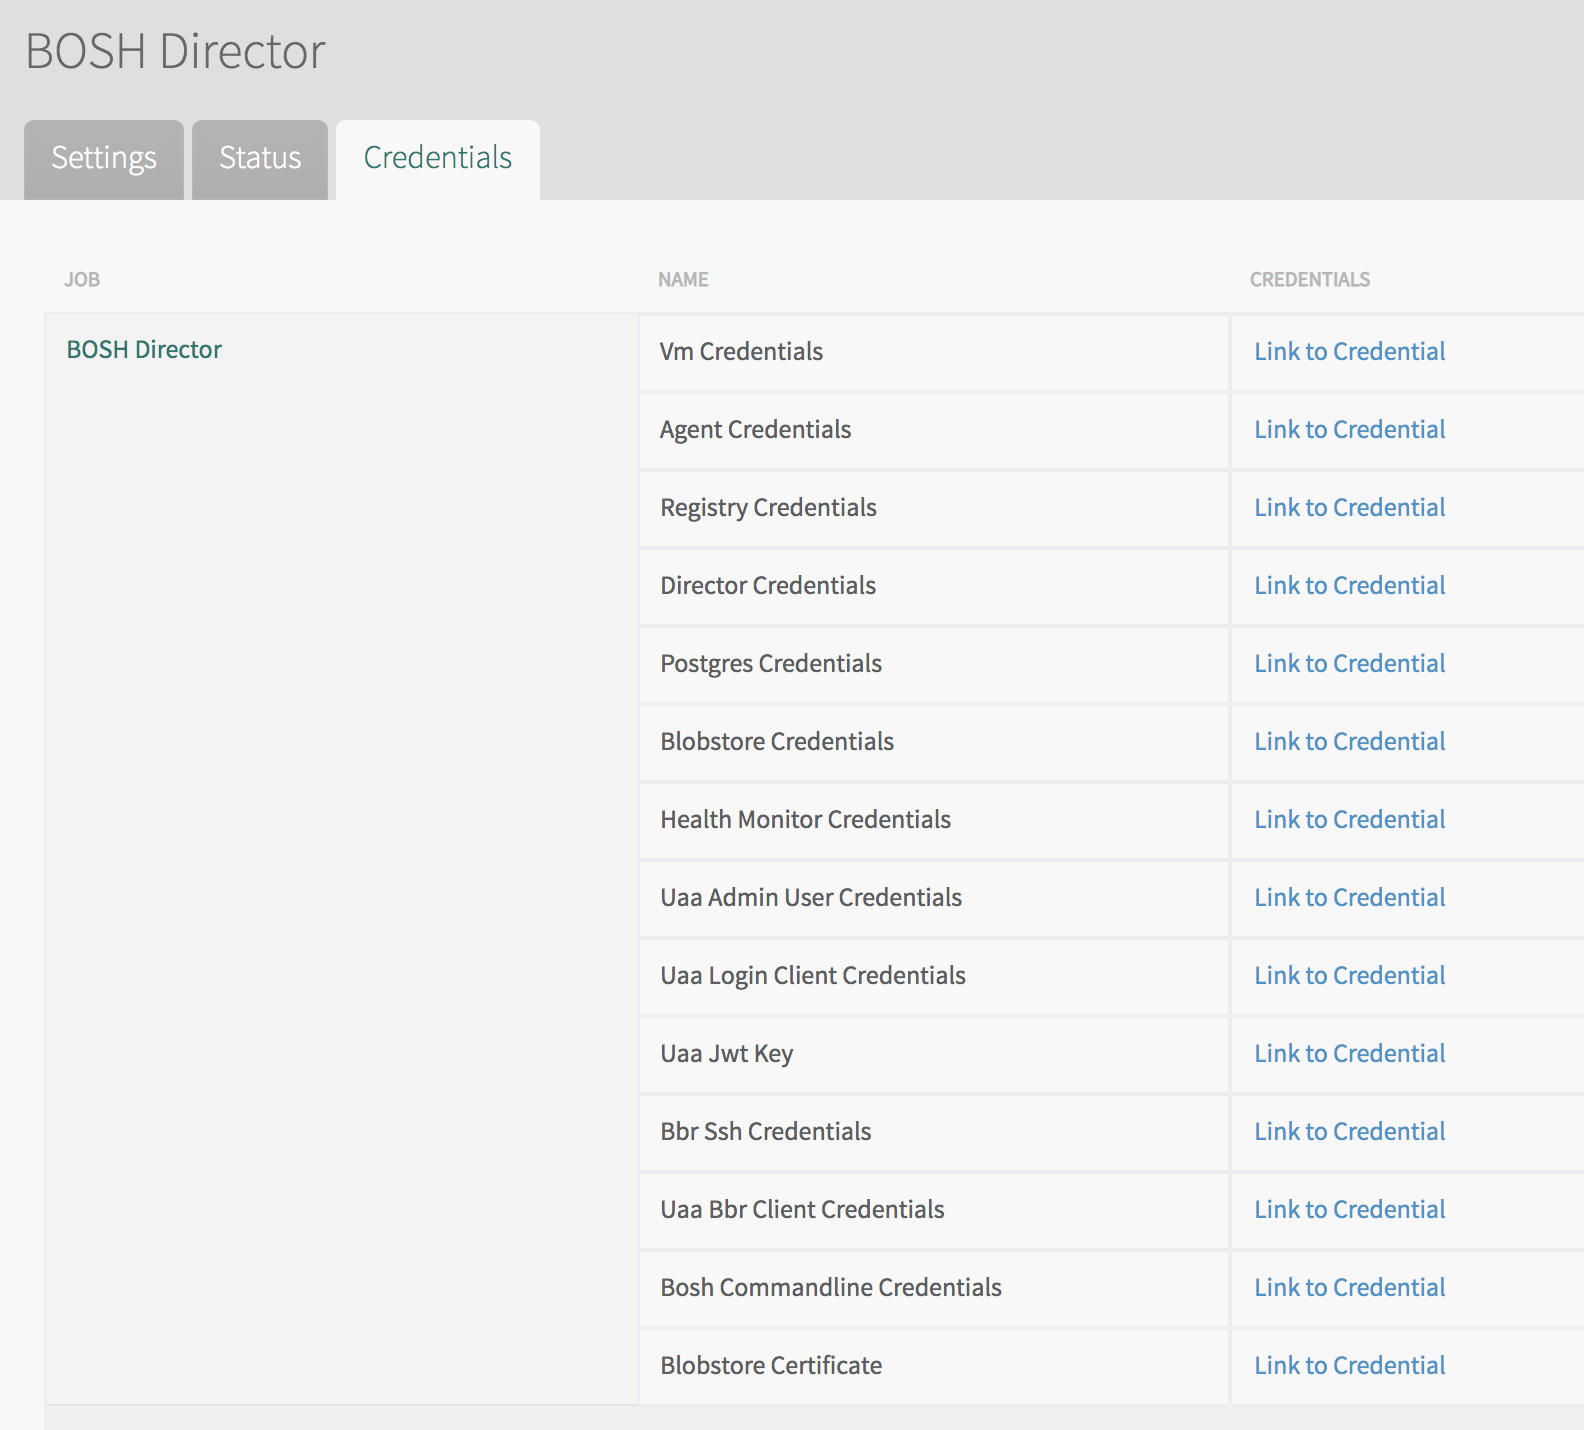
Locate Director Credentials.
- Click Link to Credentials next to it.
- Verify the value of the
identitytext box. It can bedirector. - Copy and record the value of the
passwordtext box.
-
Locate Bbr Ssh Credentials.
- Click Link to Credentials next to it.
- Copy the value of the
private_key_pemtext box. -
Reformat the copied value and save it in the current directory to a file named
PRIVATE-KEY-FILE. Run:printf -- "YOUR-PRIVATE-KEY" > PRIVATE-KEY-FILEWhere:
YOUR-PRIVATE-KEYis the text of your private key.PRIVATE-KEY-FILEis the path to the private key file you are creating.
For example:
$ printf -- "-----BEGIN RSA PRIVATE KEY----- MIIEkeycontents ----END RSA PRIVATE KEY-----" > bbr_key.pem
-
Locate Uaa Bbr Client Credentials.
- Click Link to Credentials next to it.
- Verify the value of the
identitytext box. It can bebbr_client. - Record the value of the
passwordtext box.
Option 2: Tanzu Operations Manager API
To retrieve BOSH Director credentials using the Tanzu Operations Manager API:
-
Obtain your UAA access token. For more information, see Access the API in Using the Tanzu Operations Manager API.
-
Retrieve the Director Credentials.
-
Run:
curl "https://OPS-MAN-FQDN/api/v0/deployed/director/credentials/director_credentials" \
-X GET \
-H "Authorization: Bearer UAA-ACCESS-TOKEN"
Where:
OPS-MAN-FQDNis the fully-qualified domain name (FQDN) for your Tanzu Operations Manager deployment.UAA-ACCESS-TOKENis your UAA access token.
-
Verify the value of the
identitytext box. It can bedirector. - Record the value of the
passwordtext box.
-
-
Retrieve Bbr Ssh Credentials.
-
Run:
curl "https://OPS-MAN-FQDN/api/v0/deployed/director/credentials/bbr_ssh_credentials" \
-X GET \
-H "Authorization: Bearer UAA-ACCESS-TOKEN"
Where:
OPS-MAN-FQDNis the fully-qualified domain name (FQDN) for your Tanzu Operations Manager deployment.UAA-ACCESS-TOKENis your UAA access token.
-
Copy the value of the
private_key_pemtext box. -
Reformat the copied value and save it in the current directory to a file named
PRIVATE-KEY-FILE. Run:printf -- "YOUR-PRIVATE-KEY" > PRIVATE-KEY-FILEWhere:
YOUR-PRIVATE-KEYis the text of your private key.PRIVATE-KEY-FILEis the path to the private key file you are creating.
For example:
$ printf -- "-----BEGIN RSA PRIVATE KEY----- MIIEkeycontents ----END RSA PRIVATE KEY-----" > bbr_key.pem
-
-
Retrieve Uaa Bbr Client Credentials.
-
Run:
curl "https://OPS-MAN-FQDN/api/v0/deployed/director/credentials/uaa_bbr_client_credentials" \
-X GET \
-H "Authorization: Bearer UAA-ACCESS-TOKEN"
Where:
OPS-MAN-FQDNis the fully-qualified domain name (FQDN) for your Tanzu Operations Manager deployment.UAA-ACCESS-TOKENis your UAA access token.
-
Verify the value of the
identitytext box. It can bebbr_client. - Record the value of the
passwordtext box.
-
For more information about using the Tanzu Operations Manager API, see Using the Tanzu Operations Manager API.
Step 8: Retrieve BOSH Director address
To retrieve the IP address of your BOSH Director from the BOSH Director tile:
-
If you are not using the Tanzu Operations Manager VM as your jumpbox, install the latest BOSH CLI on your jumpbox.
-
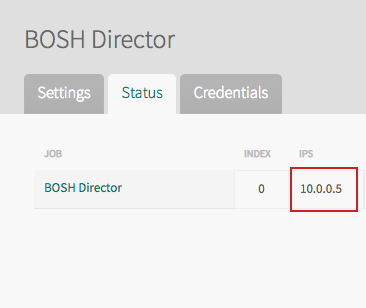
From the Installation Dashboard in Tanzu Operations Manager, click BOSH Director, then Status, and record the IP address listed for the Director. You access the BOSH Director using this IP address.
-
From the command line, log in to the BOSH Director, using the IP address that you previously used. Run:
bosh -e DIRECTOR-IP \
--ca-cert PATH-TO-BOSH-SERVER-CERTIFICATE log-in
Where:
DIRECTOR-IPis the BOSH Director IP address recorded above.PATH-TO-BOSH-SERVER-CERTIFICATEis the path to the root Certificate Authority (CA) certificate as outlined in Set Up your Jumpbox.
-
When prompted for Email (), specify
director. -
When prompted for Password (), enter the Director Credentials that you obtained in Retrieve BOSH Director Credentials.
For example:
$ bosh -e 10.0.0.3 \
--ca-cert /var/tempest/workspaces/default/root_ca_certificate log-in
Email (): director
Password (): *******************
Successfully authenticated with UAA
Succeeded
Step 9: Restore BOSH Director
The BBR BOSH Director restore command can take at least 15 minutes to complete. VMware recommends that you run it independently of the SSH session, so that the process can continue running even if your connection to the jumpbox fails. The preceding command uses nohup, but you could also run the command in a screen or tmux session.
To restore BOSH Director:
-
SSH into your jumpbox. If you are using the Tanzu Operations Manager VM as your jumpbox, see Log into the Tanzu Operations Manager VM with SSH for procedures on how to use SSH to connect to the Tanzu Operations Manager VM.
-
Ensure the BOSH Director backup artifact is in the directory you from which you run BBR.
-
Run the BBR restore command from your jumpbox to restore the BOSH Director:
bbr director \
--private-key-path PRIVATE-KEY-FILE \
--username bbr \
--host HOST \
restore \
--artifact-path PATH-TO-BOSH-DIRECTOR-BACKUP
Where:
PRIVATE-KEY-FILEis the path to the private key file you created in Retrieve BOSH Director Credentials.HOSTis the address of the BOSH Director.- If the BOSH Director is public,
HOSTis a URL, such ashttps://bosh-director.xxx.cf-app.com. - If the BOSH Director is not public,
HOSTis theBOSH-DIRECTOR-IPyou retrieved in Retrieve BOSH Director Address.
- If the BOSH Director is public,
PATH-TO-BOSH-DIRECTOR-BACKUPis the path to the BOSH Director backup you want to restore.- (Optional) To enable debug logs, use the
--debugflag. For more information, see Logging in Backing Up Deployments with BBR.
- (Optional) To enable debug logs, use the
-
After the command succeeds, continue to Identify Your Deployment. If the command fails:
-
Run:
bbr director \
--private-key-path PRIVATE-KEY-FILE \
--username bbr \
--host HOST \
restore-cleanup
Where:
PRIVATE-KEY-FILEis the path to the private key file you created in Retrieve BOSH Credentials.HOSTis the address of the BOSH Director.- If the BOSH Director is public,
HOSTis a URL, such ashttps://bosh-director.xxx.cf-app.com. - If the BOSH Director is not public,
HOSTis theBOSH-DIRECTOR-IPyou retrieved in Retrieve BOSH Director Address.
-
Run the BBR restore command again after ensuring that:
- All the parameters in the command are set.
- The BOSH Director credentials are valid.
- The specified deployment exists.
- The source deployment is compatible with the target deployment.
- That the jumpbox can reach the BOSH Director.
-
Step 10: Identify your deployment
To identify the name of the BOSH deployment that contains Tanzu Operations Manager:
-
Log in to your BOSH Director.
-
Run:
bosh -e BOSH-DIRECTOR-IP --ca-cert PATH-TO-BOSH-SERVER-CERTIFICATE deploymentsWhere:
BOSH-DIRECTOR-IPis the BOSH Director IP you retrieved in Retrieve BOSH Director Address.PATH-TO-BOSH-SERVER-CERTIFICATEis the path to the certificate authority (CA) for the BOSH Director, if the certificate is not verifiable by the local machine’s certificate chain.
Step 11: Remove stale cloud IDs for all deployments
To remove stale cloud IDs for all deployments:
-
Review the deployments listed when performing Identify your deployment.
-
To reconcile the BOSH Director’s internal state with the state in the IaaS, run:
bosh -e BOSH-DIRECTOR-IP \
--ca-cert PATH-TO-BOSH-SERVER-CERTIFICATE \
-d DEPLOYMENT-NAME -n cck \
--resolution delete_disk_reference \
--resolution delete_vm_reference
Where:
BOSH-DIRECTOR-IPis the BOSH Director IP you retrieved in Retrieve BOSH Director Address.PATH-TO-BOSH-SERVER-CERTIFICATEis the path to the CA for the BOSH Director, if the certificate is not verifiable by the local machine’s certificate chain.DEPLOYMENT-NAMEis the deployment name you retrieved in Identify Your Deployment.
Run this command for each deployment.
Step 12: Redeploy TAS for VMs
These sections describe the steps to redeploy TAS for VMs.
Determine the required stemcell
To determine which stemcell is used by TAS for VMs, either:
-
Review the Stemcell Library:
- Go to Stemcell Library.
- Record the TAS for VMs stemcell release number from the Staged column.
-
Review a stemcell list using BOSH CLI:
-
To retrieve the stemcell release using the BOSH CLI, run:
bosh -e BOSH-DIRECTOR-IP deploymentsWhere
BOSH-DIRECTOR-IPis the BOSH Director IP you retrieved in Retrieve BOSH Director address.
-
For more information about stemcells in Tanzu Operations Manager, see Importing and managing stemcells.
Upload the stemcell
To upload the required stemcell:
-
Download the Xenial Stemcell from Broadcom Support.
-
Upload the stemcell used by TAS for VMs by running:
bosh -e BOSH-DIRECTOR-IP \
-d DEPLOYMENT-NAME \
--ca-cert PATH-TO-BOSH-SERVER-CERTIFICATE \
upload-stemcell \
--fix PATH-TO-STEMCELL
Where:
BOSH-DIRECTOR-IPis the BOSH Director IP you retrieved in Retrieve BOSH Director Address.DEPLOYMENT-NAMEis the deployment name you retrieved in Identify Your Deployment.PATH-TO-BOSH-SERVER-CERTIFICATEis the path to the CA certificate for the BOSH Director, if the certificate is not verifiable by the local machine’s certificate chain.PATH-TO-STEMCELLis the path to your tile’s stemcell.
-
To ensure the stemcells for all of your other installed tiles have been uploaded, repeat the previous step, running
bosh upload-stemcell --fix PATH-TO-STEMCELL, for each stemcell that is different from the already uploaded TAS for VMs stemcell.
Create external databases
If your foundation is configured to use an external MySQL database instance, re-create the databases on the external database instance, and then ensure that your external database is suitably configured.
For an example of how to create external databases, see the TAS for VMs documentation.
If you do not know whether your foundation uses an external or internal database, look on the Databases pane in the TAS for VMs tile.
If your external database VM instance has also changed, for example, if the database instance has been lost, update the configuration settings in the Databases pane on the TAS for VMs tile. For information about the Databases pane, see the TAS for VMs documentation.
Redeploy TAS for VMs
To redeploy TAS for VMs:
-
Navigate to the Installation Dashboard.
-
Click the TAS for VMs tile.
-
Click Resource Config.
-
Ensure the number of instances for MySQL Server is set to
1.Restore fails if there is not exactly one MySQL Server instance deployed.
-
(Optional) Increase the CPU and memory of the
backup_restoreVM. This decreases how long the restore process takes during Restore TAS for VMs. -
Ensure that all errands needed by your system are set to Run.
-
Return to the Installation Dashboard.
-
Click Review Pending Changes.
-
Review your changes and ensure the TAS for VMs tile is selected. Other tiles are optional. For more information, see Reviewing Pending Product Changes.
-
Click Apply Changes to redeploy.
Step 13: Restore service data (optional)
BBR does not back up or restore any service data.
For this step, you must restore data to pre-provisioned service tiles.
The procedures for restoring service data vary. For more information, see the documentation for your service tile.
For example, if you are using Redis for Tanzu Operations Manager v1.14, see Using BOSH Backup and Restore (BBR).
Step 14: Restore TAS for VMs
The BBR TAS for VMs restore command can take at least 15 minutes to complete.
After the BBR TAS for VMs restore completes, then Diego brings the apps back into a running state, unless TAS for VMs file storage has been configured to selectively back up the blobstore. In that case, you need to follow (Optional) Restore apps to a running state.
VMware recommends that you run the BBR TAS for VMs restore command independently of the SSH session, so that the process can continue running even if your connection to the jumpbox fails. The command uses nohup, but you could also run the command in a screen or tmux session.
To restore your TAS for VMs backup:
-
For more information, see the table in External Blobstore support in Enabling External Blobstore Backups. If external blobstore support is not included in the version of Tanzu Operations Manager and TAS for VMs you are using, restore the external blobstore with your IaaS-specific tools before restoring TAS for VMs.
-
From your jumpbox, run:
bbr deployment \
--target BOSH-DIRECTOR-IP \
--username BOSH-CLIENT \
--password BOSH-PASSWORD \
--deployment DEPLOYMENT-NAME \
--ca-cert PATH-TO-BOSH-SERVER-CERTIFICATE \
restore \
--artifact-path PATH-TO-TAS for VMs-BACKUP
Where:
BOSH-DIRECTOR-IPis the BOSH Director IP you retrieved in Retrieve BOSH Director Address.BOSH-CLIENTandBOSH-PASSWORDare the Uaa Bbr Client Credentials, identity and password that you retrieved in Retrieve BOSH Director Credentials.DEPLOYMENT-NAMEis the deployment name you retrieved in Identify Your Deployment.PATH-TO-BOSH-SERVER-CERTIFICATEis the path to the CA for the BOSH Director, if the certificate is not verifiable by the local machine’s certificate chain.PATH-TO-TAS for VMs-BACKUPis the path to the TAS for VMs backup you want to restore.
-
(Optional) To scale the MySQL Server job back up to its previous number of instances:
- Navigate to the Installation Dashboard
- Click the the TAS for VMs tile.
- Click Resource Config.
- Scale the MySQL Server job back up.
- Return to the Installation Dashboard.
-
Click Review Pending Changes.
-
Review your changes. For more information, see Reviewing Pending Product Changes.
-
Click Apply Changes to deploy.
-
(Optional) Run
cf appsto view the status of apps. By observing which apps are running and which are still pending, you can estimate how much longer the restore takes.
Step 15: Restore apps to a running state (optional)
Restoring apps to a running state is only required if you configured a TAS for VMs file storage backup that excludes droplets or both droplets and packages. For more information about the advantages and disadvantages of excluding droplets and packages, see File Storage Backup Level.
To return apps to a running state:
-
If you excluded droplets from your backup, restage each app by running:
cf restage APP-NAMEWhere
APP-NAMEis the name of the app you want to restage. -
If you excluded both droplets and packages from your backup, re-push each app by running:
cf push APP-NAME OPTIONAL-FLAGSWhere:
APP-NAMEis the name of the app you want to re-push.OPTIONAL-FLAGSare any flags you want to use while re-pushing your app.
Step 16: Restore on-demand service instances (optional)
If you have on-demand service instances provisioned by an on-demand service broker, you can restore them after successfully restoring TAS for VMs.
If the leader is lost and you use an on-demand MySQL service instance plan that replicates between foundations, purge the lost service instance to avoid accidentally restoring the former leader. Delete the former leader before running the Upgrade All Service Instances errand for MySQL.
To restore your on-demand service instances:
-
Go to Installation Dashboard.
-
Click an on-demand service tile.
-
Click the Errands tab.
-
Ensure the Upgrade All Service Instances errand is On.
-
Repeat for all on-demand service tiles.
-
Return to the Installation Dashboard.
-
Click Review Pending Changes.
-
Click Apply Changes. This runs the Upgrade All Service Instances errand for the on-demand service, which redeploys the on-demand service instances.
-
(Optional) Restore service data to every on-demand service instance.
-
Any app on TAS for VMs bound to an on-demand service instance might need to be restarted to start consuming the restored on-demand service instances.
Step 17: Restore non-tile deployments (optional)
If you have any deployments that were deployed manually with the BOSH Director rather than through a Tanzu Operations Manager tile, you must restore their VMs.
To restore the VMs:
-
To obtain a list of all deployments on your BOSH Director, run:
bosh -e BOSH-DIRECTOR-IP \
--ca-cert PATH-TO-BOSH-SERVER-CERTIFICATE \
deployments
Where:
BOSH-DIRECTOR-IPis the BOSH Director IP you retrieved in Retrieve BOSH Director Address.PATH-TO-BOSH-SERVER-CERTIFICATEis the path to the CA certificate for the BOSH Director, if the certificate is not verifiable by the local machine’s certificate chain.
-
Identify the names of the deployments that you need to restore. Do not include the deployments from Tanzu Operations Manager tiles.
-
For each deployment you need to restore, run:
bosh -n -e BOSH-DIRECTOR-IP \
--ca-cert PATH-TO-BOSH-SERVER-CERTIFICATE \
-d DEPLOYMENT-NAME \
cck --resolution=recreate_vm
Where:
BOSH-DIRECTOR-IPis the BOSH Director IP you retrieved in Retrieve BOSH Director Address.PATH-TO-BOSH-SERVER-CERTIFICATEis the path to the CA for the BOSH Director, if the certificate is not verifiable by the local machine’s certificate chain.DEPLOYMENT-NAMEis the deployment name you retrieved in Identify Your Deployment.
-
To verify the status of the VMs in each deployment, run:
bosh -e BOSH-DIRECTOR-IP \
--ca-cert PATH-TO-BOSH-SERVER-CERTIFICATE \
-d DEPLOYMENT-NAME \
vms
Where:
BOSH-DIRECTOR-IPis the BOSH Director IP you retrieved in Retrieve BOSH Director Address.PATH-TO-BOSH-SERVER-CERTIFICATEis the path to the CA for the BOSH Director, if the certificate is not verifiable by the local machine’s certificate chain.DEPLOYMENT-NAMEis the deployment name you retrieved in Identify Your Deployment.
The process state for all VMs show as running.
After restoring your backup
This section describes the procedures you must perform after restoring your backup with BBR.
Step 18: Remove unused disks
This is a very destructive operation.
Disks from a previous deployment prevent re-created deployments from working.
Use BOSH to clean up disks
To clean up disk references:
-
Run:
bosh cloud-check
Manually clean up disks
If bosh cloud-check does not clean up all disk references, you must manually delete the remaining disks.
To delete the remaining disks, follow one of these procedures:
-
Use the BOSH CLI to delete the disks:
- Target the redeployed BOSH Director using the BOSH CLI by following the procedures in Retrieve BOSH Director Address.
-
List the deployments by running:
bosh -e BOSH-DIRECTOR-IP \
--ca-cert PATH-TO-BOSH-SERVER-CERTIFICATE deployments
Where:
BOSH-DIRECTOR-IPis the BOSH Director IP you retrieved in Retrieve BOSH Director Address.PATH-TO-BOSH-SERVER-CERTIFICATEis the path to the CA for the BOSH Director, if the certificate is not verifiable by the local machine’s certificate chain.
-
Delete each deployment by running:
bosh -d DEPLOYMENT-NAME delete-deploymentWhere
DEPLOYMENT-NAMEis the deployment name you retrieved in Identify Your Deployment.
-
Log in to your IaaS account and delete the disks manually.
-
To retrieve a list of disk IDs, run:
bosh -e BOSH-DIRECTOR-IP \
--ca-cert PATH-TO-BOSH-SERVER-CERTIFICATE instances -i
Where:
BOSH-DIRECTOR-IPis the BOSH Director IP you retrieved in Retrieve BOSH Director Address.PATH-TO-BOSH-SERVER-CERTIFICATEis the path to the CA for the BOSH Director, if the certificate is not verifiable by the local machine’s certificate chain.
-
After the disks are deleted, continue with Remove Stale Cloud IDs for all deployments.
