


This topic tells you about the key features of the VMware Tanzu Operations Manager interface.
Installation Dashboard page
The Installation Dashboard is the central Tanzu Operations Manager interface for managing your deployment. It displays the BOSH Director configuration for your IaaS and product tiles for your deployment.
The following screenshot shows the Tanzu Operations Manager Installation Dashboard. Each section is labeled with a red letter. Click the image to see it at full size.
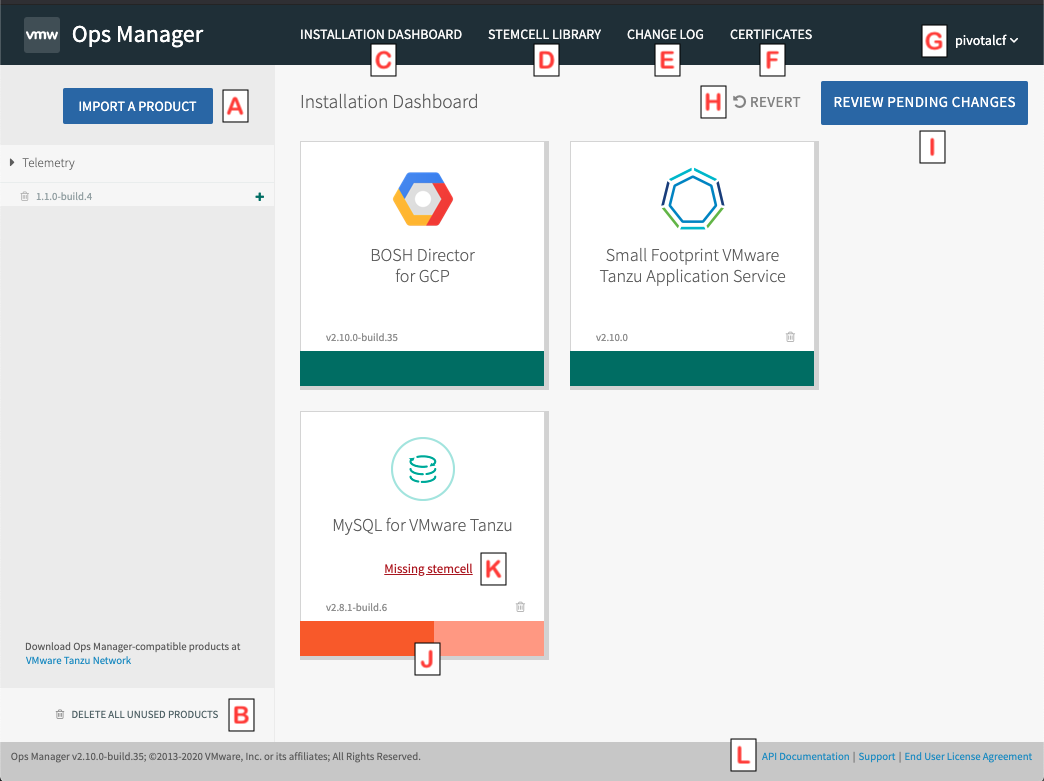
The following list describes each labeled section of the Installation Dashboard:
-
A—Import a Product: Click this button to add a new product to Tanzu Operations Manager. You can download Tanzu Operations Manager-compatible product files from the Broadcom Support portal.
- If you configure a Tanzu API token in the Settings section of Tanzu Operations Manager, a list of the latest versions of already imported products appears automatically.
-
B—Delete All Unused Products: Click this link to delete any unused products.
-
C—Installation Dashboard: Click this link to return to the Tanzu Operations Manager Installation Dashboard page from other Tanzu Operations Manager pages.
-
D—Stemcell Library: Click this link to open the Stemcell Library. In the Stemcell Library you can import stemcells, stage stemcells, and review your stemcell version numbers. For more information, see Importing and Managing Stemcells.
-
E—Change Log: Click this link to view and search a log of your previous installations. For more information, see the Change Log Page section of this topic for details.
-
F—Certificates: Click this link to view certificates in your installation. For more information, see the Certificates Page section of this topic for details.
-
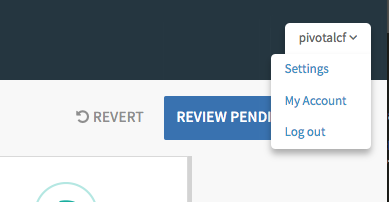
G—User Account Menu: Click the arrow next to your user name to view the menu. Use this menu to go to your Settings page, view My Account to change your email and password, or log out of the Tanzu Operations Manager Installation Dashboard. For more details about accounts, see My account of this topic for details on account information. For more information, see the Settings page section of this topic for details that are available Tanzu Operations Manager settings.
-
H—Revert: Click the revert button to return to the previous successful installation. Any pending changes you have made to the current installation settings will be lost.
-
I—Review Pending Changes: Click the button to go to the Review Pending Changes page, which organizes pending changes by tile. You can activate or deactivate each tile to selectively deploy individual tiles and their dependencies. For more information, see Reviewing pending product changes.
-
J—Orange Bar: Indicates that additional configuration for the product tile is required before deployment. Click the product tile to complete its configuration.
-
K—Missing Stemcell Link: If an imported product is missing a required stemcell, a Missing Stemcell link appears on the tile. Click this link to open the stemcell library. For more information about stemcells, see Importing and managing stemcells.
-
L—API Docs: Click this link to go to the Tanzu Operations Manager API documentation, which details how you can manage Tanzu Operations Manager through the API rather than with the UI. For more information about the Tanzu Operations Manager API, see Using the Tanzu Operations Manager API.
Change Log page
Go to the Change Log page by clicking the corresponding link in the dashboard header. This topic shows the Tanzu Operations Manager’s deployment history, and a record of all of its Apply Changes actions.
The following table lists the following top-level attributes for each deployment:
| Label | Type | Description |
|---|---|---|
| STATUS | Icon | Whether the deployment succeeded or failed |
| DEPLOYMENT ID | Text | A sequentially-numbered identifier for the deployment |
| USER | Username | The user who initiated the deployment |
A LOGS button for each deployment opens the deployment’s full Installation Log.
Within each deployment listing, a table details for the individual products deployed in or deleted from each installation.
The details listed for each product are as follows:
| Label | Type | Description |
|---|---|---|
| PRODUCT | Text | The name of the product |
| ACTION | One of the following labels: ADDED, UPDATED, DELETED, NO CHANGES, FAILED | The action, if any, that the deployment took with the product |
| STARTED | UTC timestamp | When Tanzu Operations Manager began deploying the product |
| FINISHED | UTC timestamp | When Tanzu Operations Manager stopped deploying or attempting to deploy the product |
| DURATION | Time, in minutes | How long Tanzu Operations Manager took to deploy or attempt to deploy the product |
A Total row, below the individual product rows, lists all-product totals for the STARTED, FINISHED, AND DURATION fields.
The Change Log page shows up to 10 Apply Changes at a time, starting with the most recent. You can navigate additional Apply Changes records using the following buttons:
-
First Page—Click First Page to return to the most recent 10 Apply Changes records.
-
Previous Page / Next Page—Click Previous Page, or Next Page to load older or newer entries.
Certificates page
Navigate to the Certificates page by clicking the corresponding link in the dashboard header. This page shows the certificates in your Tanzu Operations Manager installation.
The following image shows the top section of the Certificates page:

The top section of the Certificates page includes the certificates that the Tanzu Operations Manager API attempts to rotate. This section includes both certificates that the Tanzu Operations Manager API can rotate and certificates that you must rotate manually.
For information about how to rotate these certificates, see Overview of Certificate Rotation.
The following describes the information listed on the Certificates page:
-
Certificate name: the name of the certificate.
-
Product GUID: the product name with its unique identifier.
-
Location: whether CredHub or Tanzu Operations Manager stores and manages the certificate.
-
Type: a certificate authority (CA) or leaf certificate.
-
Configurable: whether or not you can configure the certificate. If a certificate is configurable, you can generate your own and paste it into Tanzu Operations Manager configuration panes.
-
Valid until: the date that the certificate expires.
The following image shows the Excluded certificates section of the Certificates page:
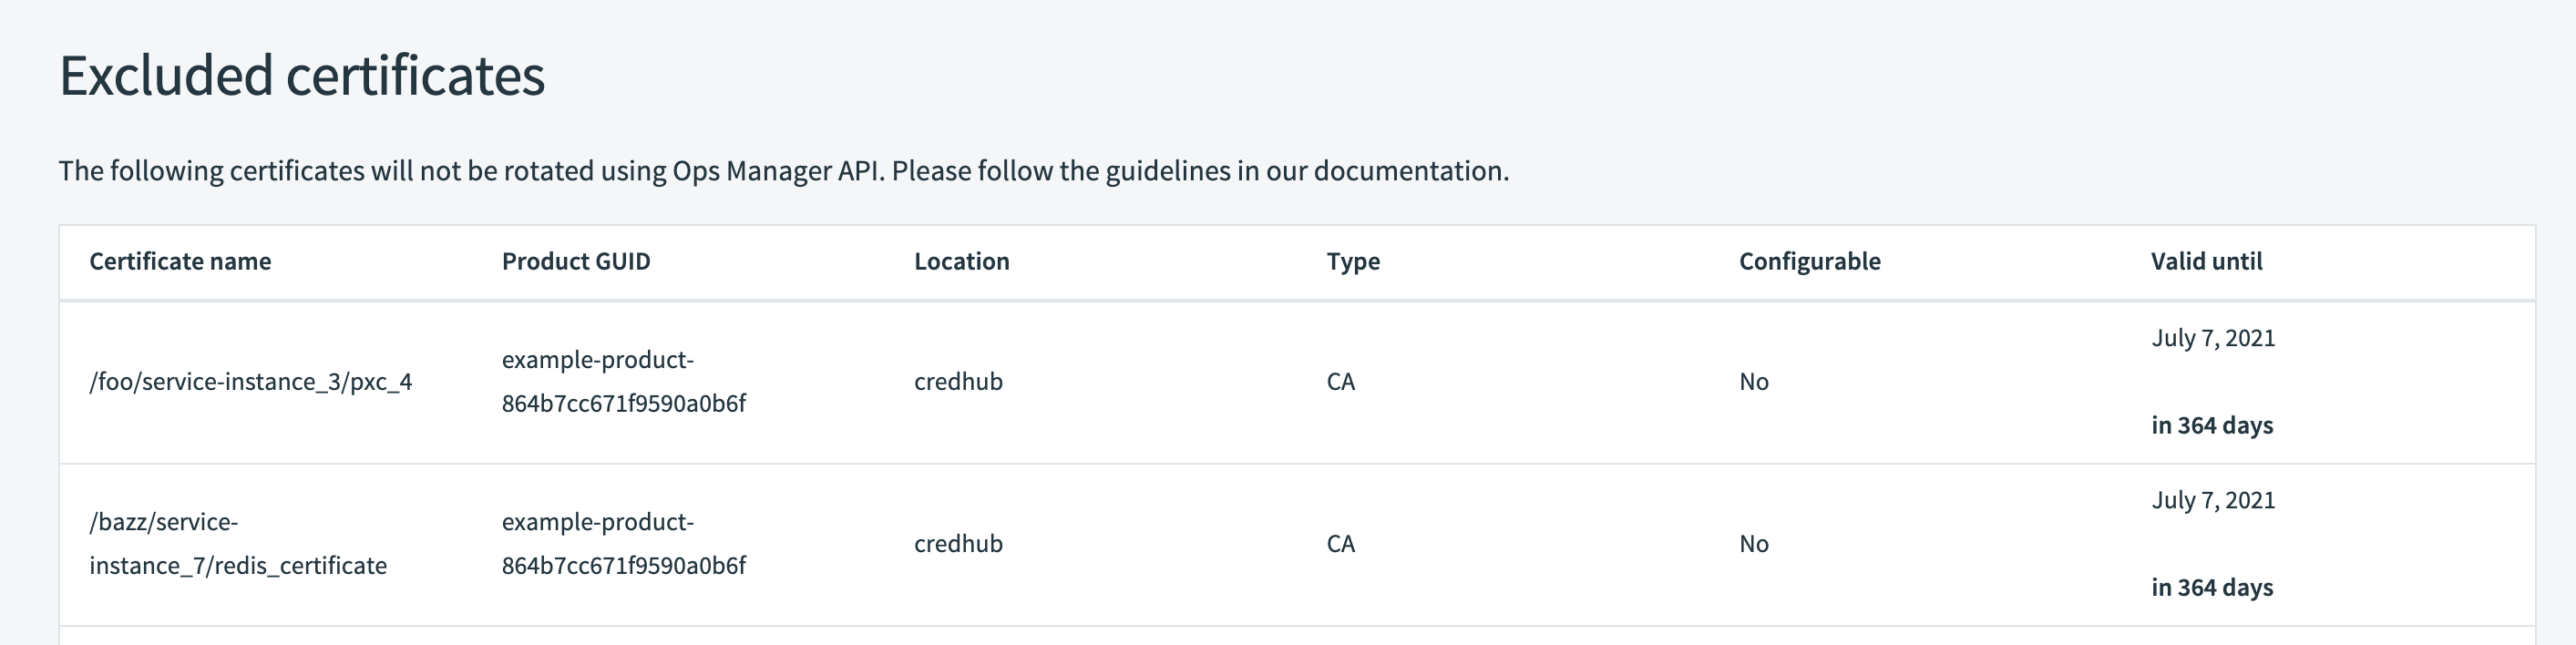
The Excluded certificates section includes the certificates that the Tanzu Operations Manager API does not attempt to rotate, because they either must be rotated using the CredHub Maestro CLI or cannot be rotated safely at all.
The Services TLS CA and its leaf certificates must be rotated using the CredHub Maestro CLI. To rotate the Services TLS CA certificate and its leaf certificates, see Rotate the services TLS CA and the Leaf Certificates in Advanced Certificate Rotation with CredHub Maestro.
For all other certificates listed in Excluded certificates, see the documentation for the product tile associated with the non-rotatable certificate or contact Support.
Settings page
Go to the Settings page by clicking on your user name, located at the upper right corner of the screen, and selecting Settings. On the screen that appears, select Change Decryption Passprase.
The following sections describes the configuration panes.
Modifying these settings does not require you to return to the Installation Dashboard and click Apply Changes. These settings apply to the Tanzu Operations Manager VM. The BOSH Director does not apply them to your deployment.
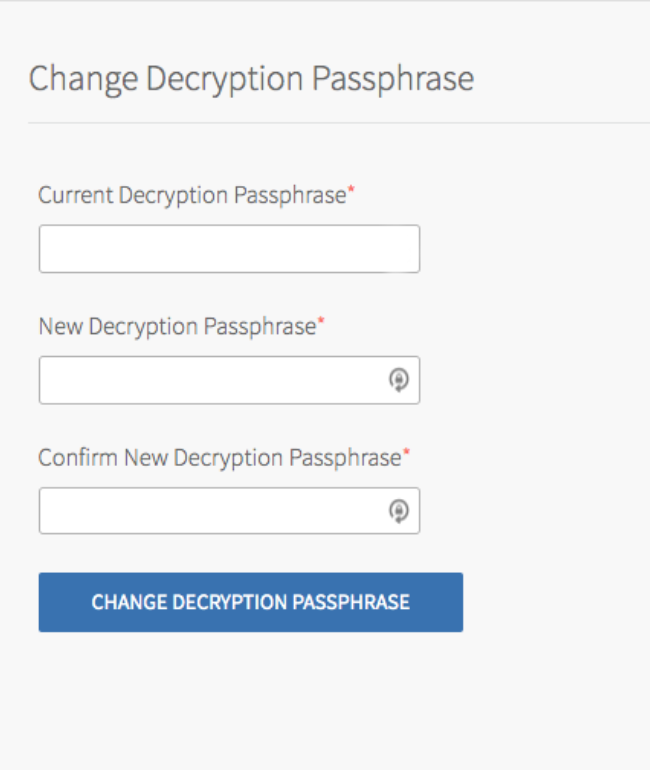
Change Decryption Passphrase
To reset your decryption passphrase, enter the details as follows, and click Change Decryption Passphrase.
- Current Decryption Passphrase
- New Decryption Passphrase
- Confirm New Decryption Passphrase
Internal Authentication Settings
You can use the Internal Authentication Settings pane to view and update the settings for your internal authentication method.
This pane includes the following fields:
-
Current Decryption Passphrase: Update the decryption passphrase for your internal authentication method.
-
Admin Username: Update the username for the admin user.
-
Admin Password and Admin Password Confirmation: Update the password for the admin user.
SAML settings
To change your Identity Provider (IdP) to SAML, configure the following fields:
-
Current Decryption Passphrase: Enter your decryption passphrase.
-
SAML IDP Metadata: Enter the full URL or XML SAML IdP metadata.
-
BOSH IDP Metadata: (Optional) Enter the full URL or XML BOSH IdP metadata. If left blank, the default is the same metadata as the field above.
-
SAML Admin Group: Enter the name of the SAML group that contains all of the Tanzu Operations Manager administrators. This field is case-sensitive.
-
Groups Attribute: Enter the groups attribute tag name with which you configured the SAML server. This field is case-sensitive.
-
Provision an admin client in the Bosh UAA: Enable to provision an admin client in the BOSH UAA. For more information, see Provision Admin Client.
LDAP settings
Use this pane to change your IdP to LDAP.
For more information about changing your IdP to SAML or LDAP, view the following instructions for your IaaS configuration:
SSL Certificate
You can use the SSL Certificate pane to configure Tanzu Operations Manager to use a custom SSL certificate for all Tanzu Operations Manager traffic both through the UI and API.
This pane includes the following fields:
- Certificate: Enter a custom certificate.
- Private Key: Enter the private key for the certificate.
If you leave the fields blank, Tanzu Operations Manager uses an auto-generated self-signed certificate rather than your own custom certificate and private key. If you want to replace a custom certificate with a self-signed certificate, select Revert to self-signed certificate.

VMware Tanzu Settings
Enter your Tanzu API token and click Add Token to connect your Installation Dashboard to Broadcom Support Portal.
Proxy settings
If you are using a proxy to connect to Tanzu Operations Manager, update your Proxy Settings by providing a HTTP proxy, HTTPS proxy, or No proxy.
Custom banner
Create a custom text banner to communicate important messages to operators. For UI Banner, enter the text you want to be shown on each page of the Tanzu Operations Manager UI. For SSH Banner, enter the text that appears when an operator logs in to Tanzu Operations Manager.
Export Installation settings
Exports the current installation with all of its assets. When you export an installation, the exported file contains references to the base VM images, necessary packages, and configuration settings.
Syslog
Viewable by administrators only. Configure a custom Syslog server for Tanzu Operations Manager. When you select Yes and fill the following fields, Tanzu Operations Manager produces and sends all syslog entries from the Tanzu Operations Manager VM to the configured syslog endpoint. Tanzu Operations Manager also sends BOSH Director access events to the syslog endpoint.
Tanzu Operations Manager syslog entries are sent in RFC 3164 format.
To configure a custom syslog endpoint for Tanzu Operations Manager logs:
-
Select Syslog.
-
(Optional) To send Ops Manager system logs to a remote server, select Yes.
-
In Address, enter the IP address or DNS name for the remote server.
-
In Port, enter the port number that the remote server listens on.
-
From the Transport Protocol drop-down menu, select TCP or UDP. This selection determines which transport protocol is used to send the logs to the remote server.
-
(Optional) Select the Enable TLS check box to send encrypted logs to remote server with TLS. After you select the checkbox:
- In Permitted Peer, enter either the name or SHA1 fingerprint of the remote peer.
-
In SSL Certificate, enter the SSL certificate for the remote server.
Note VMware strongly recommends that you enable TLS encryption when you are forwarding logs. Logs can contain sensitive information, such as cloud provider credentials.
-
(Optional) In Environment identifier, enter a string. This is a human-readable identifier that is included in each log entry.
-
(Optional) In Queue Size, enter an integer. This value specifies the number of log messages held in the buffer. The default value is 100,000.
-
(Optional) Select the Forward Debug Logs check box to forward the logs to an external source. This option is deselected by default. If you select it, you may generate a large amount of log data.
-
(Optional) In the Custom rsyslog Configuration field, enter configuration details for
rsyslog. This field requires the rainerscript syntax. -
Click Save.
Advanced Options
-
Download Activity Data: Downloads a directory containing the configuration file for the installation, the deployment history, and version information.
-
Download Root CA Cert: Use this to download the root CA certificate of your deployment as an alternative to curling the Tanzu Operations Manager API.
-
View Diagnostic Report: Displays various types of information about the configuration of your deployment.
-
Delete This Installation: Deletes your Tanzu Operations Manager installation permanently.
My Account page
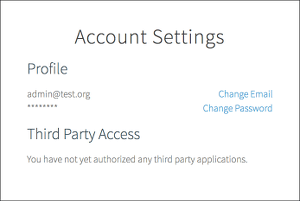
To change your email and password, go to the My Account page by clicking on your user name located at the upper right corner of the screen and selecting My Account. The Account Settings page includes the following information and links:
- Profile: The current email address and obscured password are shown.
- Third Party Access: Any third-party applications authorized for use are listed here.
- Change Email
- Change Password
Support page
Click Support in the footer of any page in Tanzu Operations Manager to access the Support page.
The Support page allows you to download a ZIP file that includes Tanzu Operations Manager logs, deployed manifests and configurations, and BOSH deployment diagnostics.
The contents of the ZIP file help Support quickly address any issues in your deployment.
You can also access Broadcom Support to search for Knowledge base article and other documentation.
