


This topic for operators gives you instructions about how to install, configure, and deploy the VMware Tanzu RabbitMQ for Tanzu Application Service tile to provide on-demand service.
The RabbitMQ open source product provides additional documentation. For more information about getting started with RabbitMQ and ensuring production readiness, see the Production Checklist in the RabbitMQ Documentation.
- For how to install and configure the Tanzu RabbitMQ for Tanzu Application Service pre-provisioned service, see Installing and Configuring the Pre-Provisioned Service.
- For how to deactivate the pre-provisioned service, see Turning Off the Pre-Provisioned Service.
Role-Based Access in Ops Manager
Ops Manager admins can use Role-Based Access Control (RBAC) to manage which operators can make deployment changes, view credentials, and manage user roles in Ops Manager. Therefore, your role permissions might not permit you to follow every procedure in this operator guide.
For more information about roles in Ops Manager, see Understand Roles in Ops Manager.
Prerequisites for Deploying the On-Demand Service
Before deploying Tanzu RabbitMQ for Tanzu Application Service as an on-demand service meet the prerequisites below:
-
Networking: Ensure that the required network rules are in place to allow various components to communicate. For details about the network connections that must be open to enable the on-demand service, see Required Networking Rules for On-Demand Services.
-
Transport Layer Security (TLS): To secure communication between apps and Tanzu RabbitMQ for Tanzu Application Service service instances through TLS, follow the procedures in Provide or Generate a CA Certificate before installing and configuring the tile.
-
BOSH DNS must be enabled: This is enabled by default. If you have deactivated BOSH DNS, you must activate it for BOSH Hot Swaps to work. For more information, see BOSH Hot Swap.
Download and Install Tanzu RabbitMQ for Tanzu Application Service
To download and install Tanzu RabbitMQ for Tanzu Application Service:
-
Download the product file from VMware Tanzu Network.
-
Navigate to the Ops Manager Installation Dashboard and click Import a Product to upload the product file.
-
Under the Import a Product button, click + next to the version number of Tanzu RabbitMQ for Tanzu Application Service. This adds the tile to your staging area.
-
Click the newly added Tanzu RabbitMQ for Tanzu Application Service tile. This lets you begin configuring the tile. The installation is complete when you apply the changes from the configuration.
Configure On-Demand Tanzu RabbitMQ for Tanzu Application Service
The configuration screen below appears when you click the Tanzu RabbitMQ for Tanzu Application Service tile in Ops Manager. An orange circle indicates that you are required to configure fields on the tab before you can deploy the tile. A green check mark indicates that the tab is preconfigured and you can change its settings.
Configure AZs and Networks
Follow the steps below to configure the AZs and networks:
-
Click Assign AZs and Networks.
Caution You cannot change the regions or networks after you have clicked Apply Changes in the Apply Changes from Your Configuration below.
-
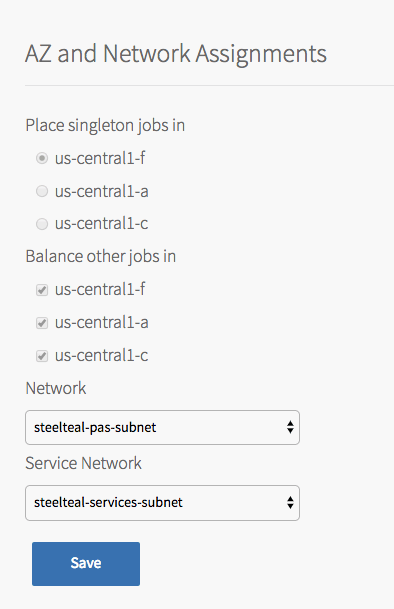
Configure the fields on the Assign AZs and Networks as follows:
Field Instructions Place singleton jobs in Select the region that you want for singleton VMs. Ops Manager creates the RabbitMQ broker in this AZ. Balance other jobs in Select additional region. This selection does not affect the on-demand Tanzu RabbitMQ for Tanzu Application Service service. Network Select a network for the Tanzu RabbitMQ for Tanzu Application Service on-demand broker.
This should be a separate network from the one you select for Service Network. For more information about the Default Network, see Default Network and Service Network.
Typically, you select the network used for VMware Tanzu Application Service for VMs (TAS for VMs) components.Service Network Select a separate network that the on-demand service instances run on.
A typical practice is to put all on-demand services on a single network, separate from the network that TAS for VMs and the on-demand broker run on. For information about the Service Network, see Default Network and Service Network.
This field is also required for the pre-provisioned service, though in that case, it does not matter which network you select.Caution Changing the Network or Service Network after you have configured them or changing their IP configurations results in a failed deployment. For more information, see Changing Network or IP Addresses Results in a Failed Deployment.
-
Click Save.
Note BOSH randomly deploys single node on-demand service instances across configured AZs. This minimizes the impact of an AZ outage and removes single points of failure.
Set up Syslog Forwarding and Metrics Polling Interval
VMware recommends that you configure logging to monitor the health of Tanzu RabbitMQ for Tanzu Application Service. Follow the instructions in Configure Syslog Forwarding and Configure the Metrics Polling Interval.
Configure Global Settings
Follow the steps below to configure global settings:
- Click the Global Settings for On-Demand Plans tab.
-
Configure the settings:
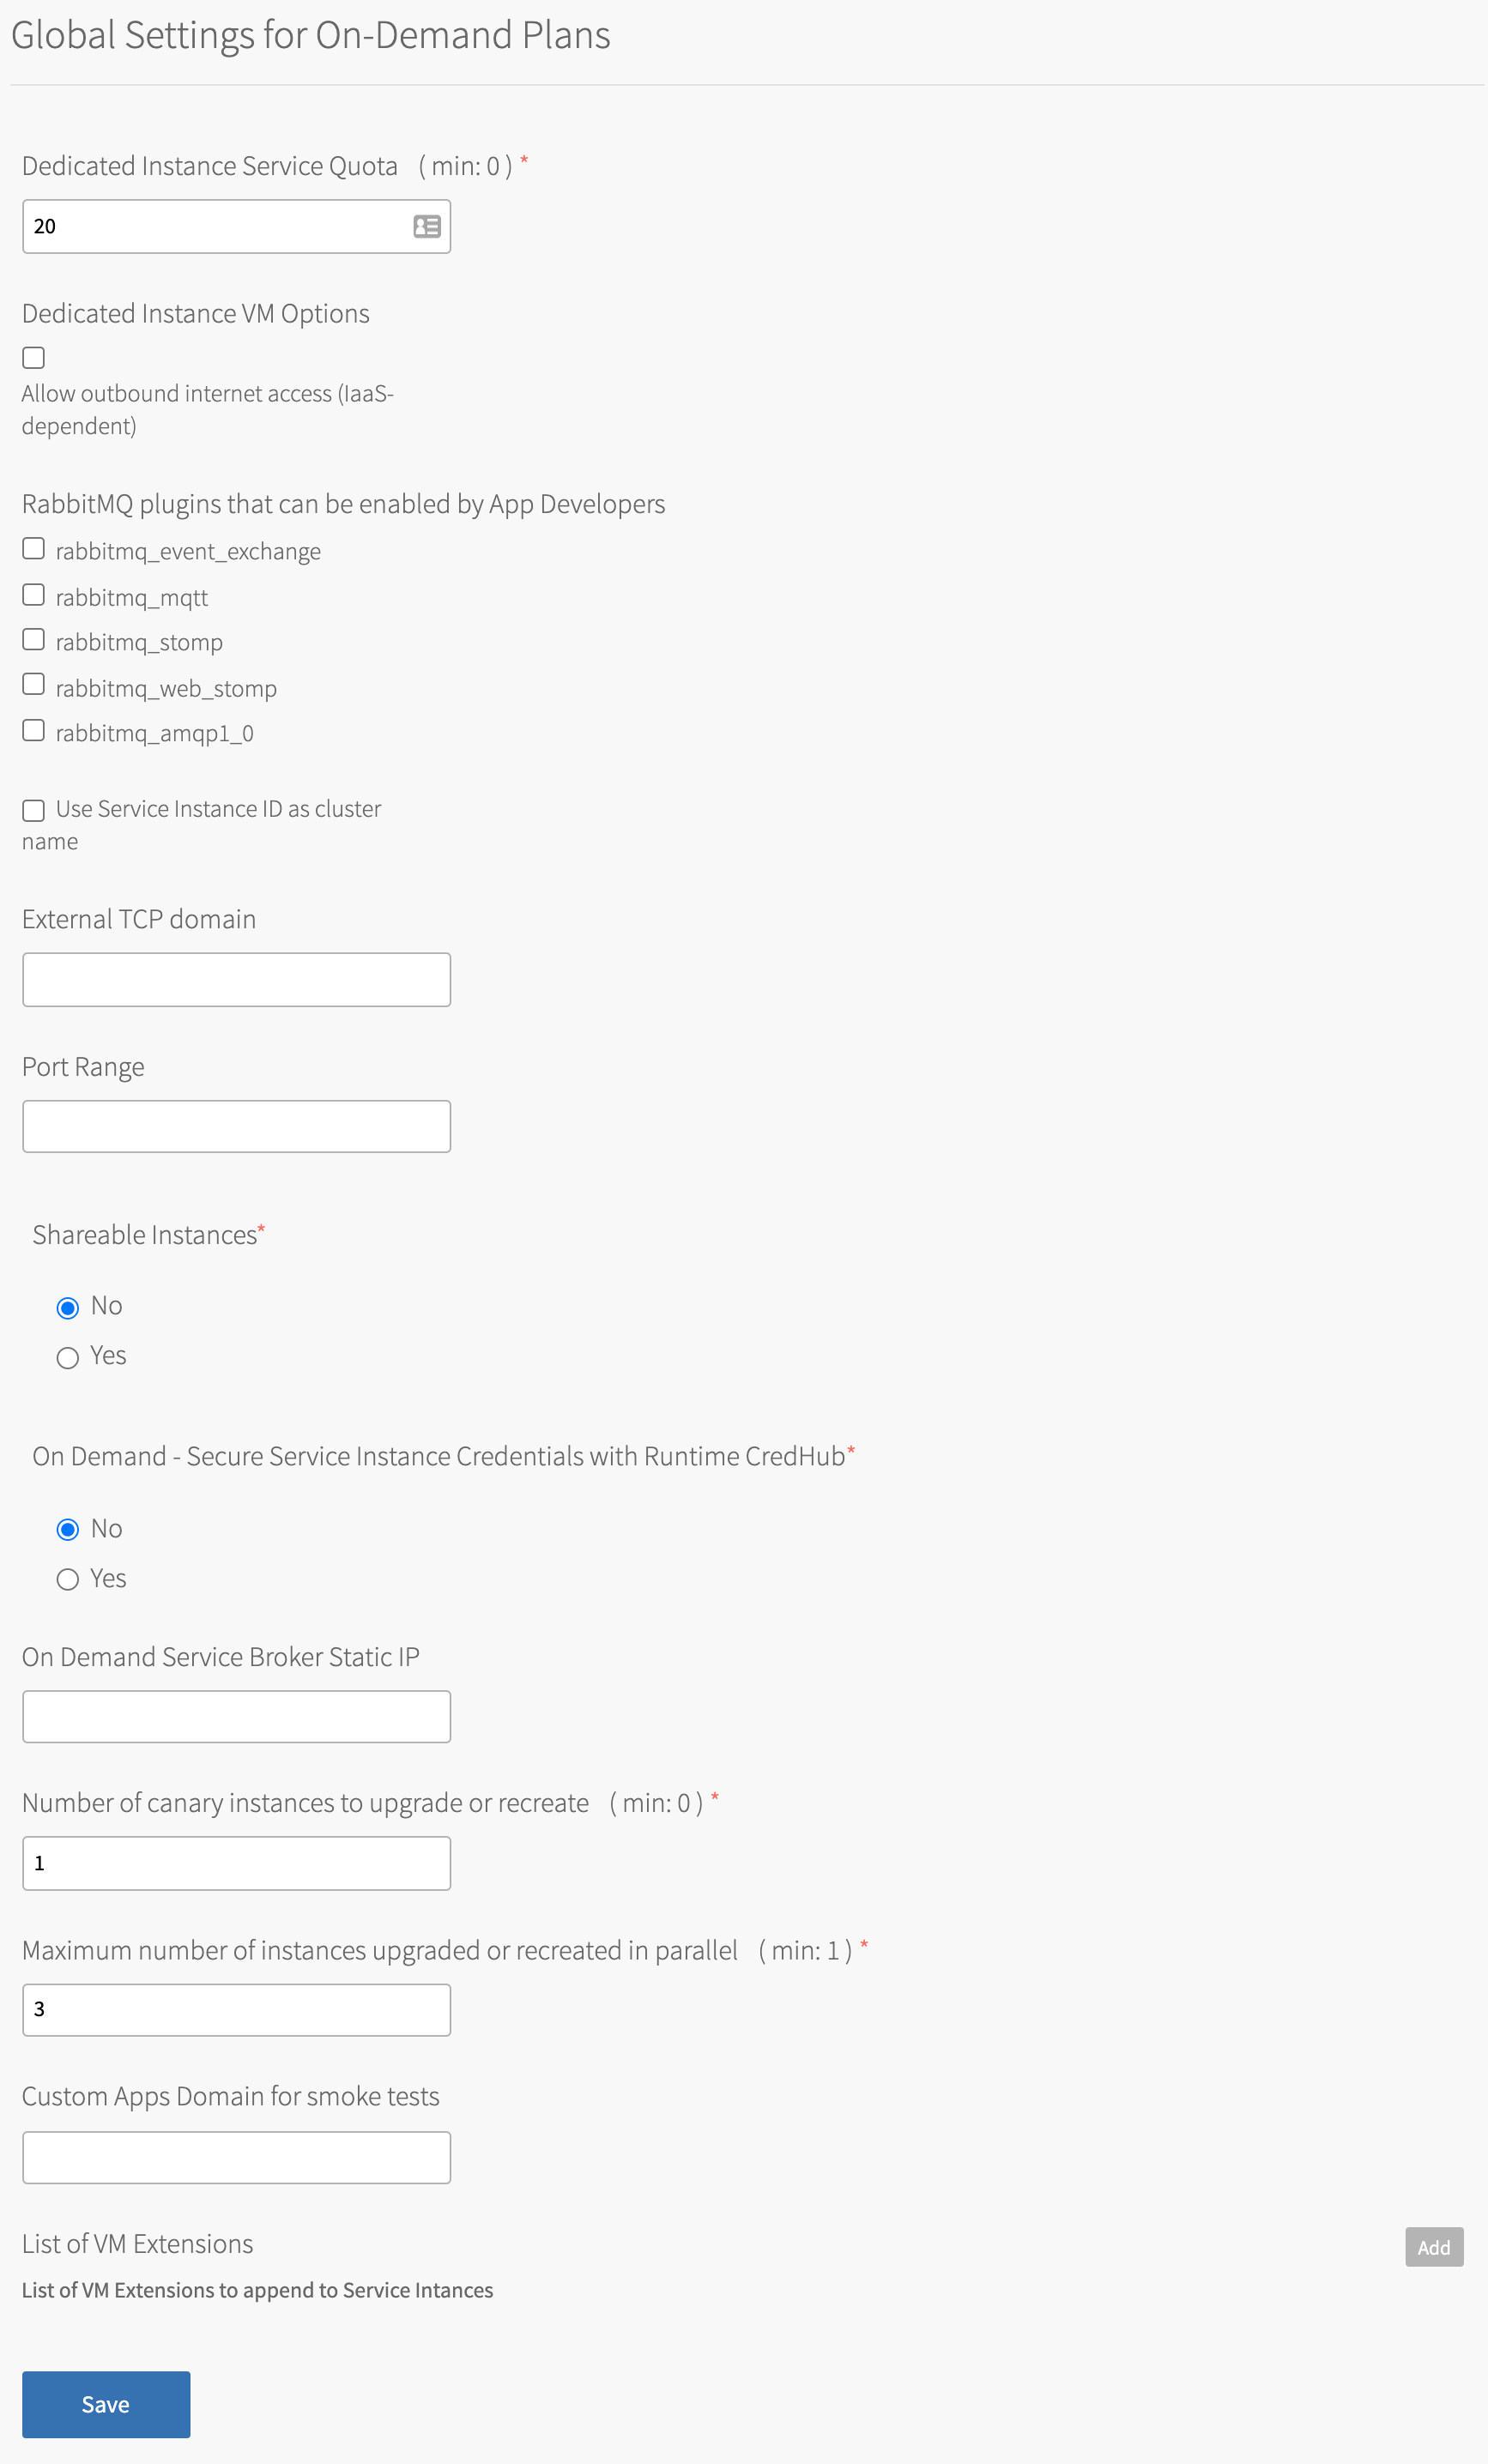
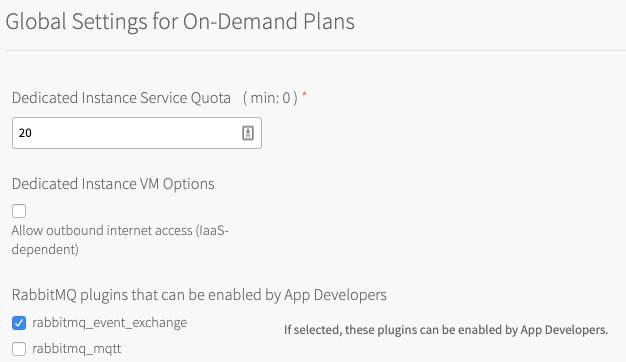
Field Instructions Dedicated Instance Service Quota Set the total number of on-demand service instances that can be deployed. For more information, see Setting Limits for On-Demand Service Instances. Allow outbound internet access (IaaS-dependent) Select this checkbox to enable external log forwarding, send backup artifacts to external destinations, or communicate with an external BOSH blobstore. Note Outbound network traffic rules also depend on your IaaS settings. Consult your network or IaaS admin to ensure that your IaaS permits outbound traffic to the external networks you need.
RabbitMQ plug-ins that can be enabled by App Developers For more information, see Enable Extra Optional RabbitMQ Server Plug-ins below. Use Service Instance ID as cluster name Select this checkbox to set the cluster name to its service instance GUID instead of the default name `rabbit@localhost`. This enables you to filter metrics by cluster name. Caution If you have federated queues and you select this checkbox, Tanzu RabbitMQ for Tanzu Application Service recreates the federated queues with a new cluster name. This duplicates the number of downstream federated queues that consume messages from an upstream queue.
External TCP domain Enter the external URL assigned to the TCP router. This corresponds to your external load balancer. Port Range Enter a range of ports to expose on the TCP Router. You must have at least one port for each service instance. Ensure that the range has enough capacity to accommodate the maximum number of service instances. Shareable Instances Click Yes to enable the feature for sharing instances.
Sharing a service instance between spaces enables apps in different spaces to share databases and messaging queues. For more information, see Sharing Service Instances.On Demand - Secure Service Instance Credentials with Runtime CredHub For on-demand services instances, click Yes to secure credentials with CredHub. Note For this feature to work you must also enable it in TAS for VMs. For instructions, see Step 1: Configure the TAS for VMs Tile. After deploying the tile, notify developers that they must unbind and rebind existing service instances to secure their credentials with CredHub.
On Demand Service Broker Static IP Enter an IP address to assign to your on-demand service broker node. BOSH allocates an IP address if the field is left blank. Number of upgrade canary instances Set the number of canary instances on which to run the upgrade-all-service-instancesor therecreate-all-service-instanceserrands first. If the errand succeeds on all canary instances, it runs on the remaining instances.Maximum number of instances upgraded in parallel Set the limit for the number of instances on which to simultaneously run the upgrade-all-service-instanceserrand or therecreate-all-service-instanceserrand. The number of available BOSH workers limits the number of simultaneous runs. See workers in the BOSH documentation. Set the value lower than this limit to avoid over-saturating BOSH.Custom apps domain for smoke tests Configure to provide a custom apps domain for the smoke tests. If left blank, the default Cloud Foundry apps domain is used.
Failure to configure a custom apps domain could cause smoke tests to fail if the smoke tests domain is not accessible from the RabbitMQ Service Instance domain for on-demand services.List of VM Extensions Click Add to enter names of VM extensions to apply to all service instances. You can separately apply additional sets of VM extensions on each specific plan. For more information, see On-demand plans.
You can manage custom VM Extensions in Ops Manager or through the OM CLI. For more information, see Create or Update a VM Extension or om create-vm-extension in GitHub.
You can use this to deactivate IaaS specific behavior. For example, you can use a VM extension to deactivate vMotion in a vSphere infrastructure.
To remove a VM extension, click the trash can icon.Prom Scraper Compatibility with Log Cache Select this check box to ensure metrics from on-demand service instances are compatible with Log Cache. Caution VMware strongly recommends to leave this box checked. If you deactivate this feature, metrics might not be visible from on-demand service instances.
-
Click Save.
Configure Security
Tanzu RabbitMQ for Tanzu Application Service lets you use Transport Layer Security (TLS) to secure communication between apps and service instances. You can also enable TLS to secure communication between Tanzu RabbitMQ for Tanzu Application Service nodes in a cluster. Mutual TLS (mTLS) verification is not supported.
Tanzu RabbitMQ for Tanzu Application Service also lets you use OAuth 2.0 to enable developers to access the RabbitMQ Management UI using their VMware Tanzu Application Service for VMs credentials.
To configure the security settings:
-
Ensure that you have performed the procedures in Provide or Generate a CA Certificate before configuring the tile and applying changes.
-
Click the Security for On-Demand Plans tab.
-
Configure the settings:
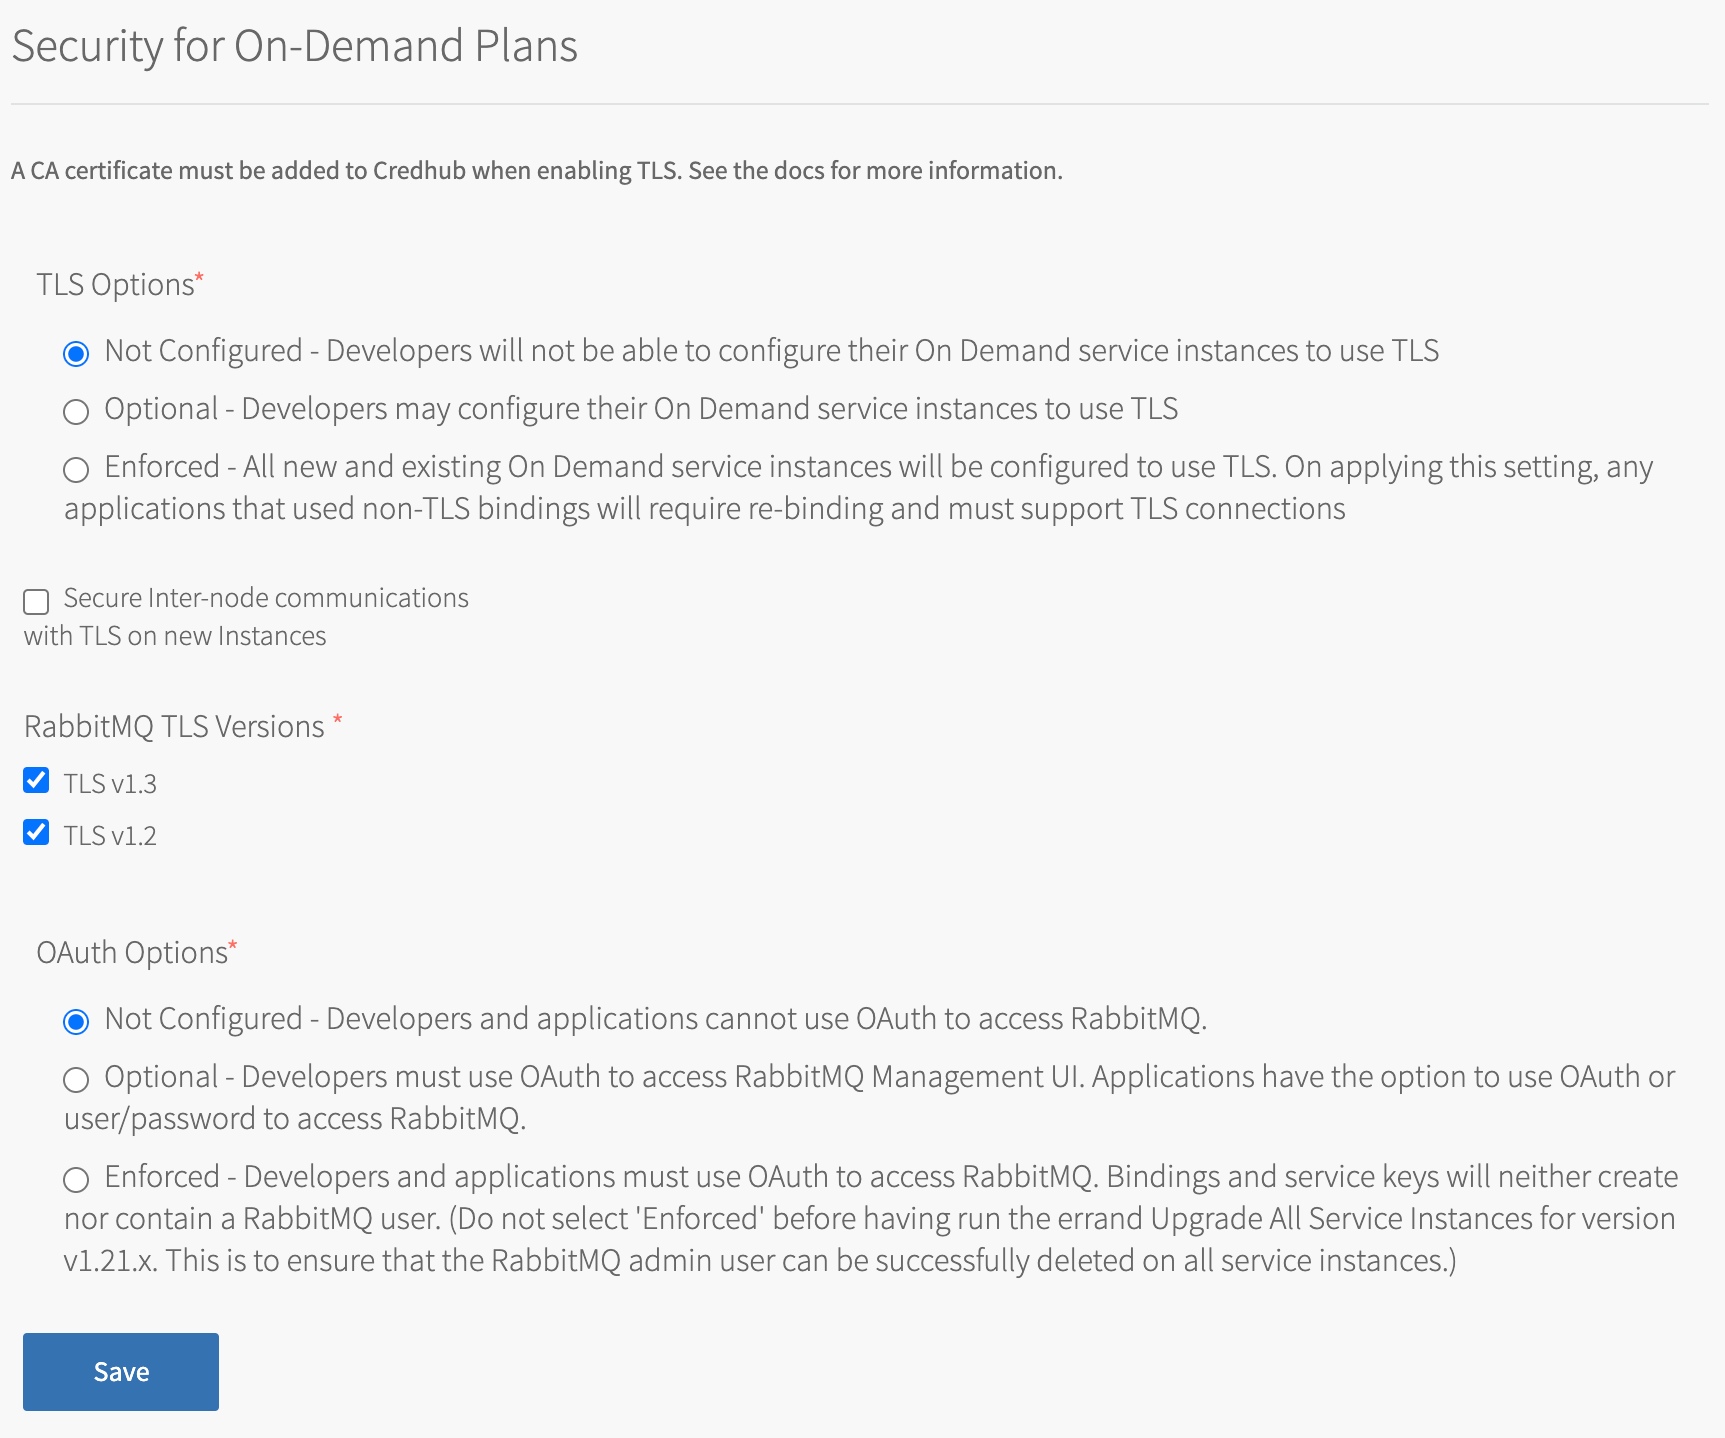
Field Instructions TLS Options Select either Optional or Enforced. Optional enables developers to configure their Tanzu RabbitMQ for Tanzu Application Service service instances to use TLS. Enforced requires TLS to be enabled. Breaking Change: If TLS is set to Enforced then all existing service instances use TLS after changes from the Upgrade All Service Instances errand are applied. Any apps not using TLS are no longer able to communicate with their service instances. Such apps require a new binding and must be configured to communicate with their Tanzu RabbitMQ for Tanzu Application Service service instance through TLS.
Note When TLS is subsequently set to Not Configured, existing service instances continue to use TLS. However, new instances are not configured with TLS.
Secure Inter-node communications with TLS on new Instances Select this checkbox to secure all communication between nodes in the Tanzu RabbitMQ for Tanzu Application Service cluster with TLS. This includes communication with Tanzu RabbitMQ for Tanzu Application Service CLI tools, such as rabbitmqctl.Caution This option only affects service instances created after running Apply Changes. It has no effect on existing service instances. To migrate your app traffic to a cluster using inter-node TLS, see Migrate to a Secure Inter-node Cluster.
Note Inter-node communication is independent of communication between your apps and RabbitMQ. You can secure inter-node traffic without modifying your apps to communicate over TLS.
For more information about secure inter-node communication, see Securing Inter-node Traffic with TLS.RabbitMQ TLS Versions Select the TLS versions to support. TLS v1.3 and TLS v1.2 are enabled by default. For more information about TLS versions, see the RabbitMQ documentation. OAuth Options For information about configuring OAuth options, see Configure OAuth in Ops Manager. -
Click Save.
-
Click Review Pending Changes. For more information about this Ops Manager page, see Reviewing Pending Product Changes.
-
In the Ops Manager Installation Dashboard, ensure the Upgrade All Service Instances errand is set to On, and then click Apply Changes.
-
After deploying the tile, app developers can configure their service instances to use TLS. For developer instructions, see Enable Transport Layer Security (TLS) for Your Service Instance.
Configure the Service Plans
To enable the on-demand service, you must configure at least one on-demand plan.
- You can configure up to five on-demand plans: On Demand Instance: Plan 1 – On Demand Instance: Plan 5.
- You can configure all on-demand plans to have 1, 3, 5, or 7 RabbitMQ nodes.
- If the on-demand service is not enabled, the on-demand broker is deployed alongside the Tanzu RabbitMQ for Tanzu Application Service installation, but it is not available in the Marketplace.
Note You must fully configure On Demand Instance: Plan 1 even if you deactivate access to this plan. See CF Service Access in the table below.
To configure an on-demand service plan:
-
Choose the on-demand service instance you want to configure. You must complete the required fields for On Demand Instance: Plan 1 even if you deactivate this plan.
-
Configure the fields as follows:
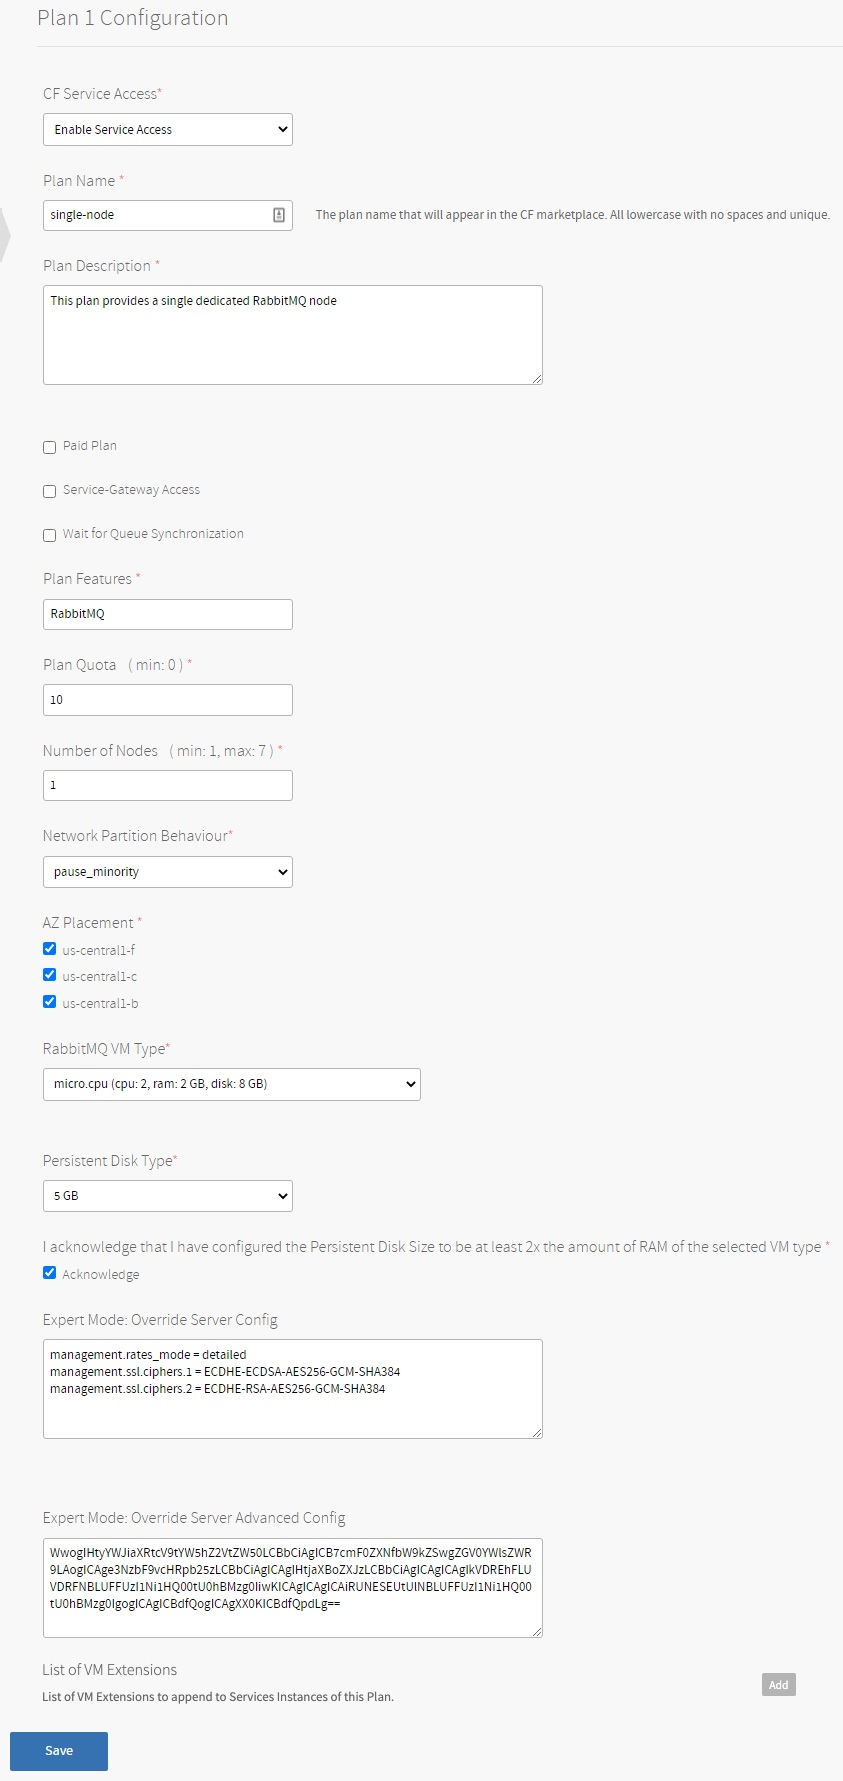
Field Instructions Enable This Plan For Plans 2 - 5, activate the plan by selecting Plan Enable. CF Service Access Activate or deactivate access to this plan, or leave access unchanged.
If you enable Plan 1, the default setting for Plans 2 - 5 is Enable Service Access. If you change this default setting, the smoke tests fail. Therefore, if you activate Plan 1 and want to change this default, before doing so, set the On-Demand Instance Smoke Tests errand to Off. For more information, see Errands below.
- Enable Service Access---Gives access to all orgs, and displays the service plan to all developers in the Marketplace.
- Disable Service Access---Deactivates access to all orgs, and hides the service plan to all developers in the Marketplace. This setting cannot be selected at a later time in the UI.
- Leave Service Access Unchanged---Keeps any existing access settings, and only displays the service plan in the Marketplace to members of orgs that have access to the plan. You can change the access settings later using the cf CLI. For instructions, see Controlling Access to Service Plans by Org.
Plan Name Accept the default or enter a name. This is the name that appears in the Marketplace. RabbitMQ Version Available in Tanzu RabbitMQ for Tanzu Application Service v2.0.7 and later. Select RabbitMQ version 3.9or3.10.Plan Description Accept the default or enter a description. This description appears in the Marketplace. Paid Plan Select this checkbox to indicate that this service plan is paid. The plan is marked with an asterisk in the cf marketplacelist and labeledpaidin thefree or paidcolumn when individual plans are listed.Service Gateway Access Select this checkbox to enable service gateway access. For information, see Enabling Service-Gateway Access. Wait for Queue Synchronization Select this checkbox to enable the following pre-stop checks: rabbitmq-upgrade await\_online\_quorum\_plus\_one --timeout 3600rabbitmq-upgrade await\_online\_synchronized\_mirror --timeout 3600
Caution If you enable these checks, the pre-stop script can fail with the error:
Timed out waiting for mirror queue critical node to sync after 3600 seconds
For more information, see Pre-Stop Script Times Out When Waiting for Queue Synchronization.Plan Features Accept the default or enter a description. This description appears in Apps Manager. Plan Quota Enter the maximum number of on-demand service instances that can be available at one time. For more information, see Setting Limits for On-Demand Service Instances. Number of Nodes Enter 1, 3, 5 or 7. This setting only affects new service instances. Previously deployed service instances are not updated. Network Partition Behaviour Select pause_minorityorautoheal. VMware recommends using pause minority. For more information, see Consistency or Availability Tradeoff.AZ Placement This field is available after you complete the Assign AZs and Networks page. For more information, see Assign AZs and Networks above. - For a single-node plan, select one or more AZs.
- For a plan containing multiple nodes, if there is high network latency between the AZs, select only one AZ. VMware recommends this for multi-node plans to minimize risks due to network latency and partitions. See Network Latency and Consistency or Availability Tradeoff for details.
If you change this selection after deployment, existing instances are not affected by the change. For more information, see Determine Which AZs a Service Instance Uses below.
RabbitMQ VM Type Select a large VM type. The plan creates a service instance of this size. For more information, see About RabbitMQ VM Types and Persistent Disk Size below. Persistent Disk Type This is where RabbitMQ pages messages to disk. Service instance deployments fail if this value is less than twice the volume of RAM of the selected RabbitMQ VM Type. For more information, see About RabbitMQ VM Types and Persistent Disk Size below. Expert Mode: Override Server Config (Optional, experts only) Provide server config to set on service instances that use this plan. For more information, see Expert mode: Overriding RabbitMQ Server configuration. Expert Mode: Override Server Advanced Config (Optional, experts only) Provide server config to set on service instances that use this plan. For more information, see Expert mode: Overriding RabbitMQ Server configuration. List of VM Extensions Click Add to enter names of VM extensions to apply to service instances created under this plan. These are applied in addition to any global VM extensions that are configured under the Global Settings section.
You can manage custom VM Extensions in Ops Manager or through the OM CLI. For more information, see Create or Update a VM Extension or om create-vm-extension in GitHub.
You can use this to deactivate IaaS-specific behavior. For example, you can use a VM extension to deactivate vMotion in a vSphere infrastructure.
To remove a VM extension, click the trash can icon. -
Click Save.
Determine Which AZs a Service Instance Uses
Caution If you change this configuration after you have selected AZs and deployed service instances, existing instances are not placed in the newly configured AZs when the Upgrade All Service Instances or Recreate All Service Instances errands are run. This prevents re-creation of the VMs in different AZs, which could lead to data loss.
All new service instances, however, are created in the newly configured AZs.
To learn which AZs a service instance is placed in, do one of the following:
- Retrieve the service GUID using the
cf service SERVICE-INSTANCE-NAME --guidcommand and then run the BOSHinstancescommand for theservice-instance_GUIDdeployment. - With syslog forwarding enabled, inspect the service broker logs when running the Upgrade All Service Instances errand. For each existing service instance, the log entry includes the service instance GUID and the AZs the service instance is running in.
RabbitMQ VM Types and Persistent Disk Size
The RabbitMQ VM Type and Persistent disk type are required fields on the service plan configuration pages. These properties are pre-configured by default.
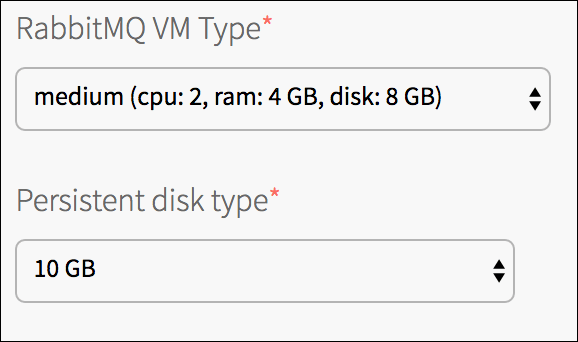
VMware recommends that the value of Persistent disk type be twice the amount of RAM of the selected RabbitMQ VM Type.
-
You can change the RabbitMQ VM type and the size of the persistent disk that is attached to the Tanzu RabbitMQ for Tanzu Application Service service instances. For example, if you are running out of disk space you can increase the persistent disk size by changing the Persistent disk type field. If you make changes, ensure that the persistent disk size is still twice the size of the RAM of the RabbitMQ VM type.
-
RabbitMQ raises alarms when disk space drops below the configured limit. Incorrect disk sizes might cause the deployed instance not to start. RabbitMQ declines to start if there is not enough space available according to the threshold.
-
On-Demand instances are configured with a threshold set to the 150% of the RAM of the VM. Use the following table as a guide when selecting the size of the persistent disk.
The following table shows an example of possible RAM values, absolute minimal value below which RabbitMQ declines to start, and the disk size suggested for an average use case.
| RAM | Free disk alarm threshold (1.5 x RAM) | Suggested disk size (2 x RAM) |
|---|---|---|
| 10 GB | 15 GB | 20 GB |
| 16 GB | 24 GB | 32 GB |
| 32 GB | 48 GB | 64 GB |
Minimum resources required for each RabbitMQ VM:
- CPU: 2
- RAM: 1 GB
- Ephemeral disk: 2 GB
- Persistent disk: 4 GB
For more information, see:
For information about all preconfigured settings, see Things That Are Preconfigured.
Verify the Stemcell
To verify that you have the correct stemcell, follow the procedure in Importing and Managing Stemcells.
Apply Changes from Your Configuration
Your installation is not complete until you apply your configuration changes. To apply the changes:
-
Return to the Ops Manager Installation Dashboard.
-
Click Review Pending Changes. For more information about this Ops Manager page, see Reviewing Pending Product Changes.
-
Click Apply Changes to complete the installation of Tanzu RabbitMQ for Tanzu Application Service.
Errands
When deploying or updating Tanzu RabbitMQ for Tanzu Application Service, Ops Manager can run a series of Post-Deploy Errands, detailed in the section below. An example is the Smoke Tests errand, which checks the health of the RabbitMQ cluster after a deployment or upgrade.
You can toggle errands on and off on the Review Pending Changes page.
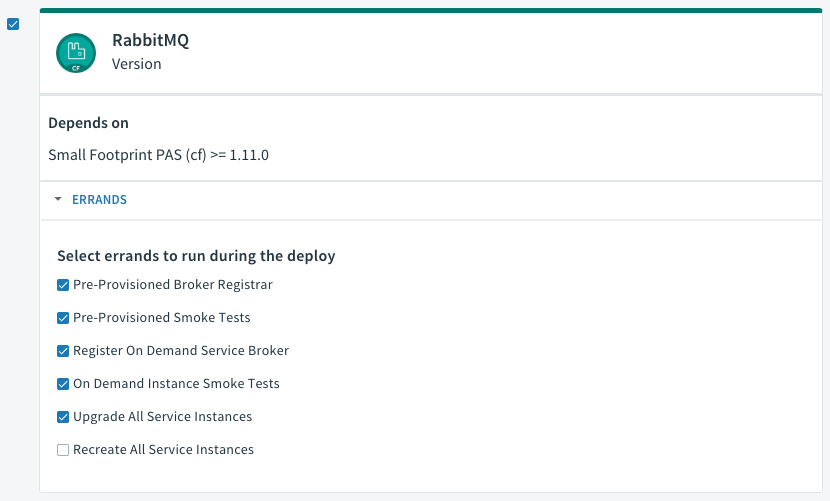
Caution In Tanzu RabbitMQ for Tanzu Application Service v1.9.0 and later, post-deploy errands are on by default except for the Recreate All Service Instances errand. VMware recommends keeping these defaults, because the smoke tests can encounter unexpected issues, and on-demand instances of Tanzu RabbitMQ for Tanzu Application Service might fall behind if the Upgrade All Service Instances errand is not on by default.
You can change these defaults by clicking Errands in the Tanzu RabbitMQ for Tanzu Application Service Settings tab as well as the defaults for pre-delete errands.
For more information, see Errand Run Rules.
Tanzu RabbitMQ for Tanzu Application Service errands are co-located with their brokers to decrease errand run time and VM footprint. In earlier releases, a new VM was deployed for each errand. For more information about errands, see Errands.
Post-deploy Errands
| Errand | Description |
|---|---|
| Pre-Provisioned Broker Registrar | Makes the pre-provisioned Tanzu RabbitMQ for Tanzu Application Service service plans available in the Marketplace |
| Pre-Provisioned Smoke Tests | Checks that a pre-provisioned Tanzu RabbitMQ for Tanzu Application Service service instance can be bound to a TAS for VMs app, and that the app can publish and subscribe to a RabbitMQ cluster. See Smoke Tests. |
| Register On Demand Service Broker | Makes the on-demand Tanzu RabbitMQ for Tanzu Application Service service plans available in the Marketplace. If you change the Service Plan Configuration, you must run this errand in order for the changes to be reflected in the Marketplace. |
| On Demand Instance Smoke Tests | Checks that on-demand Tanzu RabbitMQ for Tanzu Application Service service instances can be bound to a TAS for VMs app, and that the app can publish and subscribe to a RabbitMQ cluster. Smoke tests only run against Plan 1. See Smoke Tests. |
| Upgrade All Service Instances | On-Demand instances are updated and redeployed if there are changes to on-demand plan settings or the tile is upgraded. If this errand is set to Off, updates to on-demand plan settings are not applied to existing service instances. VMware recommends that this errand is configured to always run. |
| Recreate All Service Instances | This errand re-creates all on-demand instance VMs managed by the on-demand broker. It is useful for tasks that require re-creating a service instance VM, such as rotating the Ops Manager root certificate authority (CA) or fully restoring the platform during disaster recovery or migration. This errand is off by default and should be enabled only when you want to re-create a VM. |
Pre-delete Errands
| Errand | Description |
|---|---|
| Deregister and Purge Instances | Removes the pre-provisioned Tanzu RabbitMQ for Tanzu Application Service service from the Marketplace and deletes all associated service instances and bindings. For more information, see Turning Off the Pre-Provisioned Service. |
| Delete All Service Instances | Unbinds and deletes existing on-demand service instances. The duration of this errand depends on the number of deployed on-demand instances. |
| Deregister On-Demand Service Broker | Removes the on-demand Tanzu RabbitMQ for Tanzu Application Service service from the Marketplace |
Create an Admin User for a Service Instance
To give app developers admin privileges to the RabbitMQ Management UI, you can create an admin user for a service instance and share the user credentials with app developers.
Both operators and app developers can use this procedure.
Note If OAuth is enabled, you log in to the RabbitMQ Management UI using your TAS for VMs credentials. For more information, see Access RabbitMQ Management UI with OAuth Enabled.
To create an admin user on a Tanzu RabbitMQ for Tanzu Application Service service instance:
-
Run this command to create a service key:
cf create-service-key SERVICE-INSTANCE-NAME SERVICE-KEY -c '{"tags": "administrator"}'Where:
SERVICE-INSTANCE-NAMEis the name you supplied when you rancf create-service.SERVICE-KEYis a name you choose to identify the service key.
For example:
$ cf create-service-key my-instance my-admin-key -c '{"tags":"administrator"}'

Creating service key my-admin-key for service instance my-instance as user@example.com...

OK -
Run this command to get the admin user credentials:
cf service-key SERVICE-INSTANCE-NAME SERVICE-KEYWhere the variables are the same as above.
This returns a Dashboard URL containing the admin credentials, which can be used to access the RabbitMQ Management UI. For example:
$ cf service-key my-instance my-admin-key

Getting key my-admin-key for service instance my-instance as user@example.com...

{

  "dashboard_url": "https://my-instance.bosh-lite.com",

  "username": "admin-username",

  "password": "admin-password",

  ...

}
Creating Users with Other Privilege Levels
Create an Admin User for a Service Instance demonstrates how to create a user with the administrator privilege tag. You can follow the same process to create users with any tags supported by RabbitMQ. For a full list of supported tags, see the RabbitMQ documentation.
You can enable any supported tag for the user by providing it as a comma-separated list.
-
To create a monitoring-only user, run:
cf create-service-key INSTANCE-NAME MONITORING-KEY -c '{"tags":"monitoring"}'For example:
$ cf create-service-key my-instance my-monitoring-key -c '{"tags":"monitoring"}'

Creating service key my-monitoring-key for service instance my-instance as user@example.com...

OK -
To create a user with both policymaker and monitoring permissions, run:
cf create-service-key INSTANCE-NAME DEFAULT-KEY -c '{"tags":"policymaker,monitoring"}'For example:
$ cf create-service-key my-instance my-default-key -c '{"tags":"policymaker,monitoring"}'

Creating service key my-default-key for service instance my-instance as user@example.com...

OK
If no tags are specified, the default tags applied are management,policymaker.
RabbitMQ Server Plug-Ins
Tanzu RabbitMQ for Tanzu Application Service supports a subset of available RabbitMQ plug-ins. See the sections below for which plug-ins are supported, and whether they are activated or deactivated by default.
Enabled RabbitMQ Server Plug-Ins
The following plug-ins are activated by default, you cannot deactivate them:
| Plug-In | For more information, see… |
|---|---|
rabbitmq_management |
Management Plug-In in the RabbitMQ documentation. |
rabbitmq_federation |
Federate Exchanges and Queues. |
rabbitmq_federation_management |
n/a |
rabbitmq_shovel |
Shovel Exchanges and Queues. |
rabbitmq_shovel_management |
n/a |
rabbitmq_sharding |
rabbitmq sharding in GitHub. |
rabbitmq_consistent_hash_exchange |
rabbitmq consistent hash exchange in GitHub. |
rabbitmq_prometheus |
rabbitmq prometheus in GitHub. |
(Optional) Enable Extra RabbitMQ Server Plug-Ins
The following plug-ins are deactivated by default:
| Plug-in | For more information, see… |
|---|---|
rabbitmq_amqp1_0 |
AMQP 1.0 Plug-in in GitHub. |
rabbitmq_auth_backend_cache |
Auth Backend Cache Plug-in in GitHub. |
rabbitmq_auth_backend_http |
Auth Backend HTTP Plug-in in GitHub. |
rabbitmq_auth_backend_ldap |
LDAP Plug-in in the RabbitMQ documentation. |
rabbitmq_auth_mechanism_ssl |
Auth Mechanism SSL Plug-in in GitHub. |
rabbitmq_event_exchange |
Event Exchange Plug-in in the RabbitMQ documentation. |
rabbitmq_jms_topic_exchange |
JMS Topic Exchange Plug-in in the RabbitMQ documentation. |
rabbitmq_mqtt |
MQTT Plug-in in the RabbitMQ documentation. |
rabbitmq_stomp |
STOMP Plug-in in the RabbitMQ documentation. |
rabbitmq_stream |
Stream Plug-in in the RabbitMQ documentation. |
rabbitmq_tracing |
Tracing Plug-in in GitHub. |
rabbitmq_trust_store |
Trust Store Plug-In in GitHub. |
rabbitmq_web_mqtt |
Web MQTT Plug-in in the RabbitMQ documentation. |
rabbitmq_web_mqtt_examples |
Web MQTT Examples Plug-In in GitHub. |
rabbitmq_web_stomp |
Web STOMP Plug-in in the RabbitMQ documentation. |
rabbitmq_web_stomp_examples |
Web STOMP Examples Plug-In in GitHub. |
To activate plug-ins:
-
Navigate to Ops Manager Installation Dashboard > RabbitMQ > Settings > Global Settings for On-Demand Plans.
-
Select the plug-ins you want to activate under RabbitMQ plug-ins that can be enabled by App Developers.
After plug-ins are activated for the platform, developers can activate them for each service instance. For more information, see Enable Optional Plug-ins.
