


You must upgrade the management domain before upgrading VI workload domains in your environment. In order to upgrade to VMware Cloud Foundation 5.0, the management domain must be at VMware Cloud Foundation 4.3.x or higher. If your environment is at a version lower than 4.3.x, you must upgrade the management domain to 4.3.x or later and then upgrade to 5.0.
VMware Cloud Foundation deployments that include NSX Federation require additional manual upgrade steps, see KB article 92516 for further details.
Upgrade the components in the management domain in the following order:
SDDC Manager and VMware Cloud Foundation services.
VMware Cloud Foundation config drift.
vRealize Suite Lifecycle Manager, vRealize Suite products, and Workspace ONE Access.
NSX.
vCenter Server.
- If you have stretched clusters in your environment, upgrade the vSAN witness host. See Upgrade vSAN Witness Host for VMware Cloud Foundation.
VxRail Manager and ESXi.
After all upgrades have completed successfully:
Remove the VM snapshots you took before starting the update.
Take a backup of the newly installed components.
VMware Cloud Foundation Upgrade Prerequisites
Before you upgrade VMware Cloud Foundation, make sure that the following prerequisites are met.
Prerequisite |
Additional Information |
|---|---|
Allocate a temporary IP address for each vCenter Server upgrade |
Required for each vCenter Server upgrade. Must be allocated from the management subnet. The same IP can be reused. |
Obtain updated licenses |
New licenses required for: vSAN 8.x vSphere 8 |
Verify there are no expired or expiring passwords |
Review the password management dashboard in SDDC Manager |
Verify there are no expired or expiring certificates |
Review the certificates tab for each workload domain |
Verify ESXi host TPM module states |
[Conditional] If ESXi hosts have TPM modules in use, verify they are running the latest 2.0 firmware. If not in use they must be disabled in the BIOS |
Verify ESXi hardware is compatible with target version |
See ESXi Requirements and VMware Compatibility Guide at http://www.vmware.com/resources/compatibility/search.php. |
Manually update the vSAN HCL database to ensure that it is up-to-date. |
See KB 2145116 |
Backup SDDC Manager, all vCenter Servers, and NSX Managers. |
Take File based backups or image-level backups of SDDC Manager, all vCenter Servers, and NSX Managers. Take a Cold Snapshot of SDDC Manager. |
Make sure that there are no failed workflows in your system and none of the VMware Cloud Foundation resources are in activating or error state. |
Caution:
If any of these conditions are true, contact VMware Support before starting the upgrade. |
Review the Release Notes for known issues related to upgrades. |
|
Deactivate all 4.x async patches and run an inventory sync before upgrading to VMware Cloud Foundation 5.0 |
VMware Cloud Foundation 5.0 and later no longer require using the Async Patch Tool to enable upgrades from an async-patched VMware Cloud Foundation instance. See VCF Async Patch Tool Options for more information |
Run the NSX Upgrade Evaluation Tool before starting the upgrade process. |
The tool is designed to ensure success by checking the health and readiness of your NSX Manager prior to upgrading. |
Review Operational Impacts of NSX Upgrade in NSX Upgrade Guide to understand the impact that each component upgrade might have on your environment. |
|
Ensure there are no active alarms on hosts or vSphere clusters using the vSphere Client. |
Precheck Update - Versions Prior to SDDC Manager 5.0
If you have not yet upgraded to SDDC Manager 5.0, these are the steps to run a Precheck. You must perform a precheck before applying an update or upgrade bundle to ensure that your environment is ready for the update.
Procedure
- On the domain summary page, click the Updates/Patches tab. The image below is a sample screenshot and may not reflect the correct product versions.

- Click Precheck to validate that the environment is ready to be upgraded.
Once the precheck begins, a message appears indicating the time at which the precheck was started.

- Click View Status to see detailed tasks and their status. The image below is a sample screenshot and may not reflect the correct versions.

Results
The precheck result is displayed at the top of the Upgrade Precheck Details window. If you click Exit Details, the precheck result is displayed at the top of the Precheck section in the Updates/Patches tab.
Ensure that the precheck results are green before proceeding. A failed precheck may cause the update to fail.
Perform Update Precheck in SDDC Manager 5.0
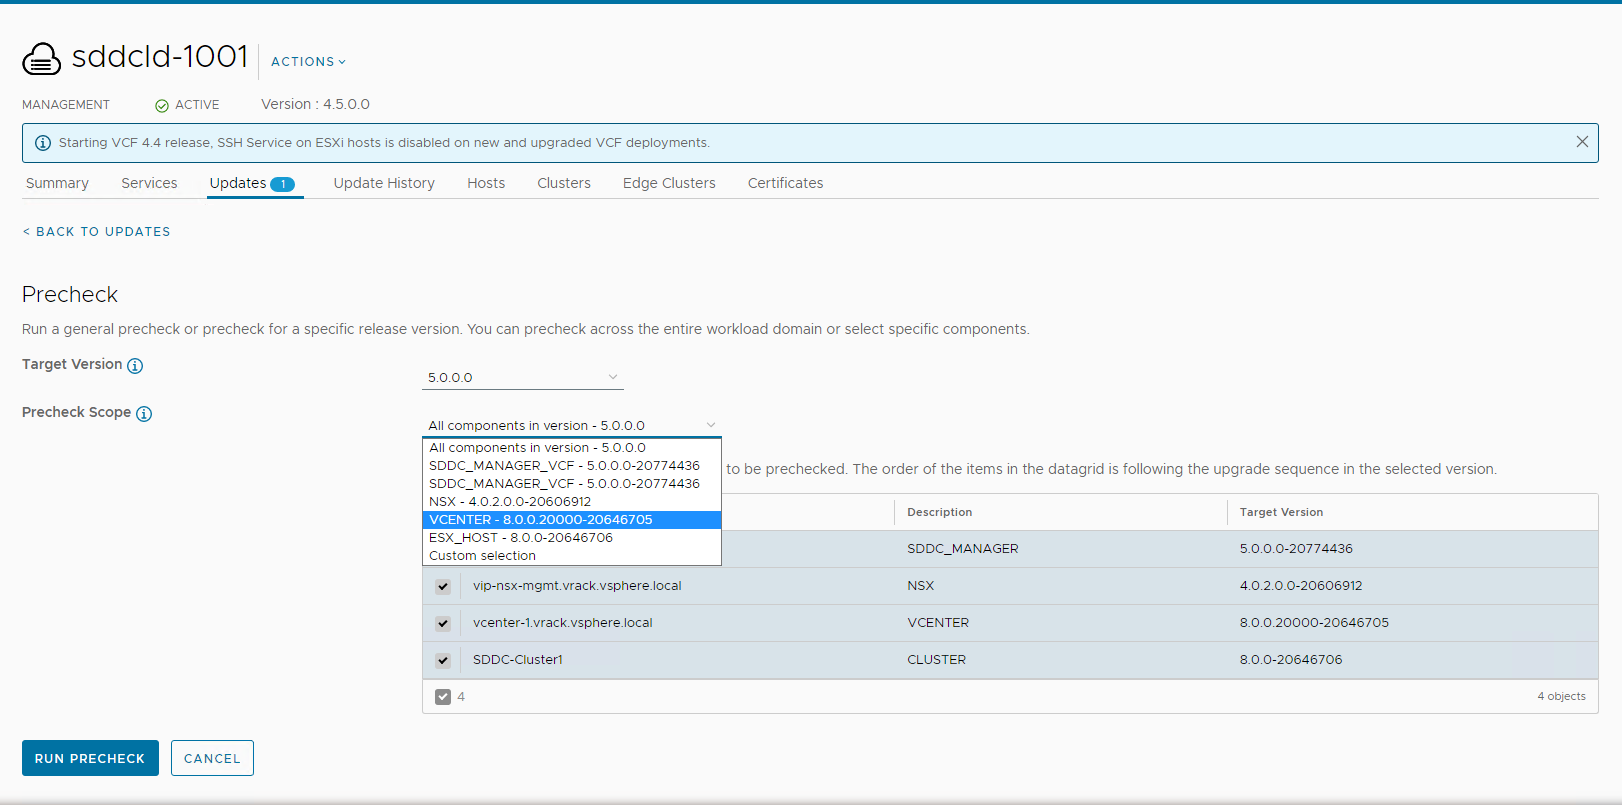
You must perform a precheck in SDDC Manager 5.0 before applying an update bundle to ensure that your environment is ready for the update.
Bundle-level pre-checks for vCenter are available in VMware Cloud Foundation 5.0.
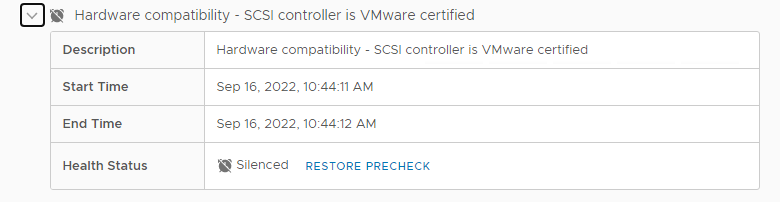
If you silence a vSAN Skyline Health alert in the vSphere Client, SDDC Manager skips the related precheck and indicates which precheck it skipped. Click RESTORE PRECHECK to include the silenced precheck. For example: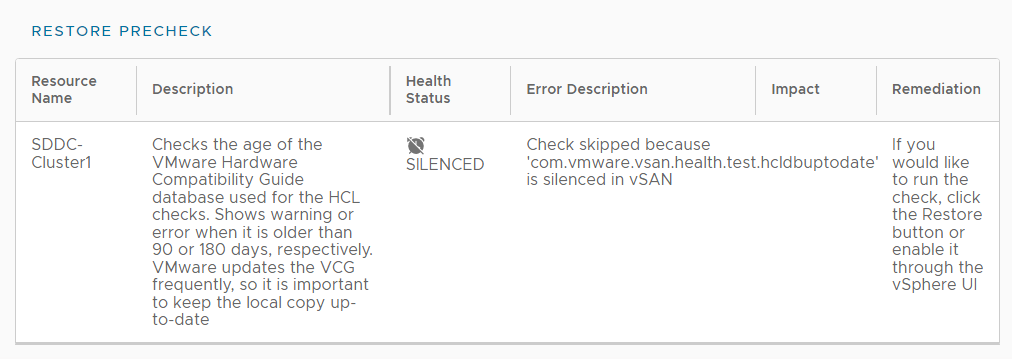
You can also silence failed vSAN prechecks in the SDDC Manager UI by clicking Silence Precheck. Silenced prechecks do not trigger warnings or block upgrades.
Only silence alerts if you know that they are incorrect. Do not silence alerts for real issues that require remediation.
Procedure
- On the domain summary page, click the Updates tab.
(The following image is a sample screenshot and may not reflect current product versions.)
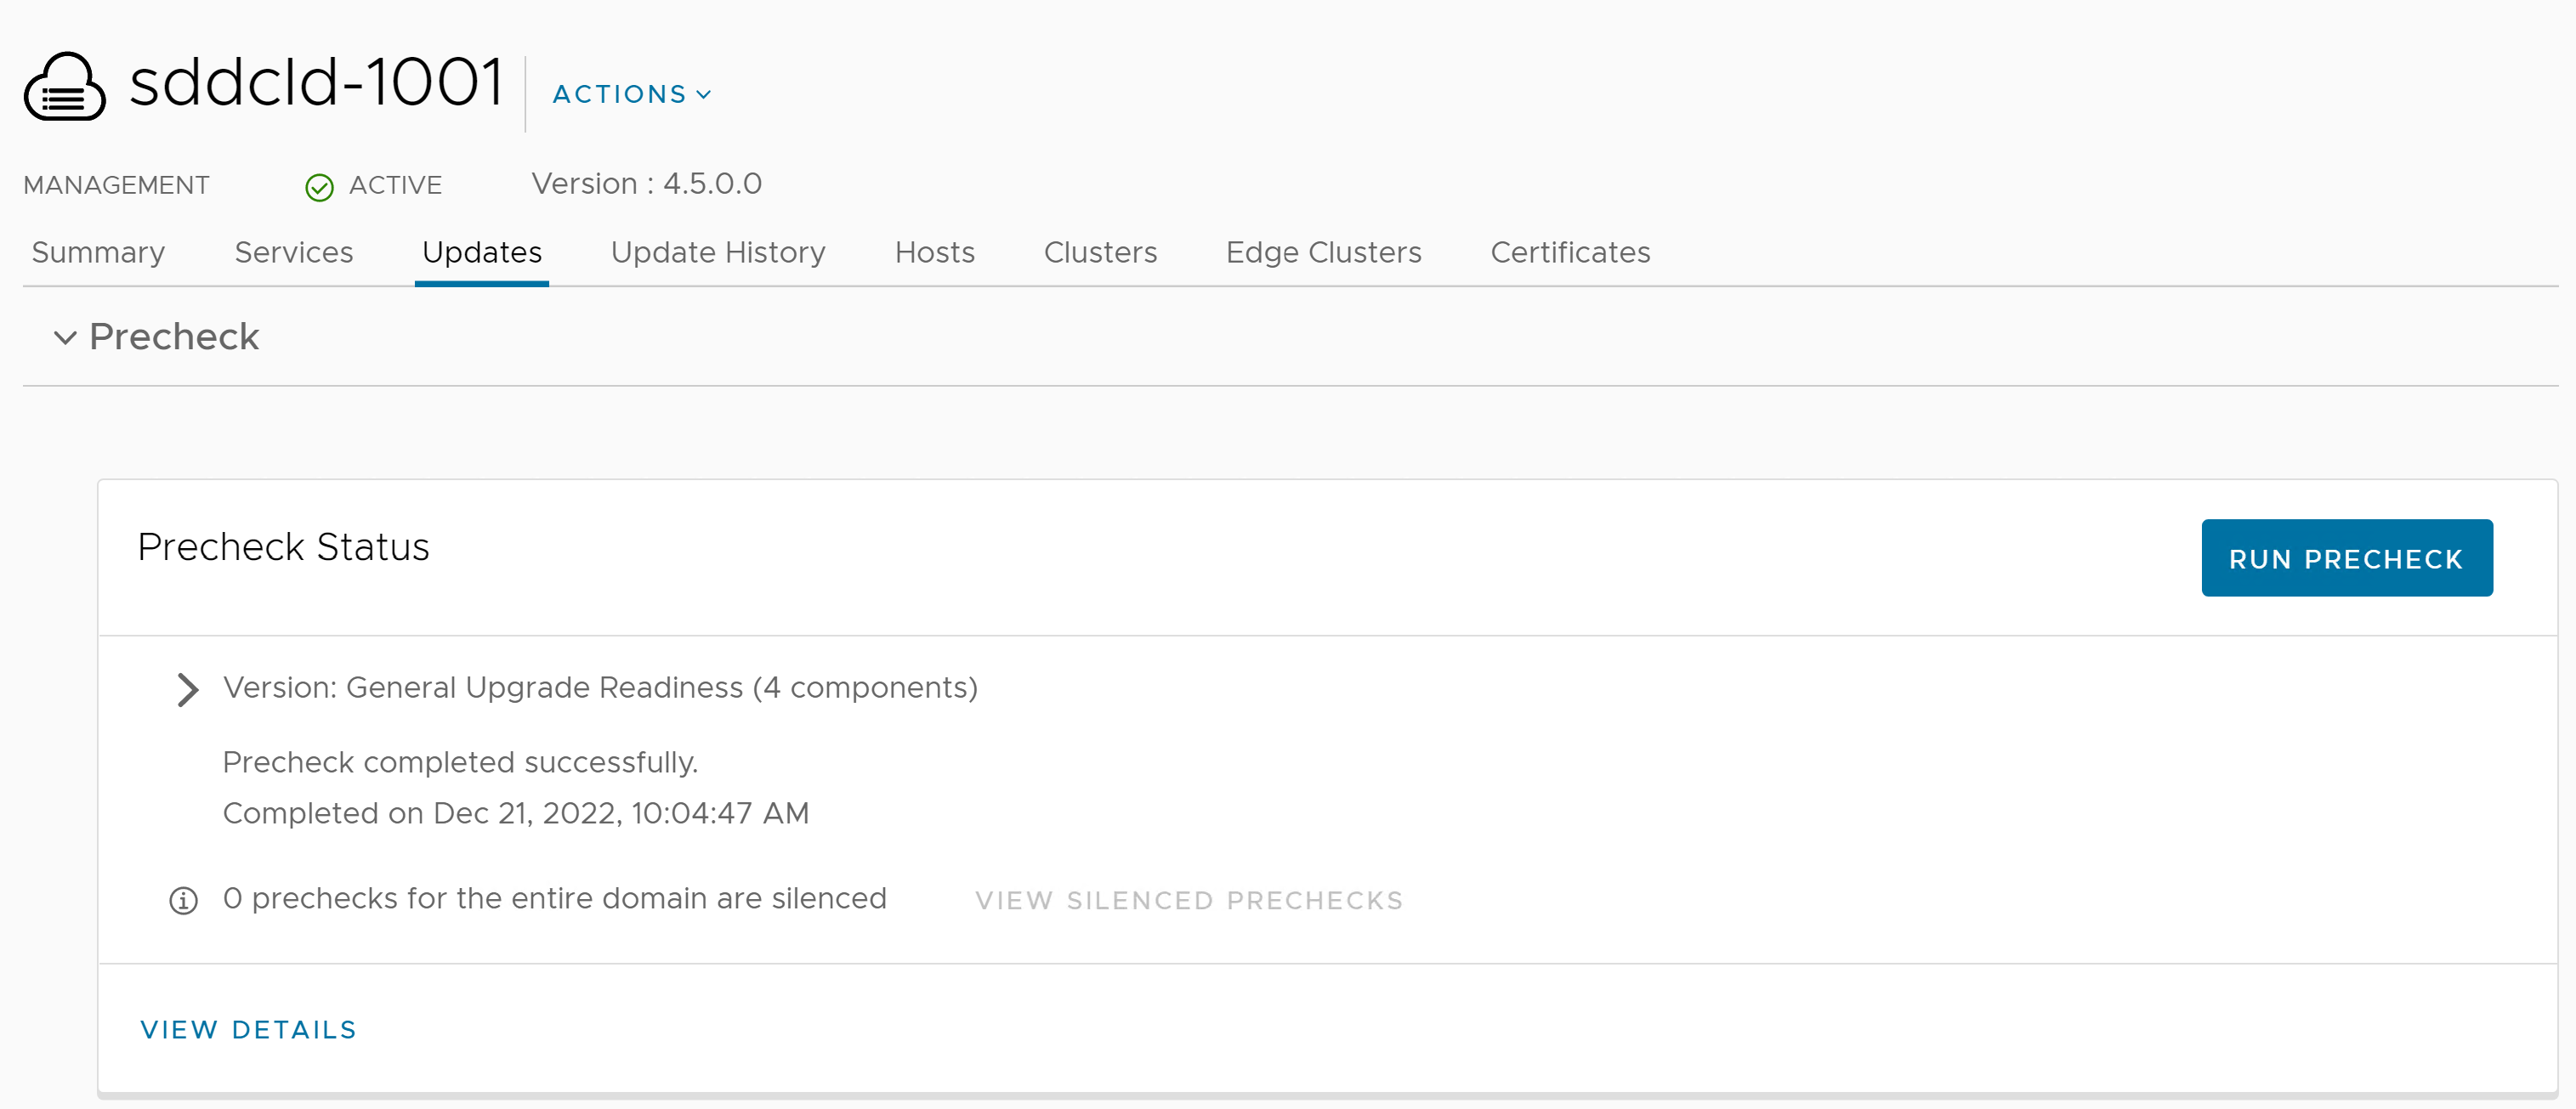
Note:It is recommended that you Precheck your workload domain prior to performing an upgrade.
- Click RUN PRECHECK to select the components in the workload domain you want to precheck.
- You can select to run a Precheck only on vCenter or the vSphere cluster. All components in the workload domain are selected by default. To perform a pre-check on certain components, choose custom selection.
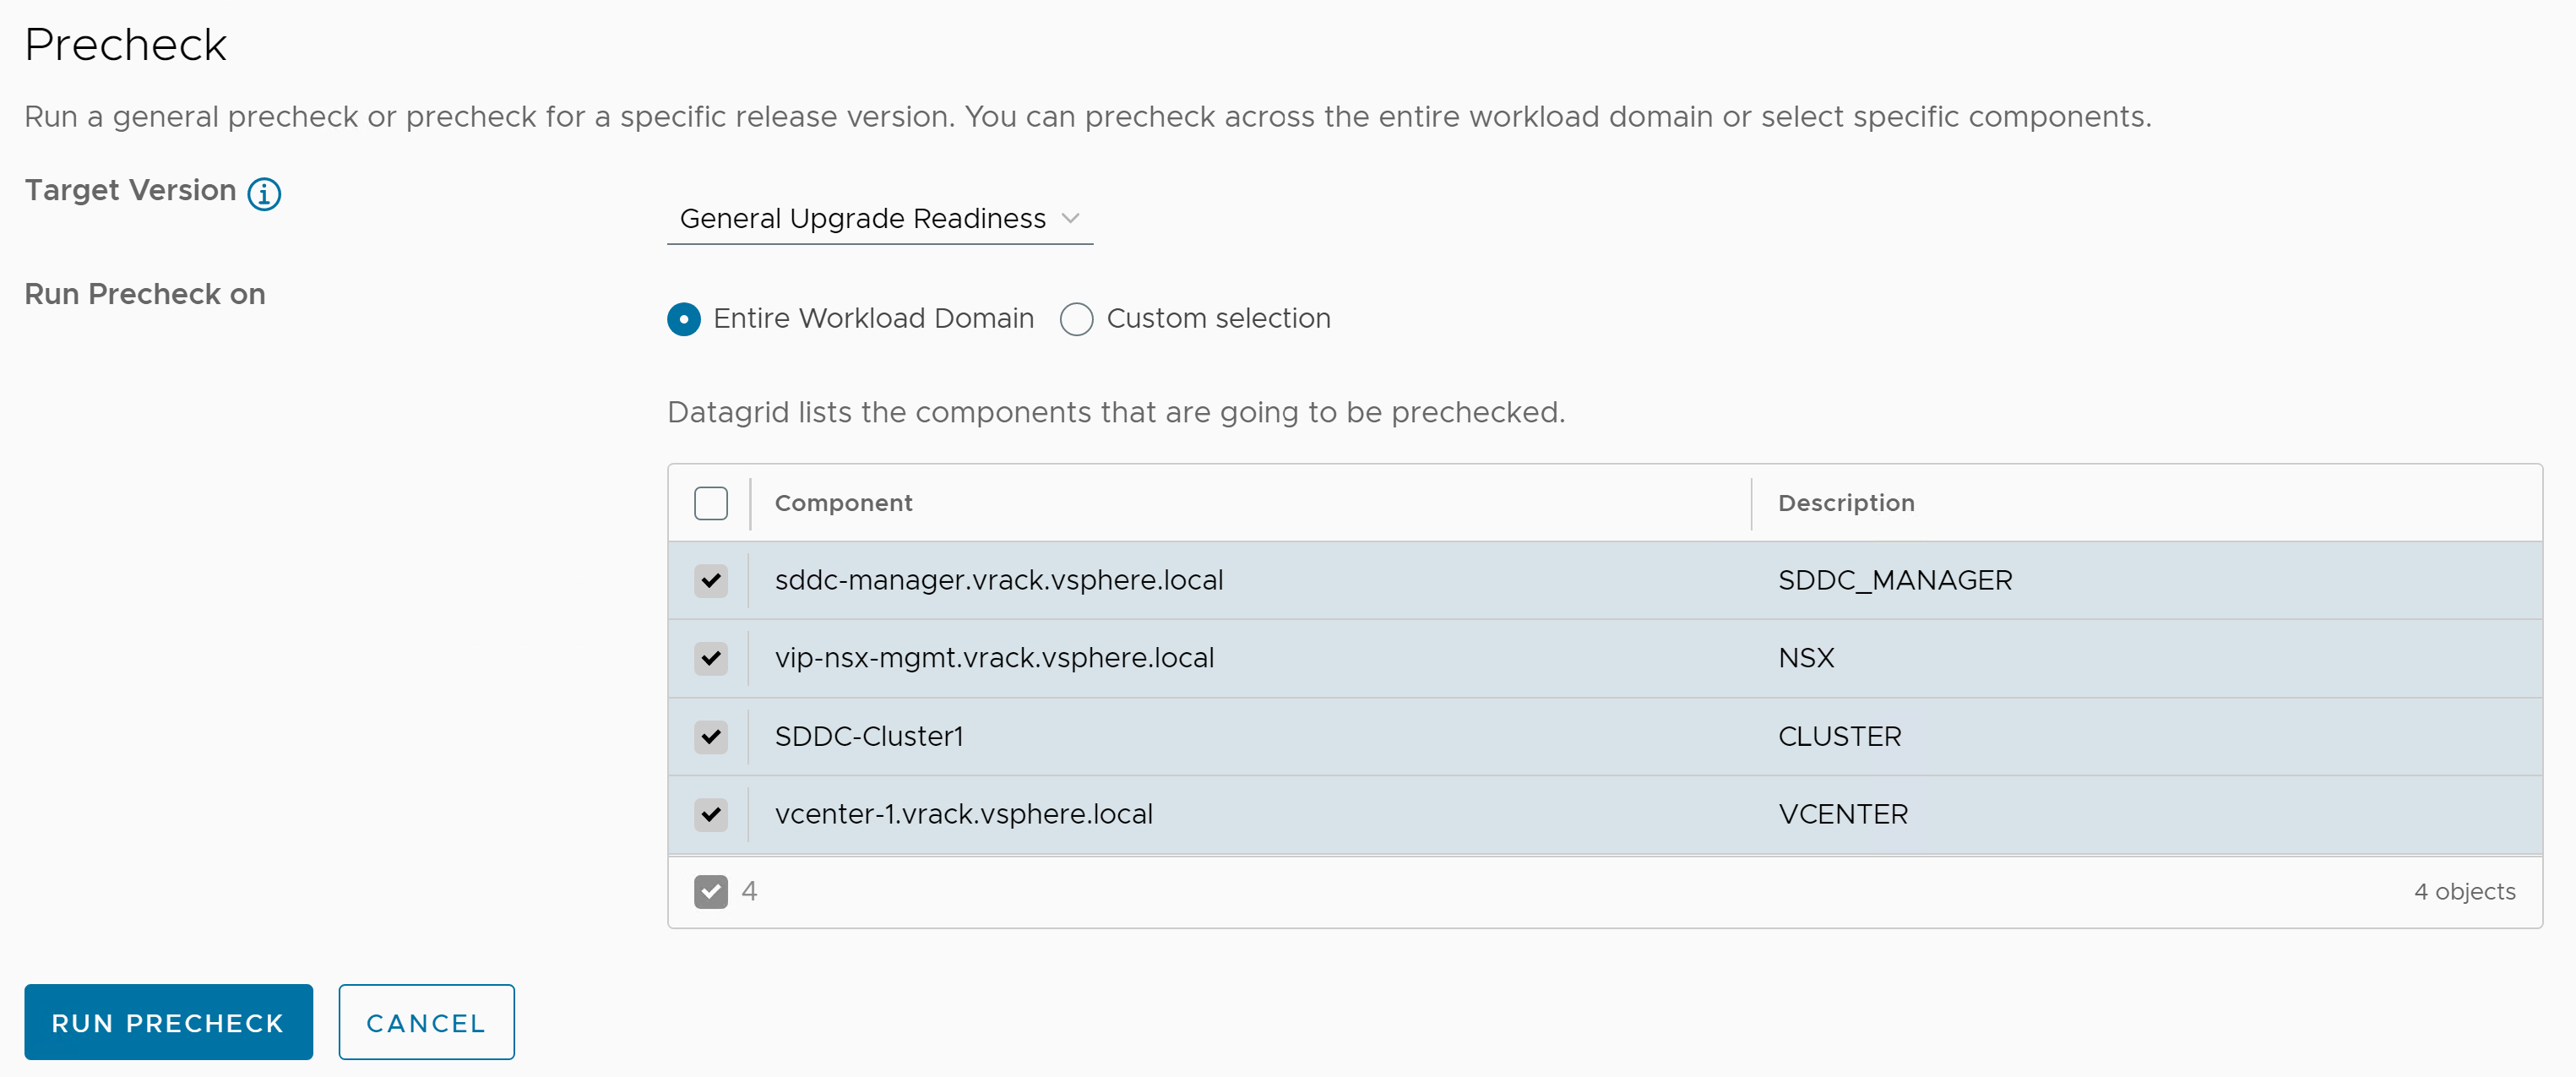
Note: For VMware Cloud Foundation on Dell EMC VxRail,, you can run prechecks on VxRail Manager. - If there are pending upgrade bundles available, then the "Target Version" dropdown contains "General Upgrade Readiness" and the available VMware Cloud Foundation versions to upgrade to. If there is an available VMware Cloud Foundation upgrade version, there will be extra checks - bundle-level prechecks for hosts, vCenter Server, and so forth. The version specific prechecks will only run prechecks on components that have available upgrade bundles downloaded.
- You can select to run a Precheck only on vCenter or the vSphere cluster. All components in the workload domain are selected by default. To perform a pre-check on certain components, choose custom selection.
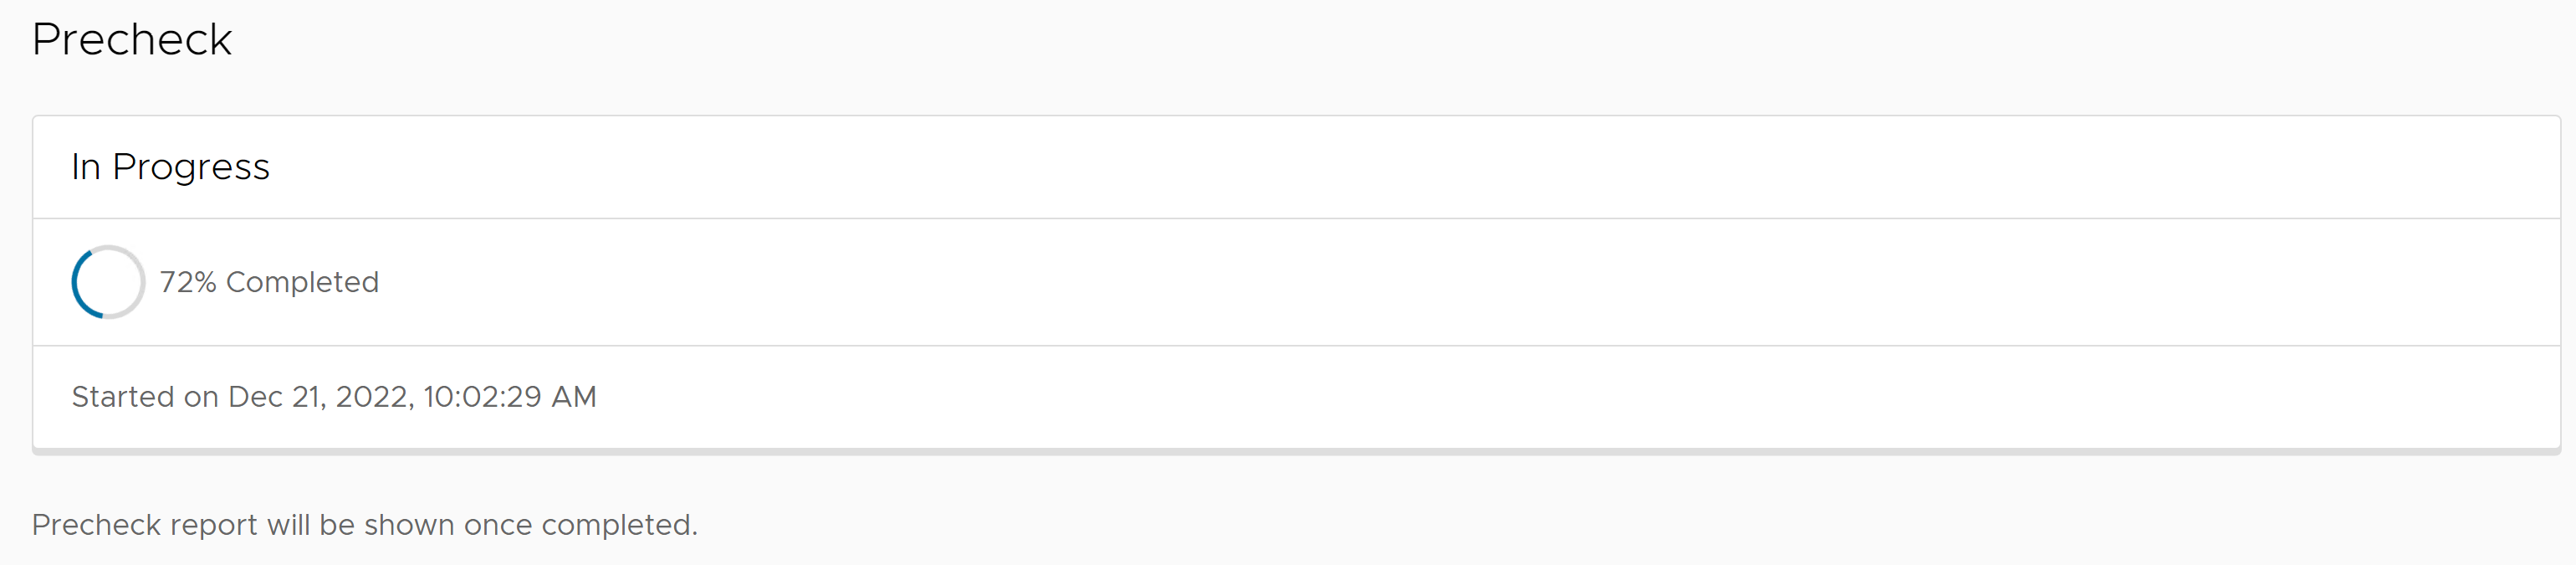
- When the precheck begins, a progress message appears indicating the precheck progress and the time when the precheck began.
- Once the Precheck is complete, the report appears. Click through ALL, ERRORS, WARNINGS, and SILENCED to filter and browse through the results.
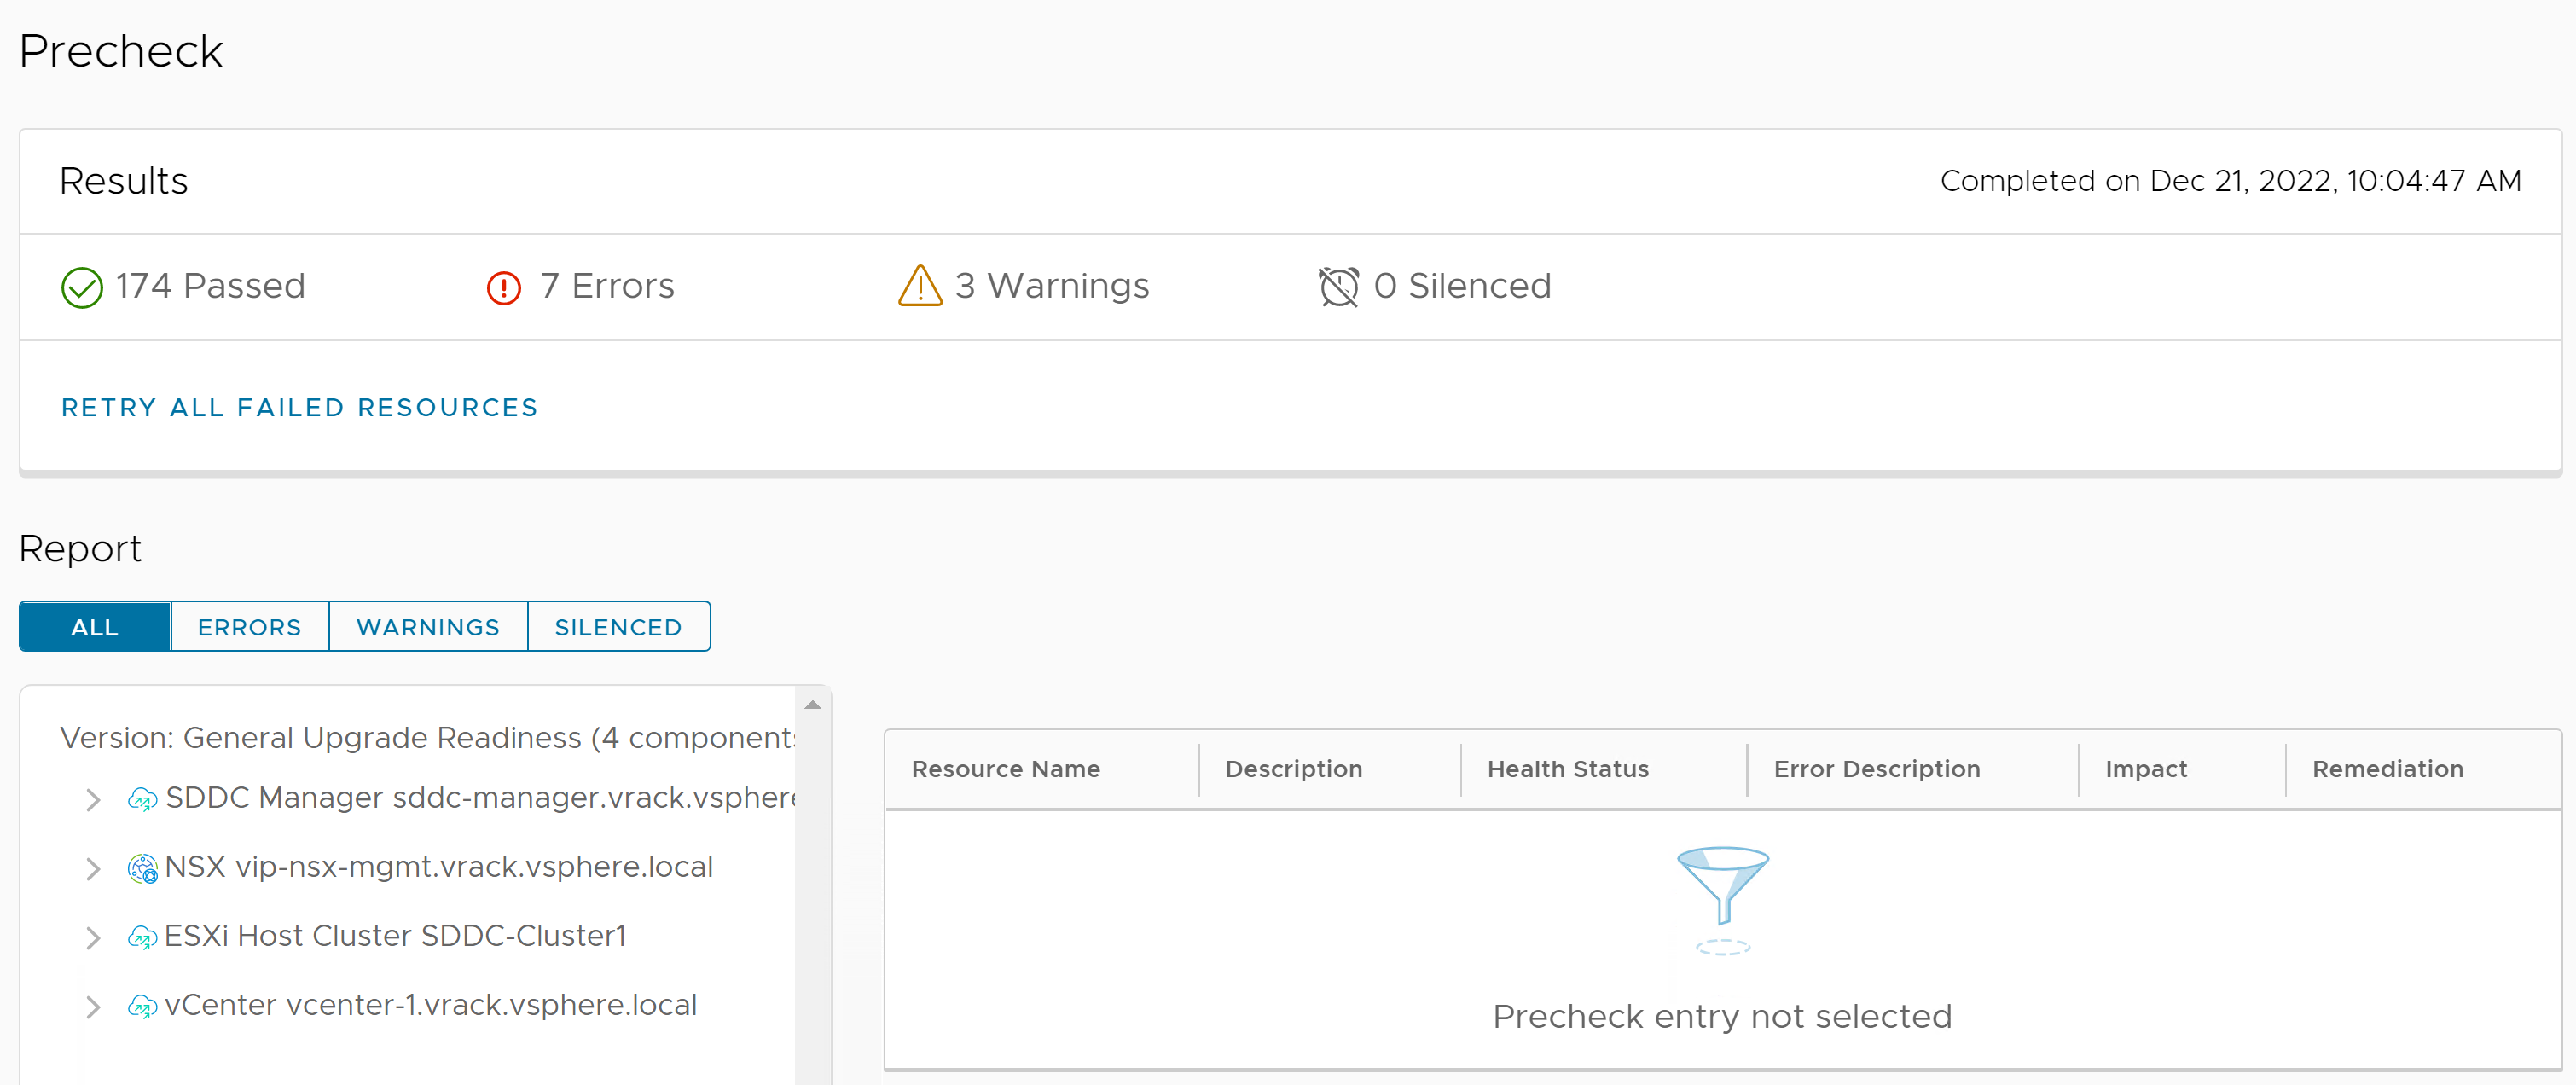
Results
The precheck result is displayed at the top of the Upgrade Precheck Details window. If you click Exit Details, the precheck result is displayed at the top of the Precheck section in the Updates tab.
Ensure that the precheck results are green before proceeding. Although a failed precheck will not prevent the upgrade from proceeding, it may cause the update to fail.
Apply the VMware Cloud Foundation Upgrade Bundle
The VMware Cloud Foundation Upgrade bundle upgrades the SDDC Manager appliance and VMware Cloud Foundation services.
Prerequisites
- Download the VMware Cloud Foundation update bundle for your target release. See Downloading VMware Cloud Foundation Upgrade Bundles.
- Ensure you have a recent successful backup of SDDC Manager using an external SFTP server.
- Ensure you have taken a snapshot of the SDDC Manager appliance.
- Ensure you have recent successful backups of the components managed by SDDC Manager.
- Perform Update Precheck in SDDC Manager 5.0 and resolve any issues.
Procedure
- If you selected Schedule Update, select the date and time for the bundle to be applied and click Schedule.

If you clicked Update Now, the VMware Cloud Foundation Update Status window displays the components that will be upgraded and the upgrade status. Click View Update Activity to view the detailed tasks. After the upgrade is completed, a green bar with a check mark is displayed.
Apply the VMware Cloud Foundation Configuration Drift Bundle
The configuration drift bundle applies configuration changes required for 2nd party software components in the VMware Cloud Foundation Bill of Materials for the target release. Configuration changes are applied to the management domain and may also affect VI workload domains in your environment. However, there is no downtime on VI workload domains and they need not be in a maintenance window.
Prerequisites
- Download the configuration drift bundle for your target release. See Downloading VMware Cloud Foundation Upgrade Bundles.
- Ensure that you have a recent successful backup of SDDC Manager using an external SFTP server.
- Ensure all hosts, cluster and workload domains are in a healthy state. See KB article 91954 for any failed/error/deactivating state of hosts, cluster, and domains.
- Ensure that you have taken a snapshot of the SDDC Manager appliance.
- Ensure that you have recent successful backups of the components managed by SDDC Manager.
- If there are disconnected/not-responding hosts in the respective domain, the configuration drift process fails and displays a final status of "COMPLETE_WITH_FAILURE." See KB article 91624 for more information.
- An SSH authentication error may occur when the SSH service is not running on ESXi hosts, leading to a refusal of the SSH connection and causing the config drift upgrade to fail. See KB article 86240 for more information.
Procedure
Apply VMware Cloud Foundation Configuration Updates
VMware Cloud Foundation Configuration Updates identifies and resolves any discrepancies between the intended/prescribed configuration and the actual configuration, ensuring that the deployment aligns with the recommended configuration for the VCF 5.0 release and above. This process includes reconciling the configuration for 2nd party software components listed in the VMware Cloud Foundation Bill of Materials (BOM).
As the upgrades for 2nd party components complete for the domain, additional Configuration Updates may become available. You have the option to apply the relevant drifts as they become available or apply them collectively at the end of the upgrade process for all 2nd party software components.
Configuration Updates can be applied to multiple domains in parallel. However, if a Configuration Update is in progress, another configuration update on the same domain should not be attempted.
Procedure
- Expand Available Configuration Updates, click APPLY ALL.

Configuration updates may be required after you apply software updates. Once a configuration update becomes available, you can apply it immediately or wait until after you have applied all software updates.
APPLY ALL applies all applicable drifts available at that time. However, more drifts may become applicable later, and a red dot notification is displayed on the Updates tab to indicate availability of new configuration updates.

- Check the progress of the configuration update by clicking the task in the Tasks panel.

- After the configuration updates are successfully applied, it will no longer appear in the table.

Pending Configuration Updates will not block future BOM upgrades.
Upgrade vRealize Suite Lifecycle Manager for VMware Cloud Foundation
The process for upgrading vRealize Suite Lifecycle Manager depends on your current version of VMware Cloud Foundation and vRealize Suite Lifecycle Manager.
If you have an earlier version of vRealize Suite Lifecycle Manager, use the process below to upgrade to vRealize Suite Lifecycle Manager 8.6.2 and then use the vRealize Suite Lifecycle Manager UI to upgrade to later supported versions.
Prerequisites
- Ensure that you have a recent successful backup of the vRealize Suite Lifecycle Manager appliance.
- Download the VMware Software Update bundle(s) for vRealize Suite Lifecycle Manager. See Downloading VMware Cloud Foundation Upgrade Bundles.
Note: You may have to download and apply multiple bundles, depending on the current product versions in your environment. If your environment is using VMware Cloud Foundation 4.4 or later and vRealize Suite Lifecycle Manager 8.6.2 and later, you do not need to download any bundles, since all upgrades are performed from the vRealize Suite Lifecycle Manager UI.
- If FIPS Mode Compliance is enabled in vRealize Suite Lifecycle Manager, you must manually turn it off on the vRealize Suite Lifecycle Manager UI. See Enable or Disable FIPS Mode Compliance in vRealize Suite Lifecycle Manager. You can re-enable FIPS Mode Compliance after the upgrade.
Procedure
Upgrade vRealize Suite Products for VMware Cloud Foundation
If you had vRealize Log Insight, vRealize Automation, vRealize Operations, or Workspace ONE Access in your pre-upgrade environment, you must upgrade them from vRealize Suite Lifecycle Manager.
- Download upgrade binaries
- Create snapshots of the virtual appliances
- Run pre-upgrade checks
- Upgrade vRealize Suite products
Prerequisites
Upgrade to vRealize Suite Lifecycle Manager 8.6.2 or later.
Procedure
Upgrade NSX from 3.1.3
Additional Information for Upgrading NSX from 3.1.3
The following additional information is applicable to the following upgrade.
[Conditional] If source NSX version is 3.1.3
Upgrade NSX to 3.2.1.2.0 using SDDC Manager
[Conditional] If NSX Federation is present, upgrade the NSX Local Manager in both VMware Cloud Foundation instances before proceeding with global Manager instances
Upgrade NSX for VMware Cloud Foundation
Upgrade NSX in the management domain before you upgrade VI workload domains.
Upgrading NSX involves the following components:
Upgrade Coordinator
NSX Edges/Clusters (if deployed)
Host clusters
NSX Manager cluster
Procedure
Results
When all NSX workload components are upgraded successfully, a message with a green background and check mark is displayed.
Upgrade NSX Global Managers from 3.1.3
When NSX Federation is configured between two VMware Cloud Foundation instances, SDDC Manager does not manage the lifecycle of the NSX Global Managers. To upgrade the NSX Global Managers, you must first follow the standard lifecycle of each VMware Cloud Foundation instance using SDDC Manager, and then manually upgrade the NSX Global Managers for each instance.
Prerequisites
VMware Cloud Foundation deployments that include NSX Federation require additional manual upgrade steps, see KB article 92516 for further details.
Download the interim and final version of NSX from VMware Customer Connect.
Additional Information for Upgrading NSX Global Managers from 3.1.3
The following additional information is applicable to the following upgrade.
[Conditional] If source NSX version is 3.1.3
[Conditional] If NSX Federation is present
Upgrade NSX Global Managers to 3.2.1.2.0 using the Global Manager UI
Upgrade standby global manager, followed by active global manager
Download NSX Global Manager Upgrade Bundle
SDDC Manager does not manage the lifecycle of the NSX Global Managers. You must download the NSX upgrade bundle manually to upgrade the NSX Global Managers.
Procedure
Upgrade the Upgrade Coordinator for NSX Federation
The upgrade coordinator runs in the NSX Manager. It is a self-contained web application that orchestrates the upgrade process of hosts, NSX Edge cluster, NSX Controller cluster, and the management plane.
The upgrade coordinator guides you through the upgrade sequence. You can track the upgrade process and, if necessary, you can pause and resume the upgrade process from the UI.
Procedure
Upgrade NSX Global Managers for VMware Cloud Foundation
Manually upgrade the NSX Global Managers when NSX Federation is configured between two VMware Cloud Foundation instances.
Prerequisites
Procedure
Upgrade NSX Global Managers from 3.2.1.2.0
When NSX Federation is configured between two VMware Cloud Foundation instances, SDDC Manager does not manage the lifecycle of the NSX Global Managers. To upgrade the NSX Global Managers, you must first follow the standard lifecycle of each VMware Cloud Foundation instance using SDDC Manager, and then manually upgrade the NSX Global Managers for each instance.
Prerequisites
VMware Cloud Foundation deployments that include NSX Federation require additional manual upgrade steps, see KB article 92516 for further details.
Download the interim and final version of NSX from VMware Customer Connect.
Additional Information for Upgrading NSX Global Managers from 3.2.1.2.0
The following additional information is applicable to the following upgrade.
[Conditional] If source NSX version is 3.2.1.2.0
[Conditional] If NSX Federation is present
Upgrade NSX Global Managers to 4.0.1.1 using the Global Manager UI
Upgrade standby global manager, followed by active global manager
Upgrading global managers to this interim build is required to maintain N±1 between local and global managers
Download NSX Global Manager Upgrade Bundle
SDDC Manager does not manage the lifecycle of the NSX Global Managers. You must download the NSX upgrade bundle manually to upgrade the NSX Global Managers.
Procedure
Upgrade the Upgrade Coordinator for NSX Federation
The upgrade coordinator runs in the NSX Manager. It is a self-contained web application that orchestrates the upgrade process of hosts, NSX Edge cluster, NSX Controller cluster, and the management plane.
The upgrade coordinator guides you through the upgrade sequence. You can track the upgrade process and, if necessary, you can pause and resume the upgrade process from the UI.
Procedure
Upgrade NSX Global Managers for VMware Cloud Foundation
Manually upgrade the NSX Global Managers when NSX Federation is configured between two VMware Cloud Foundation instances.
Prerequisites
Procedure
Upgrade NSX from 3.2.1.2.0
Additional Information for Upgrading NSX from 3.2.1.2.0
The following additional information is applicable to the following upgrade.
[Conditional] If source NSX version is 3.2.1.2.0
Upgrade NSX to 4.1.0.2.0 using SDDC Manager
[Conditional] If NSX Federation is present, upgrade the NSX Local Manager in both VMware Cloud Foundation instances before proceeding
Upgrade NSX for VMware Cloud Foundation
Upgrade NSX in the management domain before you upgrade VI workload domains.
Upgrading NSX involves the following components:
Upgrade Coordinator
NSX Edges/Clusters (if deployed)
Host clusters
NSX Manager cluster
Procedure
Results
When all NSX workload components are upgraded successfully, a message with a green background and check mark is displayed.
Upgrade NSX Global Managers from 4.0.1.1
When NSX Federation is configured between two VMware Cloud Foundation instances, SDDC Manager does not manage the lifecycle of the NSX Global Managers. To upgrade the NSX Global Managers, you must first follow the standard lifecycle of each VMware Cloud Foundation instance using SDDC Manager, and then manually upgrade the NSX Global Managers for each instance.
Prerequisites
VMware Cloud Foundation deployments that include NSX Federation require additional manual upgrade steps, see KB article 92516 for further details.
Download the interim and final version of NSX from VMware Customer Connect.
Additional Information for Upgrading NSX from 4.0.1.1
The following additional information is applicable to the following upgrade.
[Conditional] If source NSX version is 4.0.1.1
[Conditional] If NSX Federation is present
Upgrade NSX Global Managers to 4.1.0.2.0 using the Global Manager UI
Upgrade standby global manager, followed by active global manager
Download NSX Global Manager Upgrade Bundle
SDDC Manager does not manage the lifecycle of the NSX Global Managers. You must download the NSX upgrade bundle manually to upgrade the NSX Global Managers.
Procedure
Upgrade the Upgrade Coordinator for NSX Federation
The upgrade coordinator runs in the NSX Manager. It is a self-contained web application that orchestrates the upgrade process of hosts, NSX Edge cluster, NSX Controller cluster, and the management plane.
The upgrade coordinator guides you through the upgrade sequence. You can track the upgrade process and, if necessary, you can pause and resume the upgrade process from the UI.
Procedure
Upgrade NSX Global Managers for VMware Cloud Foundation
Manually upgrade the NSX Global Managers when NSX Federation is configured between two VMware Cloud Foundation instances.
Prerequisites
Procedure
Upgrade vCenter Server for VMware Cloud Foundation
The upgrade bundle for VMware vCenter Server is used to upgrade the vCenter Servers managed by SDDC Manager. Upgrade vCenter Server in the management domain before upgrading vCenter Server in VI workload domains.
Prerequisites
Download the VMware vCenter Server upgrade bundle. See Downloading VMware Cloud Foundation Upgrade Bundles.
Take a file-based backup of the vCenter Server appliance before starting the upgrade. See Manually Back Up vCenter Server.
Note:After taking a backup, do not make any changes to the vCenter Server inventory or settings until the upgrade completes successfully.
If your workload domain contains Workload Management (vSphere with Tanzu) enabled clusters, the supported target release depends on the version of Kubernetes (K8s) currently running in the cluster. Older versions of K8s may require a specific upgrade sequence. See KB 88962 for more information.
Procedure
What to do next
Once the upgrade successfully completes, use the vSphere Client to change the vSphere DRS Automation Level setting back to the original value (before you took a file-based backup) for each vSphere cluster that is managed by the vCenter Server. See KB 87631 for information about using VMware PowerCLI to change the vSphere DRS Automation Level.
Upgrade vSAN Witness Host for VMware Cloud Foundation
If your VMware Cloud Foundation environment contains stretched clusters, update and remediate the vSAN witness host.
Prerequisites
Download the ESXi ISO that matches the version listed in the the Bill of Materials (BOM) section of the VMware Cloud Foundation Release Notes.
Procedure
- In a web browser, log in to vCenter Server at https://vcenter_server_fqdn/ui.
- Upload the ESXi ISO image file to vSphere Lifecycle Manager.
- Click .
- Click the Imported ISOs tab.
- Click Import ISO and then click Browse.
- Navigate to the ESXi ISO file you downloaded and click Open.
- After the file is imported, click Close.
- Create a baseline for the ESXi image.
- On the Imported ISOs tab, select the ISO file that you imported, and click New baseline.
- Enter a name for the baseline and specify the Content Type as Upgrade.
- Click Next.
- Select the ISO file you had imported and click Next.
- Review the details and click Finish.
- Attach the baseline to the vSAN witness host.
- Click .
- In the Inventory panel, click .
- Select the vSAN witness host and click the Updates tab.
- Under Attached Baselines, click .
- Select the baseline that you had created in step 3 and click Attach.
- Click Check Compliance.
After the compliance check is completed, the Status column for the baseline is displayed as Non-Compliant.
- Remediate the vSAN witness host and update the ESXi hosts that it contains.
- Right-click the vSAN witness and click .
- Click OK.
- Click the Updates tab.
- Select the baseline that you had created in step 3 and click Remediate.
- In the End user license agreement dialog box, select the check box and click OK.
- In the Remediate dialog box, select the vSAN witness host, and click Remediate.
The remediation process might take several minutes. After the remediation is completed, the Status column for the baseline is displayed as Compliant.
- Right-click the vSAN witness host and click .
- Click OK.
Upgrade VxRail Manager and ESXi Hosts for VMware Cloud Foundation
Use the VxRail upgrade bundle to upgrade VxRail Manager and the ESXi hosts in the workload domain. Upgrade the management domain first and then VI workload domains.
By default, the upgrade process upgrades the ESXi hosts in all clusters in a workload domain in parallel. If you have multiple clusters in the management domain or in a VI workload domain, you can select the clusters to upgrade. You can also choose to upgrade the clusters in parallel or sequentially.
If you are using external (non-vSAN) storage, the following procedure updates the ESXi hosts attached to the external storage. However, updating and patching the storage software and drivers is a manual task and falls outside of SDDC Manager lifecycle management. To ensure supportability after an ESXi upgrade, consult the vSphere HCL and your storage vendor.
Prerequisites
- Validate that the ESXi passwords are valid.
- Download the VxRail upgrade bundle. See Downloading VMware Cloud Foundation Upgrade Bundles.
- Ensure that the domain for which you want to perform cluster-level upgrade does not have any hosts or clusters in an error state. Resolve the error state or remove the hosts and clusters with errors before proceeding.
Procedure
Update Licenses for a Workload Domain
After you upgrade a workload domain component, update the license using SDDC Manager.
You first add the new license to SDDC Manager. This must be done once per license instance. You then apply the license to the component on a per workload domain basis.
Prerequisites
A new license for the component to be updated.
Procedure
- Add a new license to the SDDC Manager inventory.
- In the navigation pane, click .
- On the Licensing page, click + License Key.
- Select a product from the drop-down menu.
- Enter the license key.
- Enter a description for the license.
- Click Add.
- Repeat for each license to be added.
- Update a license for a workload domain component.
- In the navigation pane, click .
- On the Workload Domains page, click the domain you are upgrading.
- On the Summary tab, expand the red error banner, and click Update Licenses.
- On the Update Licenses page, click Next.
- Select the products to update and click Next.
- For each product, select a new license from the list, and select the entity to which the license should be applied and click Next.
- On the Review pane, review each license and click Submit.
The new licenses will be applied to the workload domain. Monitor the task in the Tasks pane in SDDC Manager.
