


Prepare to Deploy Management Clusters to a VMware Cloud Environment
You can install Tanzu Kubernetes Grid on VMware Cloud infrastructures that provide a vSphere interface and environment on public cloud infrastructures.
The following sections explain how to prepare VMware Cloud and its networking on a cloud infrastructure and create a bootstrap machine for deploying Tanzu Kubernetes Grid.
On a VMware Cloud infrastructure, the bootstrap machine is not a local physical machine. The bootstrap machine is a cloud VM jumpbox that connects vSphere with its underlying infrastructure.
Prepare VMware Cloud on AWS
To run Tanzu Kubernetes Grid on VMware Cloud on AWS, set up a Software-Defined Data Center (SDDC) and create a bootstrap VM. The bootstrap machine is a VM managed through vCenter.
Ensure that you have a VMware Cloud deployment on AWS. See Getting Started with VMware Cloud on AWS.
Do the following to prepare the VMware Cloud on AWS environment for deploying Tanzu Kubernetes Grid:
-
Log in to the VMware Cloud Console and create a new SDDC.
For instructions, see Deploy an SDDC from the VMC Console in the VMware Cloud on AWS documentation.
After you click Deploy SDDC, the SDDC creation process typically takes 2-3 hours.
-
After the SDDC is created, open its pane in the VMC Console.
-
Click Networking & Security > Network > Segments.
-
The Segment List shows
sddc-cgw-network-1with a subnet CIDR of192.168.1.1/24, giving 256 addresses. -
If you need more internal IP addresses, do one of the following:
- Open
sddc-cgw-network-1and modify its subnet CIDR to something broader, for example192.168.1.1/20.
Or
- Click Add Segment and create another network segment with a different subnet. Make sure that the new subnet CIDR does not overlap with
sddc-cgw-network-1or any other existing segments.
- Open
-
Open
sddc-cgw-network-1and any other network segments you added. -
For each segment, click Edit DHCP Config. A Set DHCP Config pane appears.
-
In the Set DHCP Config pane:
- Set DHCP Config to Enabled.
- Set DHCP Ranges to an IP address range or CIDR within the segment’s subnet. You will have a pool of addresses free to serve as static IP addresses for workload clusters. Each management cluster and workload cluster that Tanzu Kubernetes Grid creates uses a unique static IP address from this pool.
-
To enable access to vCenter, add a firewall rule or set up a VPN.
For instructions, see Connect to vCenter Server in the VMware Cloud on AWS documentation.
-
To confirm access to vCenter, click Open vCenter at the top right corner in the SDDC pane. The vCenter client should appear.
-
From the vCenter portal, deploy and enable access to your bootstrap machine.
For instructions, see Deploy Workload VMs in the VMware Cloud on AWS documentation.
To log in to the bootstrap machine, click Launch Web Console on its vCenter summary pane.
Optionally, if you want to
sshin to the bootstrap machine, in addition to using the web console within vCenter, see Set Up a VMware Cloud Bootstrap Machine forssh.
NoteWhen installing the Tanzu CLI, deploying management clusters, and performing other operations, follow the instructions for vSphere, not the instructions for Amazon Web Services (AWS).
Set Up a VMware Cloud Bootstrap Machine for ssh
To set up your bootstrap machine for access via ssh, follow these procedures in the VMware Cloud for AWS documentation:
-
Assign a Public IP Address to a VM to request a public IP address for the bootstrap machine.
-
Create or Modify NAT Rules to create a NAT rule for the bootstrap machine, configured with:
- Public IP: The public IP address requested above.
- Internal IP: The IP address of the bootstrap machine. Can be either a static or DHCP IP.
-
The Procedure in Add or Modify Compute Gateway Firewall Rules to add a compute gateway rule allowing access to the VM.
Prepare Azure VMware Solution on Microsoft Azure
To run Tanzu Kubernetes Grid on Azure VMware Solution (AVS), set up AVS and its Windows 10 jumphost. The jumphost serves as the bootstrap machine for Tanzu Kubernetes Grid.
Ensure that you have an Azure VMware Solution deployment. See Azure VMware Solution documentation.
Do the following to prepare the Azure VMware Solution environment for deploying Tanzu Kubernetes Grid:
-
Log in to NSX Manager as
admin. -
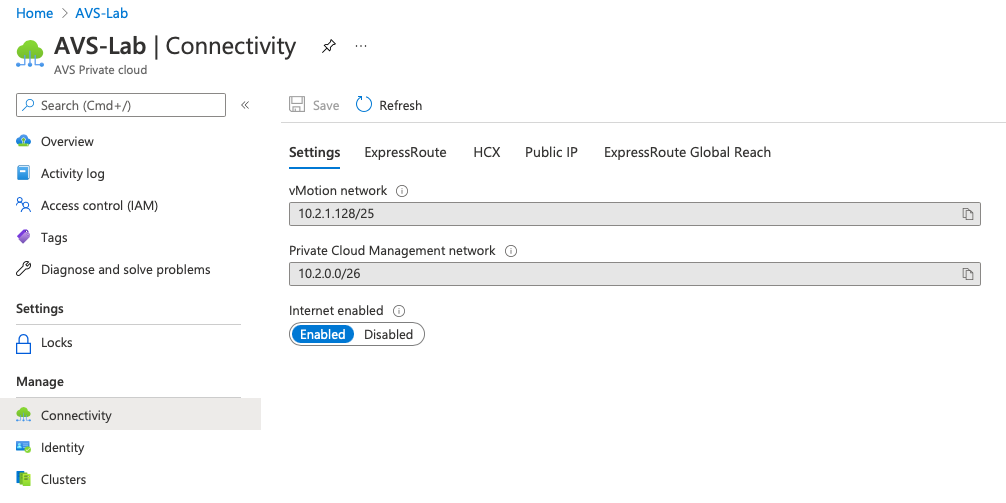
Unless you are intentionally deploying to an air-gapped environment, confirm that AVS is configured to allow Internet connectivity for AVS-hosted VMs. Internet connectivity is not enabled by default. To configure Internet connectivity, you can either:
- Route outbound Internet traffic through your on-premises data center by configuring Express Route Global Reach.
-
Allow Internet access via the AVS Express Route connection to the Azure network by logging into the Azure portal, navigating to the AVS Private Cloud object, selecting Manage > Connectivity, flipping the Internet enabled toggle to Enabled, and clicking Save.
-
Under Networking > Connectivity > Segments, click Add Segment, and configure the new segment with:
- Segment Name: An identifiable name, like
avs_tkg - Connected Gateway: The Tier-1 gateway that was predefined as part of your AVS account
- Subnets: A subnet such as
192.168.20.1/24 - DHCP Config > DHCP Range: An address range or CIDR within the subnet, for example
192.168.20.10-192.168.20.100. This range must exclude a pool of subnet addresses that DHCP cannot assign, leaving them free to serve as static IP addresses for workload clusters.
Each management cluster and workload cluster that Tanzu Kubernetes Grid creates will require a unique static IP address from the pool outside of this DHCP range. - Transport Zone: Select the Overlay transport zone that was predefined as part of your AVS account.
Note
After you create the segment, it should be visible in vCenter.
- Segment Name: An identifiable name, like
-
From the IP Management > DHCP pane, click Add Server, and configure the new DHCP server with the following:
- Server Name: An identifiable name, like
avs_tkg_dhcp - Server IP Address: A range that does not overlap with the subnet of the segment created above, for example
192.168.30.1/24. - Lease Time: 5400 seconds; shorter than the default interval, to release IP addresses sooner
- Server Name: An identifiable name, like
-
Under Networking > Connectivity > Tier-1 Gateways, open the predefined gateway.
-
Click the Tier-1 gateway’s IP Address Management setting and associate it with the DHCP server created above.
-
If your AVS environment was created before July 2021 do the following to configure a DNS forwarder in NSX Manager or the Azure portal:
-
NSX Manager:
- Under Networking > IP Management > DNS, click DNS Zones.
- Click Add DNS Zone > Add Default Zone, and provide the following:
- Zone Name: An identifiable name like
avs_tkg_dns_zone. - DNS Servers: Up to three comma-separated IP addresses representing valid DNS servers.
- Zone Name: An identifiable name like
- Click Save, and then select the DNS Services tab
- Click Add DNS Service, and provide the following:
- Name: An identifiable name, like
avs_tkg_dns_svc. - Tier0/Tier1 Gateway: The Tier-1 gateway that was predefined as part of your AVS account.
- DNS Service IP: An IP address that does not overlap with the any other subnets created, such as
192.168.40.1. - Default DNS Zone: Select the Zone Name defined earlier.
- Name: An identifiable name, like
- Click Save.
-
Azure Portal:
- Navigate to the AVS Private Cloud object and select Workload Networking > DNS.
- With the DNS zones tab selected, click Add and provide the following:
- Type: Default DNS zone.
- DNS zone name: An identifiable name like
avs_tkg_dns_zone. - DNS server IP: Up to three DNS servers.
- Click OK and then click the DNS service tab.
- Click Add and provide the following:
- Name: An identifiable name, like
avs_tkg_dns_svc. - DNS Service IP: An IP address that does not overlap. with the any other subnets created, such as
192.168.40.1 - Default DNS Zone: Select the DNS zone name defined earlier.
- Name: An identifiable name, like
- Click OK.
-
When installing the Tanzu CLI, deploying management clusters, and performing other operations, follow the instructions for vSphere, not the instructions for Azure. Configure the management cluster with:
- Kubernetes Network Settings > Network Name: The name of the new segment.
- Management Cluster Settings > Virtual IP Address The IP address range of the new segment.
Prepare Google Cloud VMware Engine
To run Tanzu Kubernetes Grid on Google Cloud VMware Engine (GCVE), set up GCVE and a bootstrap machine for Tanzu Kubernetes Grid.
Ensure that you have an Google Cloud VMware Engine (GCVE) deployment. See Purchase GCVE Through VMware and Google Cloud VMware Engine documentation.
Before doing the following steps, you should have set up an SDDC.
Do the following to prepare the Google Cloud VMware Engine (GCVE) environment for deploying Tanzu Kubernetes Grid:
- Log in to NSX Manager as
admin. - Add a DHCP.
- Go to Networking > DHCP.
- Click Add DHCP Profile to add a DHCP profile.
-
Add a network segment.
- Go to Networking > Segments.
- Click Add Segment.
- Enter the following:
- Segment Name: An identifiable name, such as
gcve_tkg. - Connected Gateway: The Tier-1 gateway that was predefined as part of your GCVE account.
- Transport Zone: TZ-Overlay
- Subnets: A subnet, such as
192.168.20.1/24
- Segment Name: An identifiable name, such as
- Click DHCP Config.
- Enter the following:
- DHCP Type: Local DHCP Server
- DHCP Profile: Select the DHCP profile created earlier.
- DHCP Config: Enabled
- DHCP Server Address: Enter the DHCP server address, such as
192.168.1.2/24. The DHCP should belong to the same subnet. - DHCP Ranges:
192.168.1.80-192.168.1.254 - DNS Servers:
10.107.0.9
After you create the segment, it is visible in vCenter.
Set Up a VM as a Bootstrap Machine
Do the following to set up a VM as a bootstrap machine:
- In vCenter, create a VM to use as a bootstrap machine.
- Log in to GCVE web portal.
-
Allocate a Public IP Address for the bootstrap machine.
- Go to Network > Public IPs.
- Click Allocate.
- Enter the following information:
- Name: A name for the IP allocation
- Location: Location
- Attached local address: The bootstrap machine’s IP address, for example
192.168.1.80
-
Create a new firewall table and add a firewall rule.
- Go to Network > Firewall Tables.
- Click Create new Firewall Table.
- Enter a name for the table.
- Click Add Rule.
- Enter the following properties for the rule:
- Name: A name for the rule
- Priority: Begin from 100 and increase by one for each new rule
- Traffic type: Public IP-stateful
- Destination: Select the public IP
- Destination Port: 22
-
Attach the firewall table to a subnet.
- Go to Network > Firewall Tables.
- Select the new firewall table you created.
- Click Attached Subnets.
- Click Attach to a subnet.
- Select the GCVE SDDC.
- Select NsxtEdgeUplink1 subnet.
- Click Submit.
- Repeat the steps to select NsxtEdgeUplink2 subnet.
For more information about creating a Firewall table in GCVE, see Firewall tables.
Update Password for Solution User Account
You use a solution user account set up Tanzu Kubernetes Grid, which requires administrative privileges. A solution user account can perform administrative actions such as adding more users, identity sources, and VMware and third-party tools.
For more information about solution user accounts, see Using solution user accounts.
Update the password for the solution user account before you use the solution user account before installing the Tanzu CLI and deploying the management cluster. To update the password of the solution user account, see Prepare a solution user account.
What to Do Next
- Install and configure NSX Advanced Load Balancer. Install NSX ALB in a VMware Cloud Environment.
- Deploy the Tanzu CLI. See Install the Tanzu CLI and Kubernetes CLI for Use with Standalone Management Clusters.
- Deploy Tanzu Kubernetes Grid clusters. See Deploy Management Clusters on vSphere.
