


SNMP is a commonly used protocol for network monitoring and MIB is a database associated with SNMP to manage entities. SNMP can be enabled by selecting the desired SNMP version as described in the steps below. At the Edge Level, you can override the SNMP settings specified in the Profile by selecting the Enable Edge Override check box.
- To download the SD-WAN Edge MIB: go to the Remote Diagnostic screen (Test & Troubleshooting > Remote Diagnostics) and run MIB for SD-WAN Edge. Copy and paste results onto your local machine.
- Install all MIBs required by VELOCLOUD-EDGE-MIB on the SNMP manager, including SNMPv2-SMI, SNMPv2-CONF, SNMPv2-TC, INET-ADDRESS-MIB, IF-MIB, UUID-TC-MIB, and VELOCLOUD-MIB. All the above-mentioned MIBs are available on the Remote Diagnostics page.
About this task: At the Edge level, you can override the SNMP settings specified in the Profile by selecting the Enable Edge Override check box. The Edge Override option enables Edge specific edits to the displayed settings, and discontinues further automatic updates from the configuration profile for this module. For ongoing consistency and ease of updates, it is recommended to set configurations at the Profile rather than Edge exception level.
- SNMP MIB-2 System
- SNMP MIB-2 Interfaces
- VELOCLOUD-EDGE-MIB
- Obtain the VELOCLOUD-EDGE-MIB on the Remote Diagnostic screen of the SD-WAN Orchestrator.
- Install all MIBs required by VELOCLOUD-EDGE-MIB.
- From the SD-WAN Orchestrator, go to Configure > Edges.
- Select an Edge you want to configure SNMP settings for, and click the Device icon under the Device column.
The Configuration Edges screen for the selected Edge appears.
- Scroll down to the SNMP Settings area and check the Enable Edge Override check box. You can choose between two versions, v2c or v3.

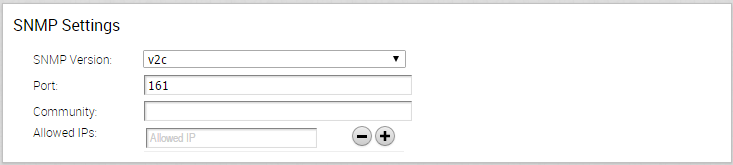
- For a SNMP v2c config follow the steps below:
- Check the v2c check box.
- Type in a Port in the Port textbox. The default setting is 161.
- In the Community textbox, type in a word or sequence of numbers that will act as a 'password' that will allow you access to the SNMP agent.
Note: Starting from the 4.5 release, the use of the special character "<" in the password is no longer supported. In cases where users have already used "<" in their passwords in previous releases, they must remove it to save any changes on the page.
- For Allowed IPs:
- Check the Any check box to allow any IP to access the SNMP agent.
- To restrict access to the SNMP agent, uncheck the Any check box and enter the IP address(es) that will be allowed access to the SNMP agent.
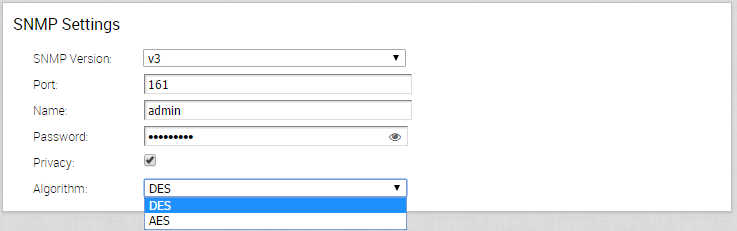
- For a SNMP v3 config, which provides added security support follow the steps below:
- Type in a port in the Port text box. 161 is the default setting.
- Type in a username and password in the appropriate text boxes. Ensure that the Privacy Password is same as the Authentication Password configured on the Edge.
Note: Starting from the 4.5 release, the use of the special character "<" in the password is no longer supported. In cases where users have already used "<" in their passwords in previous releases, they must remove it to save any changes on the page.
- Check the Privacy check box if you want your packet transfer encrypted.
- If you have checked the Privacy check box, choose DES or AES from the Algorithm drop-down menu.
Note: Algorithm AES indicates AES-128.
- Configure Firewall Settings. After you have configured SNMP Settings, go to Firewall settings (Configure >Profiles > Firewall) to configure the Firewall settings that will enable your SNMP settings.
- SNMP interface monitoring is supported on DPDK enabled interfaces for 3.3.0 and later releases.
- For software versions below 5.x, the supported authentication method is MD5 by default.
