


Refer to this topic to create a custom VM class for NVIDIA Grid vGPU devices.
Create a Custom VM Class with vGPU Profile (v8 U2 P03 and later)
NVIDIA vGPU (Virtual Graphics Processing Unit) allows multiple virtual machines (VMs) to share a single physical GPU. To use vGPUs with TKGS clusters, you define a custom VM class. Starting with this release there is a new wizard for defining custom VM classes. Unlike the previous method for defining a custom VM class, the vGPU profile is read from the device instead of being configured in the VM class.
The VM Operator polls the vCenter inventory to obtain all of the vGPU devices installed on ESXi hosts comprising the vSphere Cluster where Supervisor is deployed. The vGPU device defines its profile. The vGPU device name indicates if the profile is multi-instance GPU (MIG) or time shared GPU. MIG slices the compute and enables multiple workloads to run in parallel on a single GPU. Time sharing provides shared access to the GPU. MIG mode is based on a newer GPU architecture and is only supported on NVIDIA A100 and A30 devices. Refer to the NVIDIA documentation for more information.
For example, the GPU device "grid-a100-40c" provides a time shared vGPU profile that allocates an NVIDIA A100 GPU device with 40 GB of memory to a VM. The equivalent MIG-based vGPU profile would be the "grid-a100-7-40c" device. You can identify that it is a MIG profile because there is an extra number between the device and the RAM. The "7" indicates there are 7 compute slices on the GPU device. MIG-based vGPU profiles can have 1, 2, 3 or 7 compute slices.
- From the vSphere Client home menu, select .
- Select the VM Classes tab.
- Click Create VM Class.
This action launches the Create VM Class wizard that walks you through creating a VM class.
- For Name, enter a name for the VM class and click Next.
The VM class name identifies the VM class. Enter a unique DNS compliant name that follows these requirements:
- Use a unique name that does not duplicate the names of default or custom VM classes in your environment.
- Use alphanumeric string with maximum length of 63 characters.
- Do not use uppercase letters or spaces.
- Use a dash anywhere except as a first or last character. For example, vm-class1.
- After you create the VM class, you cannot change its name.
- For Compatibility, select ESXi 8.0 U2 and later and click Next.
For more information, see Virtual Machine Compatibility.Note: You cannot change the hardware compatibility of a VM class after it is created.
- For , add the NVIDIA GPU device to the VM class.
- Select .
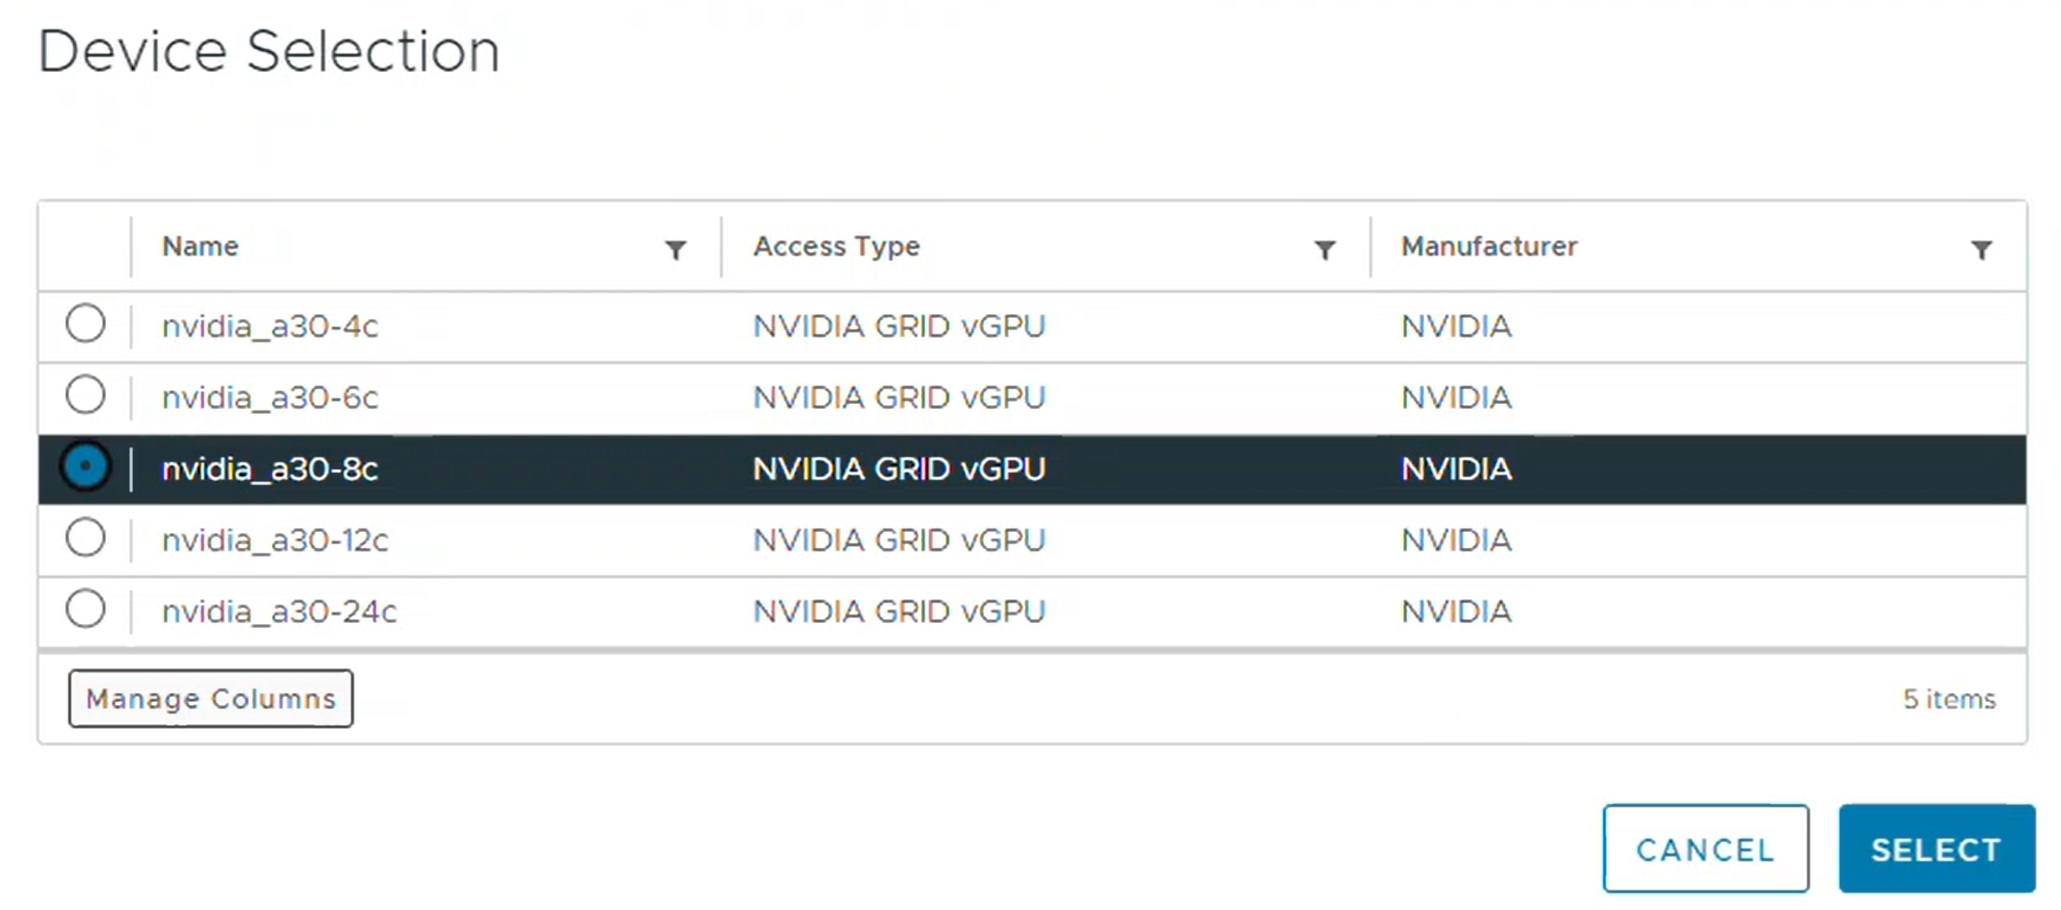
- Select the desired NVIDIA Grid vGPU device from the list. There are two types of NVIDIA Grid vGPU profiles: Time Sharing and Multi-Instance GPU Sharing. The profile is detected by the system when you select the device.
Note: You can add only one NVIDIA GRID vGPU device of type MIG profile to a VM class.
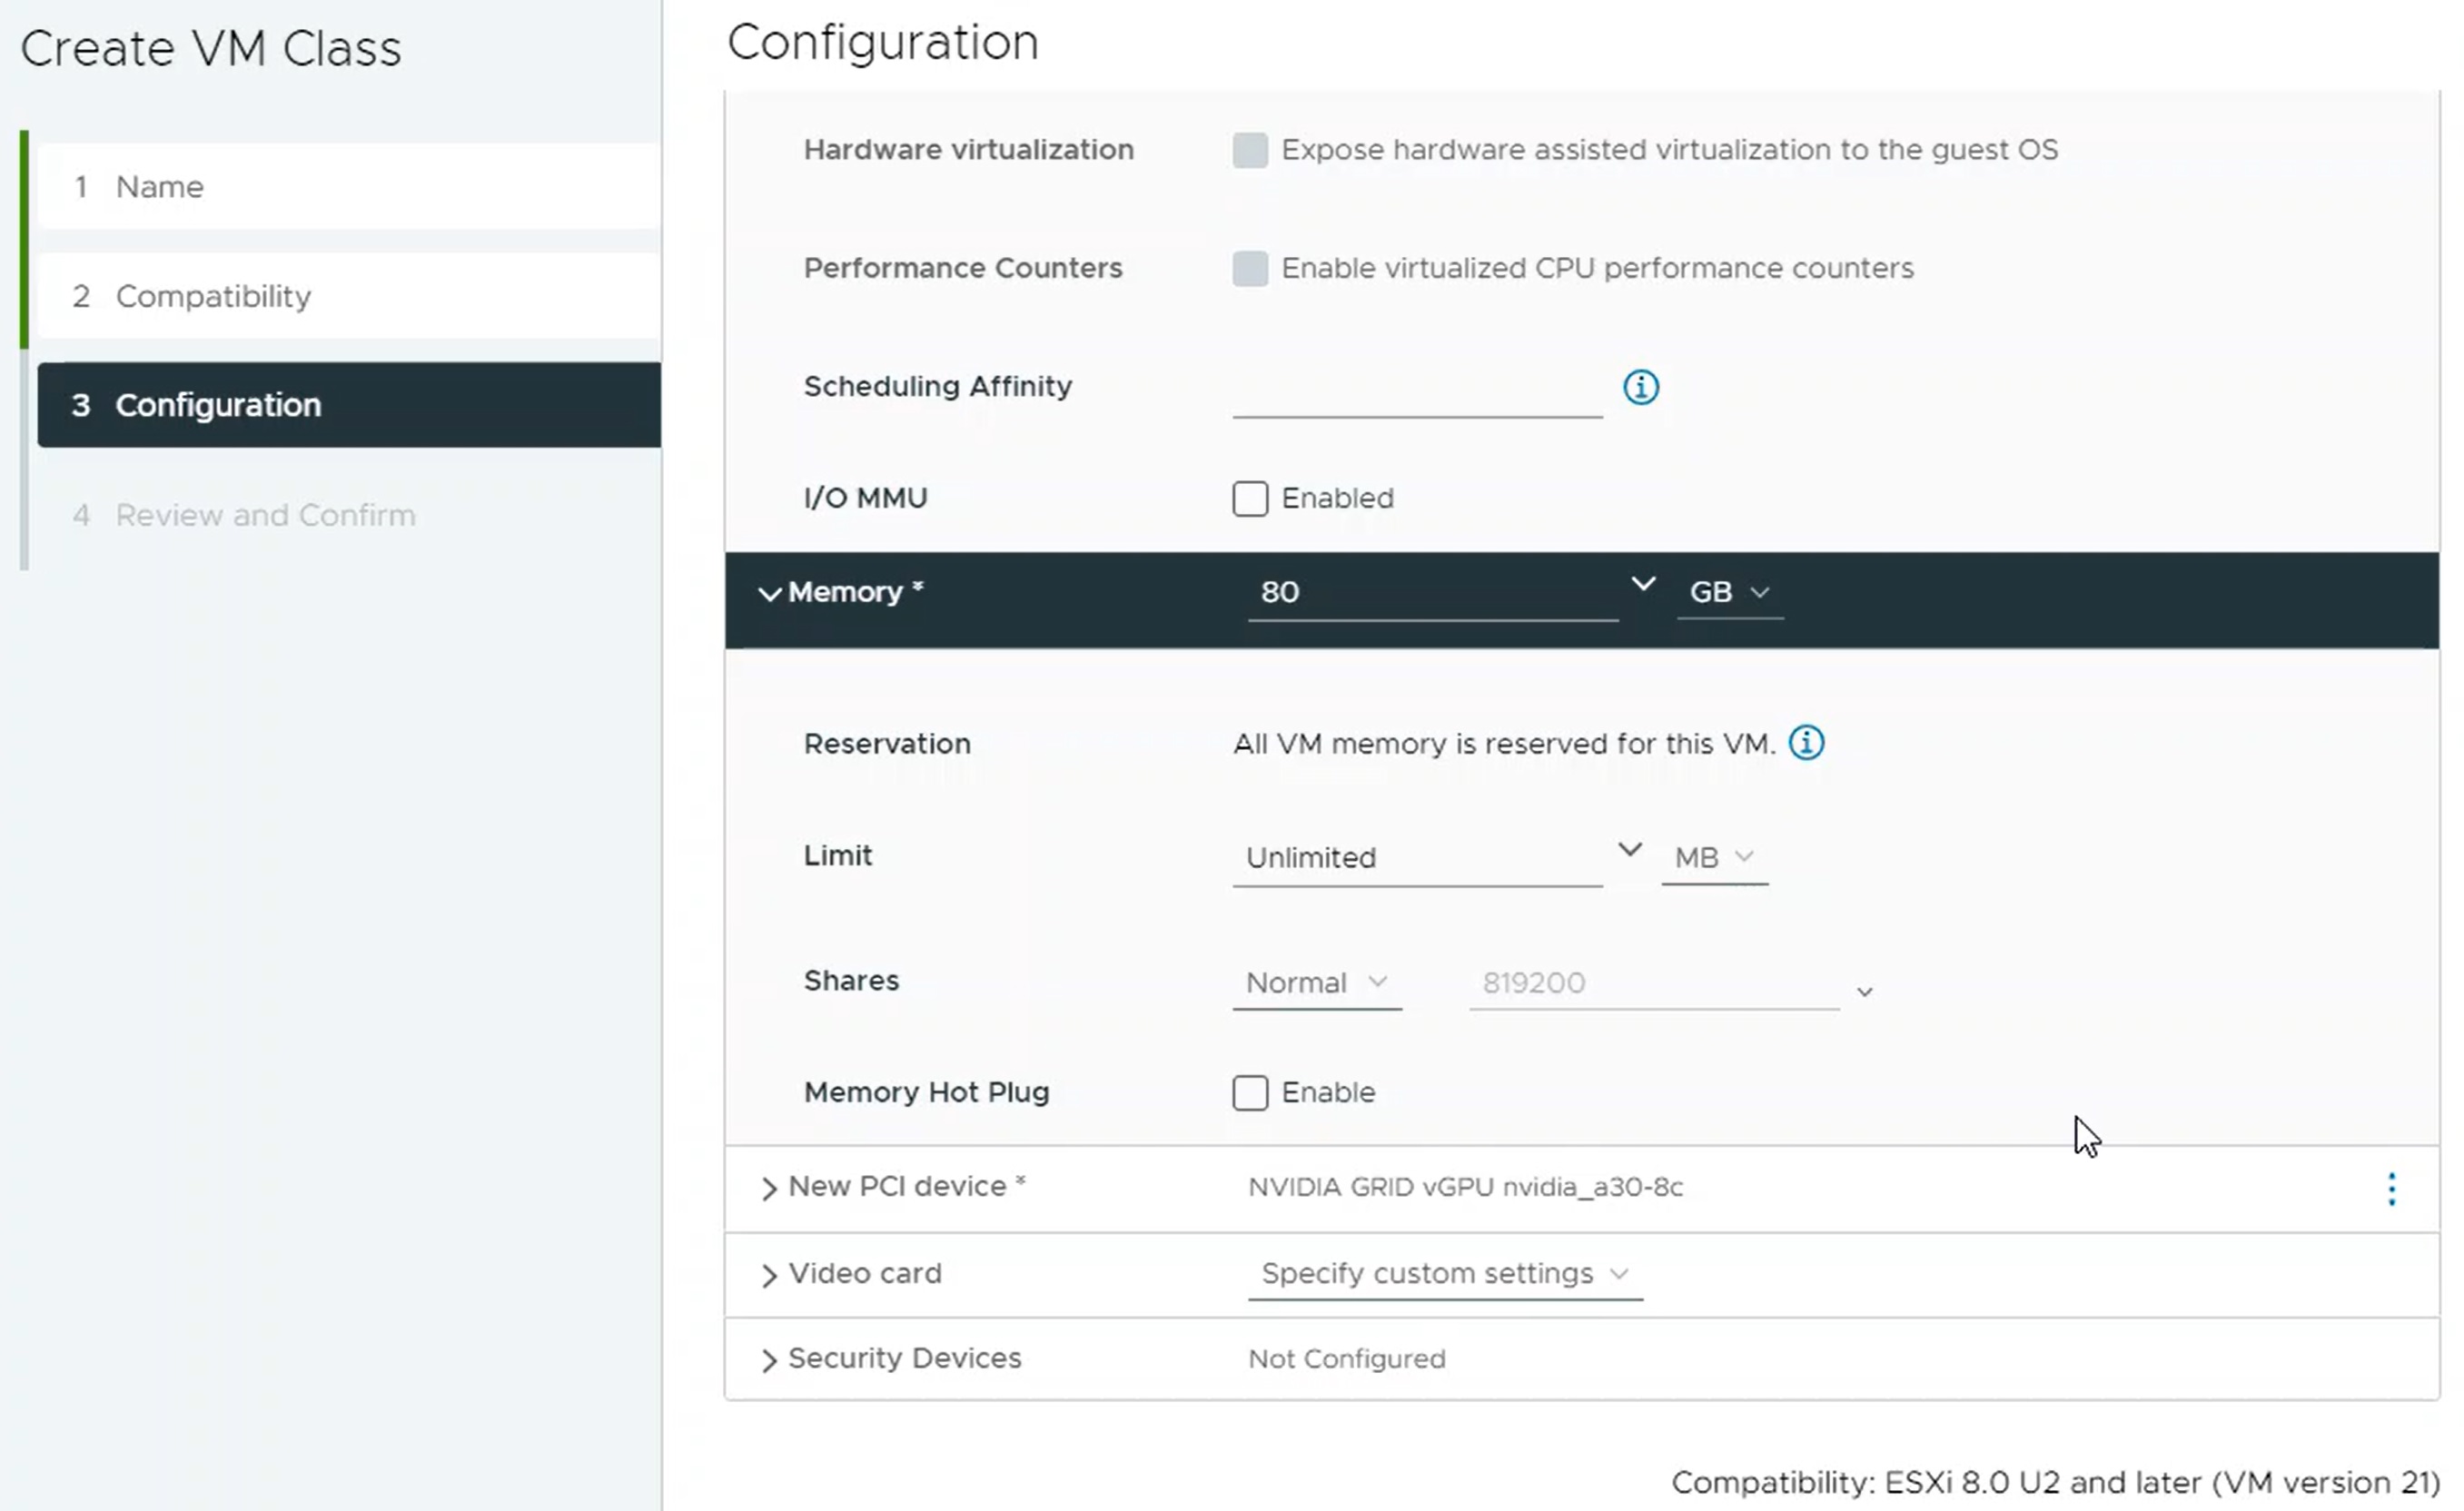
- Click Select and the New PCI device appears in the Virtual Hardware tab.
- For , specify the desired settings for CPU, Memory, New PCI Device, Video Card, and Security Devices.
Table 1. CPU Configuration Setting Configuration CPU Select the number of virtual CPUs for the VM. See Virtual CPU Configuration and Limitations for more information. CPU Topology Assigned at power on Reservation Reservation must be between 0 and 10 MHz Limit Limit must be greater than or equal to 10 MHz Shares Options are Low, Normal, High, Custom Hardware virtualization Select this option to expose hardware assisted virtualization to the guest OS Performance Counters Enable virtualized CPU performance counters Scheduling Affinity Select a physical processor affinity for this virtual machine. Use '-' for ranges and ',' to separate values. For example, "0, 2, 4-7" would indicate processors 0, 2, 4, 5, 6 and 7. Clear the string to remove affinity settings. I/O MMU Select to enable memory management unit (page to disk) Table 2. Memory Configuration Setting Configuration Memory Select the size of the memory for the VM. See Maximum Virtual Machine Memory for more information. Reservation Specify the guaranteed minimum allocation for a virtual machine, or reserve all guest memory. If the reservation cannot be met, the VM cannot run. Limit Select the amount of memory to limit to place a limit on the consumption of memory for a VM. Shares Select the amount of memory to share. Shares represent a relative metric for allocating memory capacity. For more information, see Memory Sharing. Memory Hot Plug Enable (check) to allow the addition of memory resources to a VM that is powered on. See Memory Hot Add Settings for details. Table 3. New PCI Device > GPU Sharing Configuration Time Sharing Mode MIG Mode In Time Sharing mode, the vGPU scheduler instructs the GPU to perform the work for each vGPU-enabled VM serially for a duration of time with the best effort goal of balancing performance across vGPUs.
MIG mode allows multiple vGPU-enabled VMs to run in parallel on a single GPU device. If you do not see the MIG option, the PCI device you selected does not support it.
Table 4. Configure Video Card Setting Configuration Video Card Choose to auto-detect settings from the hardware or enter custom settings. If you select auto-detect, other settings are not configurable. Number of displays Select the number of displays. Total video memory Enter the total video memory, in MB. 3D Graphics Select to enable 3D support. Table 5. Configure Security Devices Settings Configuration Security Device If the SGX security device is installed, you can configure the VM settings here, otherwise this field is not configurable. See the SGX documentation for details. - Select the tab and configure any additional VM settings. See Configuring Virtual Machine Options for guidance.
- Select the tab and add any attributes for the VM class.
- Click Next.
- At the Review and Confirm page, review the details and click Finish.
- Associate the new VM class with the vSphere Namespace. See Associate VM Classes with the vSphere Namespace.
Create a Custom VM Class with a vGPU Profile (v8 U2 and earlier)
To next step is to create a custom VM Class with a vGPU profile. The system will use this class definition when it creates the TKG cluster nodes.
- Log in to the vCenter Server using the vSphere Client.
- Select Workload Management.
- Select Services.
- Select VM Classes.
- Click Create VM Class.
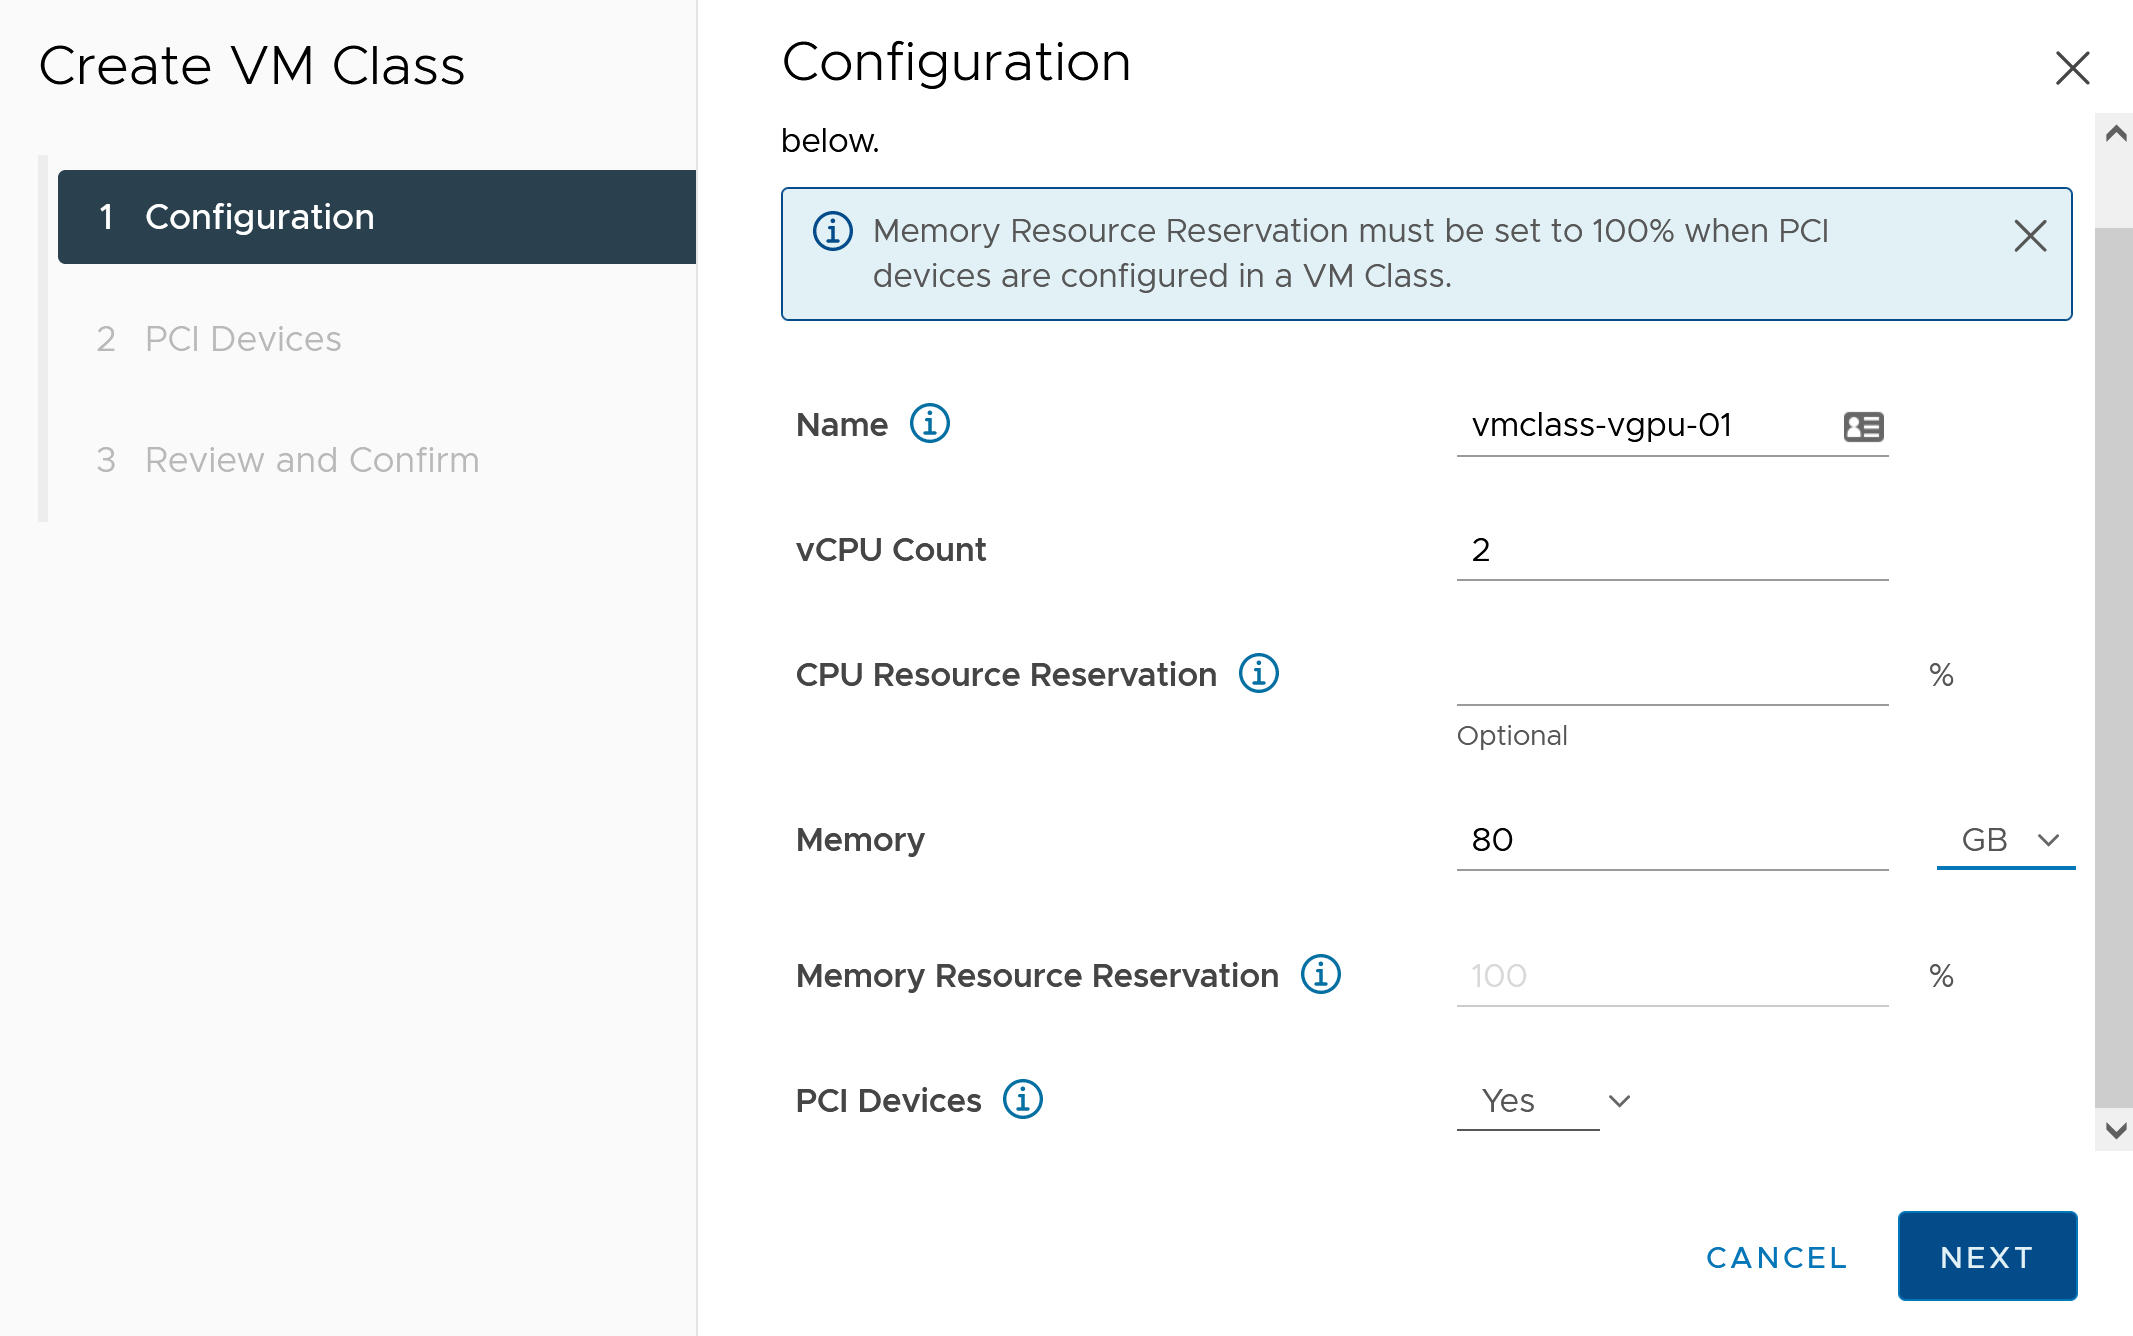
- At the Configuration tab, configure the custom VM Class.
Configuration Field Description Name Enter a self-descriptive name for the custom VM class, such as vmclass-vgpu-1. vCPU Count 2 CPU Resource Reservation Optional, OK to leave blank Memory 80 GB, for example Memory Resource Reservation 100% (mandatory when PCI devices are configured in a VM Class) PCI Devices Yes Note: Selecting Yes for PCI Devices tells the system you are using a GPU device and changes the VM Class configuration to support vGPU configuration. For more information, see Add PCI Devices to a VM Class in vSphere with Tanzu.For example:
- Click Next.
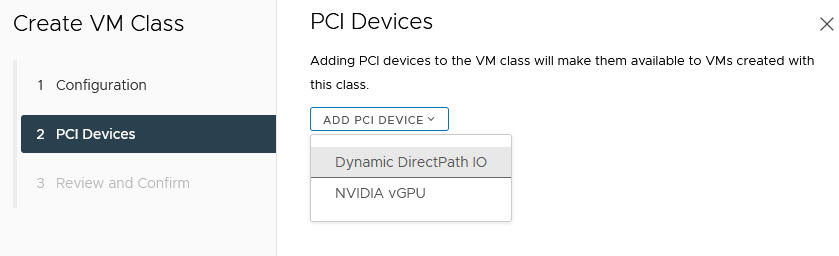
- At the PCI Devices tab, select the option.
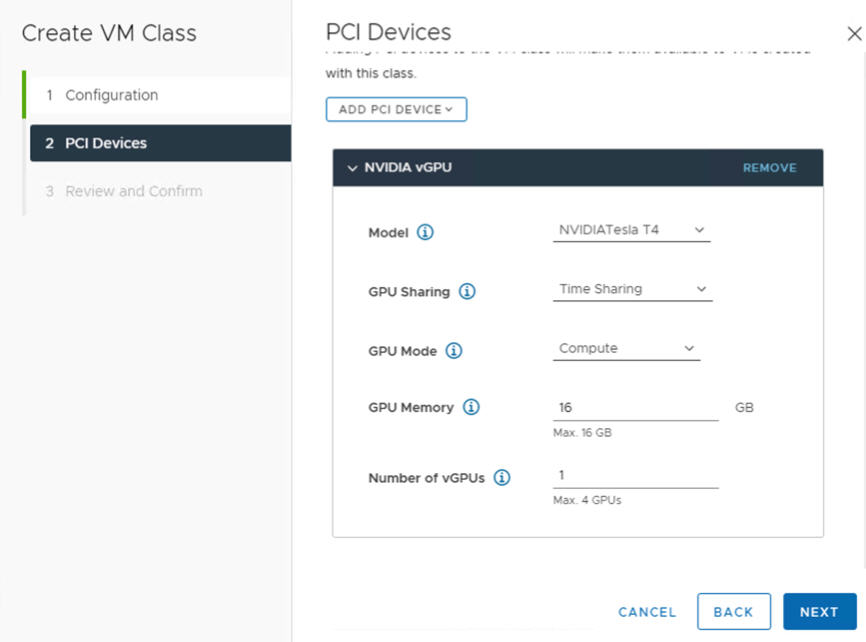
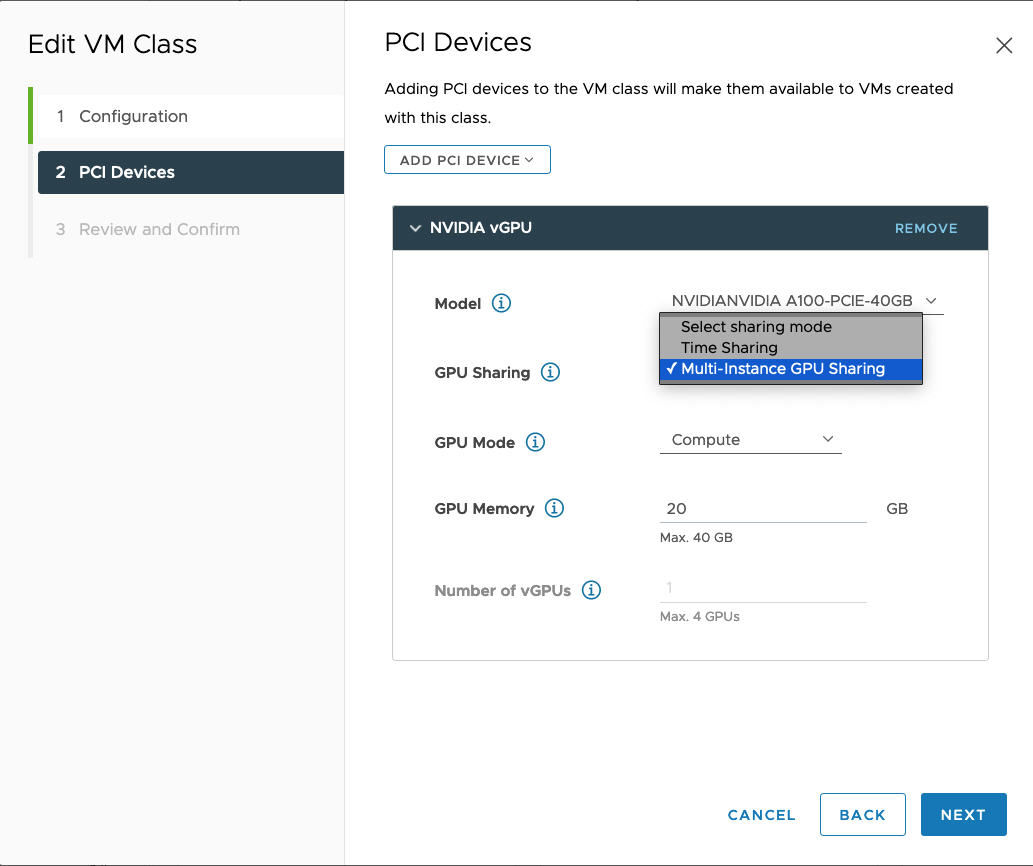
- Configure the NVIDIA vGPU model.
NVIDIA vGPU Field Description Model Select the NVIDIA GPU hardware device model from those available in the menu. If the system does not show any profiles, none of the hosts in the cluster have supported PCI devices. GPU Sharing This setting defines how the GPU device is shared across GPU-enabled VMs. There are two types of vGPU implementations: Time Sharing and Multi-Instance GPU Sharing.
In Time Sharing mode, the vGPU scheduler instructs the GPU to perform the work for each vGPU-enabled VM serially for a duration of time with the best effort goal of balancing performance across vGPUs.
MIG mode allows multiple vGPU-enabled VMs to run in parallel on a single GPU device. MIG mode is based on a newer GPU architecture and is only supported on NVIDIA A100 and A30 devices. If you do not see the MIG option, the PCI device you selected does not support it.
GPU Mode Compute GPU Memory 8 GB, for example Number of vGPUs 1, for example For example, here is a NVIDIA vGPU profile configured in Time Sharing mode:
For example, here is a NVIDIA vGPU profile configured in MIG mode with supported GPU device:
- Click Next.
- Review and confirm your selections.
- Click Finish.
- Verify that the new custom VM Class is available in the list of VM Classes.
vGPU with Dynamic DirectPath IO
- Select Workload Management.
- Select Services.
- Select VM Classes.
- Edit the custom VM Class that is already configured with the NVIDIA vGPU profile.
- Select the PCI Devices tab.
- Click Add PCI Device.
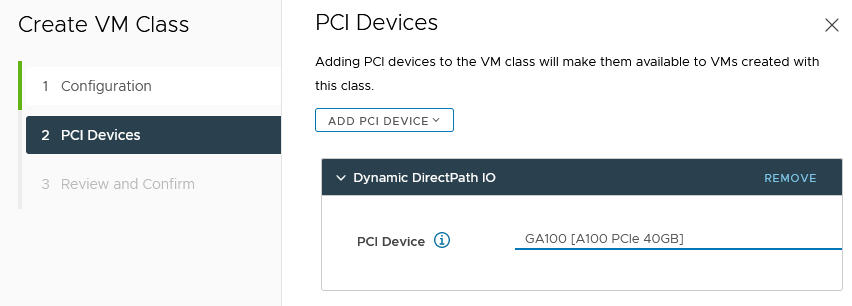
- Select the Dynamic DirectPath IO option.
- Select the PCI Device.
For example:
- Click Next.
- Review and confirm your selections.
- Click Finish.
- Verify that the new custom VM Class is available in the list of VM Classes.
